JA
  • English
  • Čeština
  • Español
  • Italiano
  • Deutsch
  • Polski
  • Français
Login

1. はじめに

1. はじめに
Relevant for:
Last updated 3 months ago
1. はじめに
 Difficulty
Moderate
 Steps
9
 Available languages
ENCSPLESDEITFR
Preparing MK2.5S upgrade kit
Welcome to the tutorial how to upgrade your Original Prusa i3 MK2/S to Original Prusa i3 MK2.5S
MK2S to MK2.5S upgrade is no longer being supported nor sold as a kit. Please see this article about current upgrading options for MK2/S and MK2.5 printers.
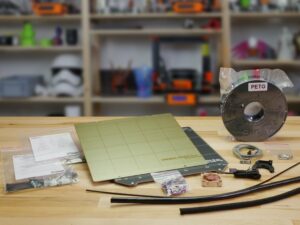
Prusa Researchから届いたMK2.5Sアップグレードパーツを準備してください。
The items on the picture might differ from yours.
WARNING: This assembly guide is valid ONLY FOR SINGLE MATERIAL MK2.5S!!! For MK2.5S MMU2S, please wait for the guide to be published. Different parts are needed!
このガイドに必要な工具
このガイドに必要な工具
For the MK2.5S upgrade you will need:
Needle-nose pliers (1x)
Allen key 2.5 mm
Allen key 2.0 mm
Allen key 1.5 mm
Slotted screwdriver for the belt insertion
ハンダ付け作業は必要ありません。
圧着工具は必要ありません。
Use labels for reference
ほとんどのラベルは1:1の縮尺で、パーツの識別に使用できます :-)
最も一般的なよく使う ネジ、ナット、PTFEチューブ など、 実寸大が描かれた Prusa Cheatsheet で、一つ一つ確認することができます。
You can download Prusa Cheatsheet from our site. Print it at 100 %, don't rescale it, otherwise it won't work.
高解像度の画像を見る
高解像度の画像を見る
manual.prusa3d.com で組み立てガイドをご覧の場合には、高画質なオリジナルの画像をご利用いただけます。
画像にカーソルを合わせ、左上にある拡大鏡ボタン(「オリジナルを表示」)をクリックします。
プリント部品のバージョン
プリント部品のバージョン
Most of the 3D printed parts on Original Prusa i3 MK2.5S most are marked with their version.
Cx シリーズ (例. C1) - これらのパーツは Prusa Research の工場でプリントされ、キットに同梱されています。
Rx series (e.g. R4) - those parts are available for download and printing by the user. They are identical to the factory ones.
もしプリンターの組み立て途中で、プリント部品に問題を見つけた場合には、このラベルを探し、サポートチームに連絡してください。
プリントパーツ - セルフプリント
プリントパーツ - セルフプリント
プリントパーツ - セルフプリント
Before we start disassembly, you need to print all the necessary parts. If you already have the parts, you can skip to the next step.
For MK2/S to MK2.5S upgrade you need to print the extruder parts, which are separated into more G-codes. Use enclosed BLACK PETG or similar material. The colour should be black to avoid issues.
G-codes and STL files are available on our website: prusa3d.com/prusa-i3-printable-parts
For printing individual parts it is recommended to use Slic3r PE with 0.2 mm layer height, GRID infill at 20%, no supports!
Fan-shroud must be printed from ABS only!!! We include this part in the upgrade package.
The pictures does not represent all the parts.
サポートが必要な時はこちらから!
サポートが必要な時はこちらから!
サポートが必要な時はこちらから!
説明書がない、ネジがない、プリント部品のひび割れがあれば、お知らせください。
以下の方法よりご連絡いただけます。
各ステップの下からコメントをします。
24時間365日対応のライブチャットshop.prusa3d.comをご利用ください。
Emailはこちら。[email protected]
ヒント: ナットを差し込む
ヒント: ナットを差し込む
ヒント: ナットを差し込む
ヒント: ナットを差し込む
3Dプリント部品は非常に精密ですが、それでもプリント部品には公差があるかもしれません。また、ナットのサイズも同様です。
ナットが簡単に入らなかったり、抜けてしまったりすることがあります。では、その対処法を見てみましょう。:
ナットが入らない場合: すべての長さにネジ山のあるネジを使い(通常 M3x10 または M3x18)、反対側からネジを差し込みます。ネジがはめ込まれたら、ナットを回しながら下まではめ込み、その後ネジを外します。
ナットがうまくはまらない:' テープを使ってナットを一時的に固定しすぐにネジを挿入し、その後テープを取り外します。 接着剤の使用は、接着剤が部分的にネジ山に入り込み、ネジを正しく締めることができなくなるため推奨されません。
"ネジ引きテクニック" を使用するように指示する場合、この絵が出てきます。
写真のパーツは一例です。
正しく組み立てる方法
正しく組み立てる方法
正しく組み立てる方法
組み立てを完璧に終わらせるには、以下の内容に従ってください:
Always read all the instructions at current step first, it will help you to understand, what you need to do.
写真だけで組み立てていかないでください! 写真だけでは不十分です。できるだけ短くまとめた説明となっていますので、必ず読みながら進めていきましょう。
他のユーザーからの、コメントを読んでください。 そこには多くの素晴らしいアイディアが載ってあり、私たちもそのフィードバックをもとにマニュアルや組立説明書を改善しています。
適度な力を使ってください。プリント部品は丈夫ですが、壊れないわけではありません。うまくはまらない場合は、やり方を2度確認してください。
最も重要なこと: 組み立てを楽しんでください。お子様、友達、パートナーと一緒に協力してください。 ただし、私たちは争い事には一切責任を負いません;)
READY? You can start by assembling Y-axis in the next chapter - 2. 分解
Was this guide helpful?

Comments

Still have questions?

Still have questions?

If you have a question about something that isn't covered here, check out our additional resources.
And if that doesn't do the trick, you can send an inquiry to [email protected] or through the button below.

Contact us