JA
  • English
  • Čeština
  • Español
  • Italiano
  • Deutsch
  • Polski
  • Français
Login

1. はじめに

1. はじめに
Relevant for:
Last updated 3 months ago
1. はじめに
 Difficulty
Very easy
 Steps
11
 Available languages
ENCSPLDEESITFR
アップグレードキットの準備
アップグレードキットの準備
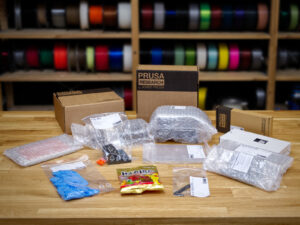
We are pleased that you have purchased the SL1 to SL1S SPEED Upgrade kit for your printer. Let's get started.
Prusa Researchから届いたアップグレードキットを準備してください。
The SL1S upgrade kit is available at the e-shop.
What will be updated?
SL1 upgrade to SL1S SPEED includes changes to:
Monochromatic print display
New UV LED assembly
Boost board
The list continues in the next step...
このガイドに必要な工具
このガイドに必要な工具
For this upgrade you will need:
T9 Torx key (1x)
2.0mm Allen key (1x)
2.5mm 六角レンチ (1本)
3.0mm Allen key (1x)
No soldering is required. No wire crimping is required.
Labels guide
Labels guide
Labels guide
組み立て用のパーツを含むすべての箱や袋にはラベルが貼られています。
Most parts have a picture on the label for better orientation and correct component recognition.
Use labels for reference
Fasteners on the labels has a scale of 1:1 and can be used to identify parts :-)
The numbers in parentheses below the fastener picture indicate the number of extra pieces added to the SPARE package.
For the most common screws and nuts you can also use the enclosed letter, which contains Prusa Cheatsheet on the other side.
help.prusa3d.com/cheatsheet から Prusa Cheatsheet をダウンロードすることができます。プリントは 100 % で、行ってください。拡大、縮小はうまくプリントできないのでしないでください。
高解像度の画像を見る
高解像度の画像を見る
help.prusa3d.comの組み立てガイドをご覧頂くと、オリジナルの画像を高解像度で見ることができます。
画像にカーソルを合わせ、左上にある拡大鏡ボタン(「オリジナルを表示」)をクリックします。
Important: Electronics protection
警告: 静電気放電 (ESD) から電子機器を保護していることを確認してください。 必要な時には電子機器を開梱するようにしてください!
以下は、電子機器の損傷を防ぐためのヒントです:
電子機器を設置するように指示があるまで、ESDバッグの中に入れておいてください。
ボードの操作中は 常にボードの側面に触れてください。 電子機器のチップ、コンデンサ、その他の部品には触れないでください。
Before you touch the electronics use any conductive (steel) structure nearby to electrostatically discharge yourself.
静電気を発生させる カーペットがある部屋での使用は、特に気をつけてください。
Wool clothing and certain synthetic fabrics can easily gather static electricity. It is safer to wear cotton clothing.
WARNING: This device utilizes UV light, which can harm your eyesight or skin. Do not turn the device ON until it is fully reassembled with all the covers installed!!!
Special symbols
Special symbols
Special symbols
According to some pictures in the instructions, it may be more difficult to orient yourself. For these cases, we have added symbols to show the direction of the view in such steps.
For example, the second picture shows that you have to look inside the printer from above.
We have not added the symbol in the pictures where the direction of view is clear.
Let's build!
Let's build!
Note: Do not throw away any screws removed during the disassembly. Some screws will be reused later on.
Make sure that the printer is clean. This means there is no spilled resin or hardened resin, remove dust and any grease.
We do not recommend disposing of any removed electronics (e.g., print display, power supply). If you ever want to downgrade your printer for some reason, you will need these parts.
Some parts on your printer may differ from the pictures in the manual. The SL1 printer has undergone several changes during its time. Mostly it's just a different look. It should have no effect on the procedure.
Are you ready to upgrade your SL1?
Start with disassembling your printer step by step. Go to chapter 2. Disassembling the SL1
Was this guide helpful?

Comments

Still have questions?

Still have questions?

If you have a question about something that isn't covered here, check out our additional resources.
And if that doesn't do the trick, you can send an inquiry to [email protected] or through the button below.

Contact us