Both Original Prusa SL1 and SL1S SPEED have a growing library of resin print profiles in the PrusaSlicer, which were tested and verified by Prusa Research. However, the printers are also open to any other 3rd-party resins. The material has to be compatible with MSLA technology and cured with 405nm UV light. To achieve the best results with any compatible resin you need to find its exact exposure time.
For this reason, both SL1 and SL1S include a resin calibration feature. This helps you evaluate your resin using a set of printed objects, where each object from the set is cured with a different exposure time. Throughout this article, you will learn the procedure, and how to select the best object and exposure time.
This procedure is as follows:
- Prepare the printer.
- Download the calibration projects.
- Print the calibration projects.
- Evaluate the printed objects.
- Create a PrusaSlicer resin profile (preset).
What you need
- A fully functional and calibrated SL1 or SL1S SPEED printer.
- Latest firmware installed: Navigate the menu to System -> Firmware -> and select Check for updates. Alternatively, the firmware file can be downloaded from our Downloads page and flashed using a memory stick. Please see Firmware updating (SL1/SL1S) for details.
Calibration Process
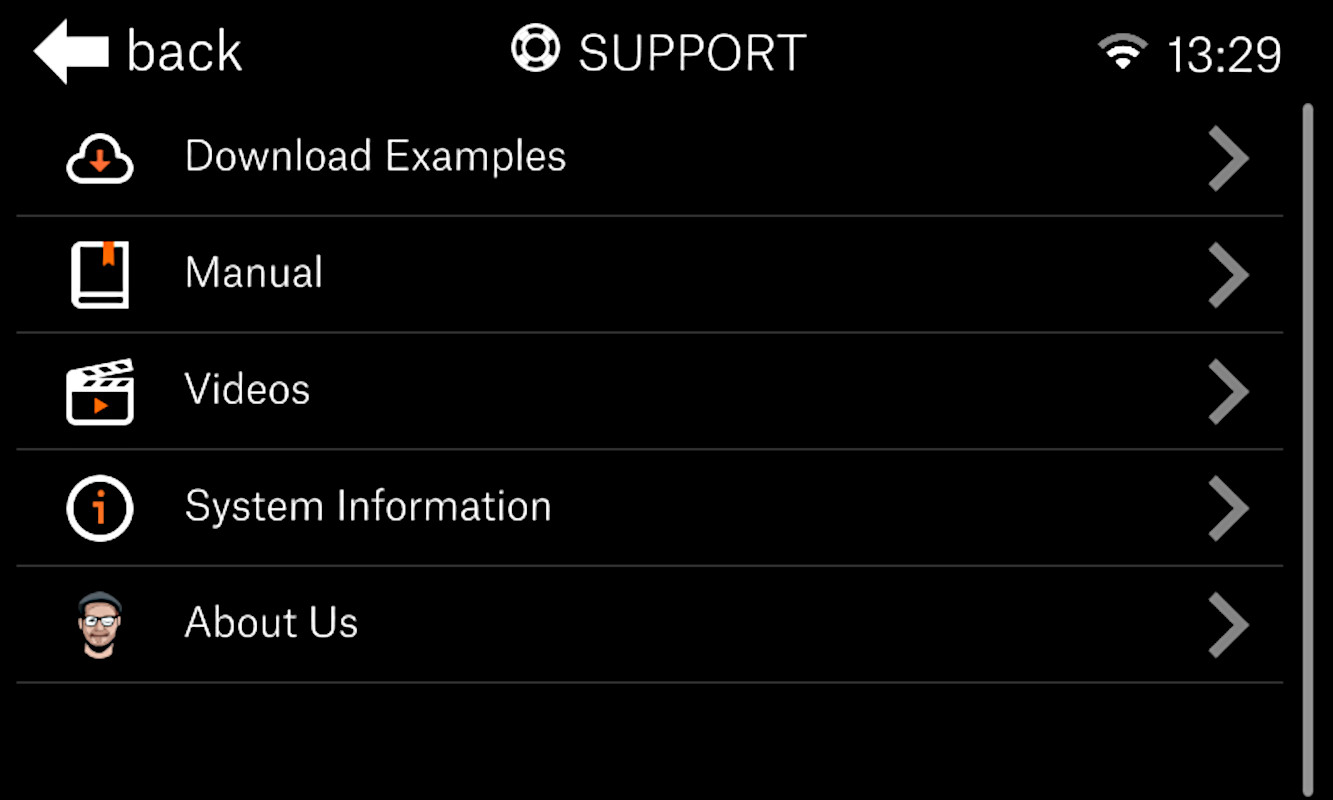
- From the Home screen, enter Settings -> Support -> Download Examples.
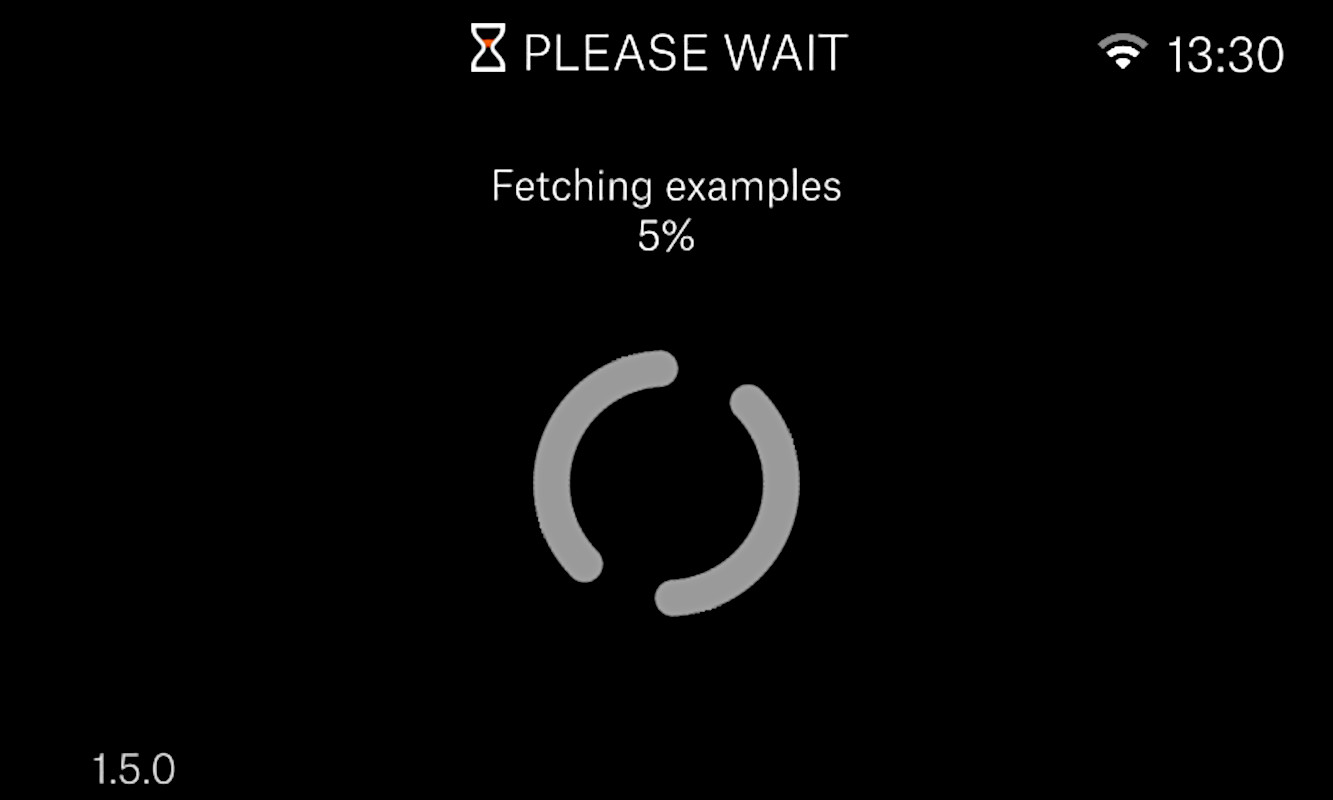
- Allow your SL1/SL1S to download and extract the example files. This can take a minute depending on your internet connection.
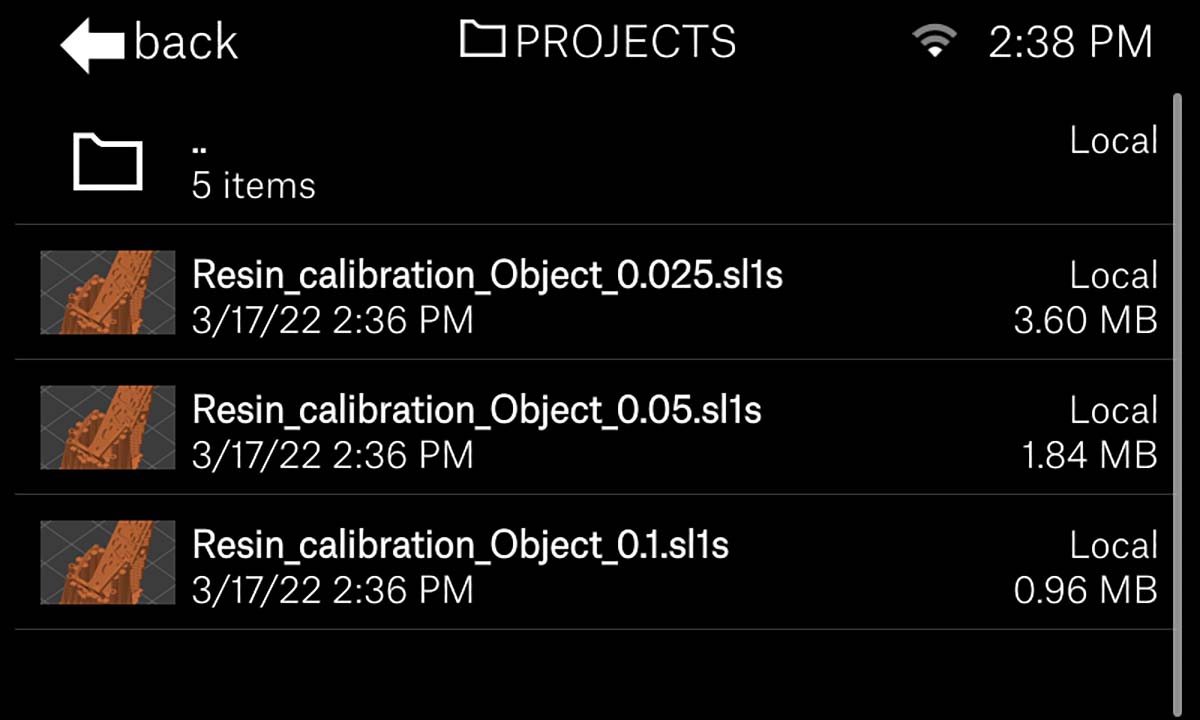
- Navigate back to the Home-screen and select Print -> Local -> Examples -> Calibration Objects. Here you will find a list of files for calibrating for different layer heights [0.025 mm - 0.05 mm - 0.1 mm]. Select the layer height you want to calibrate for. If unsure, we recommend using the 0.05 mm layer height object.
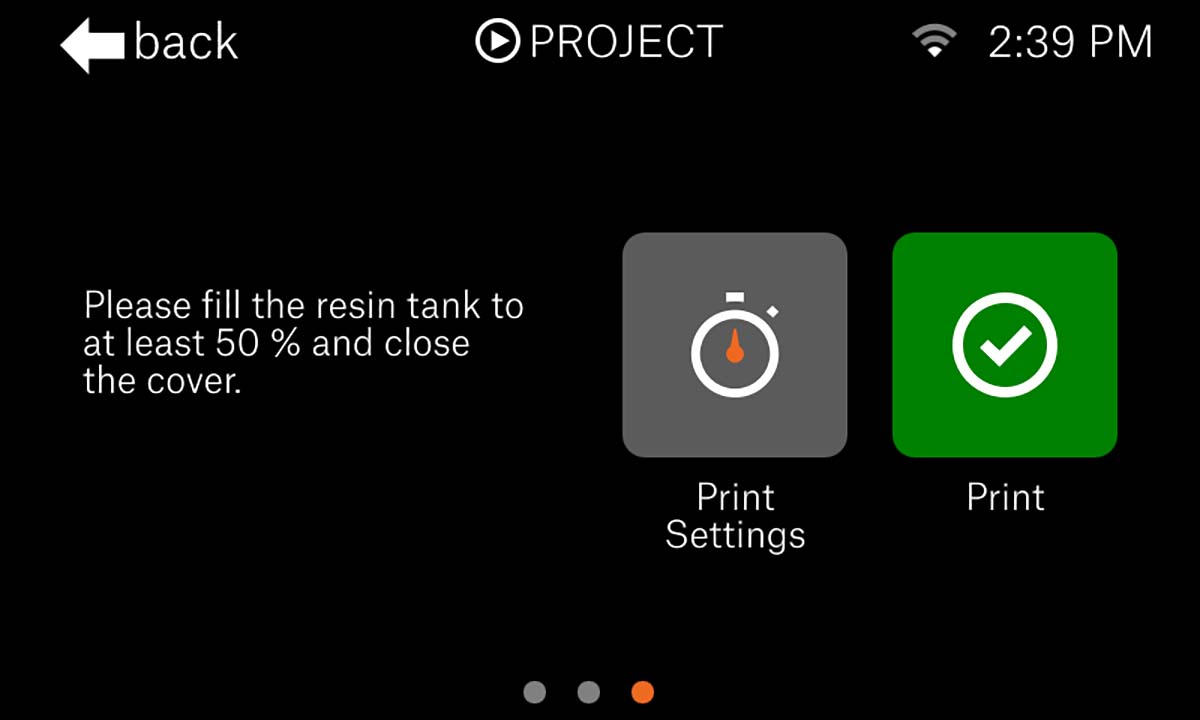
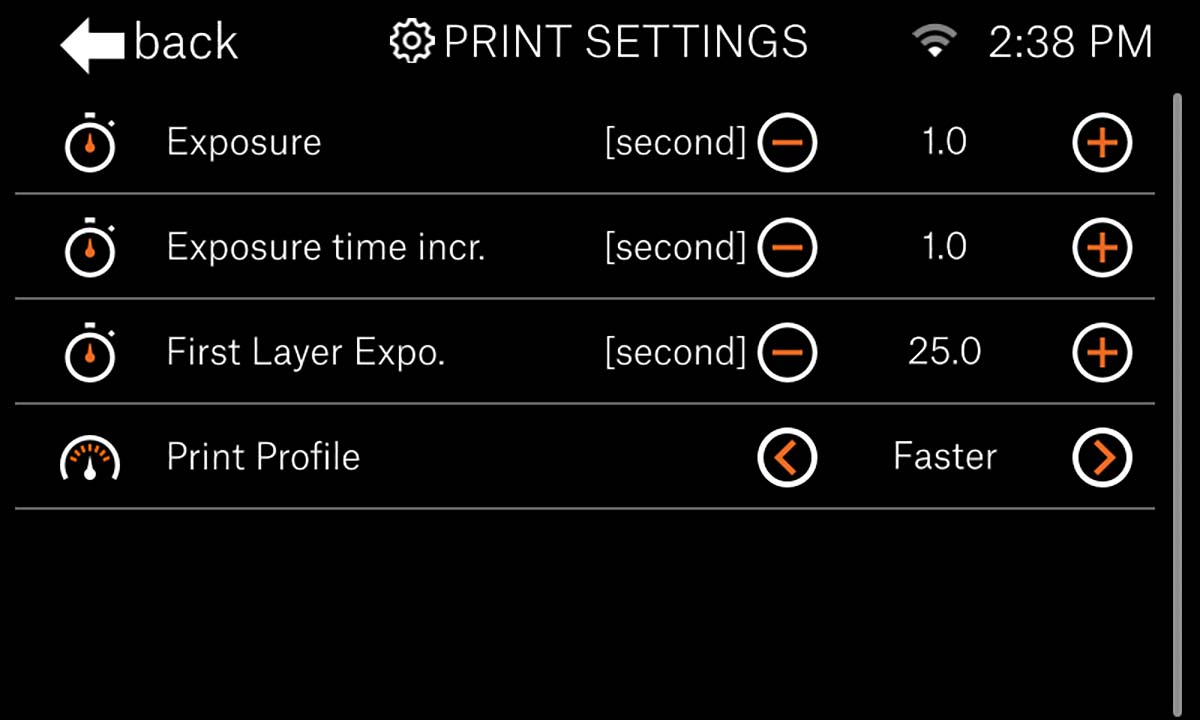
- When you swipe to the right, the screen will have two choices - Print Settings and Print. If you press Print Settings you will see that you have 4 options: Exposure [second], Exposure time incr. [second] and First Layer Expo. [second]. Here you can set the exposure time in and incremented time per object printed. Additionally, you can also change the speed profile for the print (Faster/Slower/High Viscosity).
 |  |
For exotic resins or types/brands that you do not know anything about, it is a good idea to explore the exposure times from a wide to a narrow range. Some industrial resins can require a very long exposure time (around 10s for SL1S or 30s for SL1). A good practice is starting with an increment of 1s for SL1S SPEED or 3s for SL1, to cover a wide range of exposure times. From the best-looking calibration objects, you can determine the more narrow range, before repeating the process with a shorter exposure increment to get more accurate results.
To have an idea about approximate exposure time we recommend checking what the manufacturer of the resin state for similar types of printers. Take into account that the SL1 is RGB MSLA and SL1S SPEED is Mono MSLA technology. If you have any such comparable exposure times, you can narrow in the range of exposure times and incremented time.
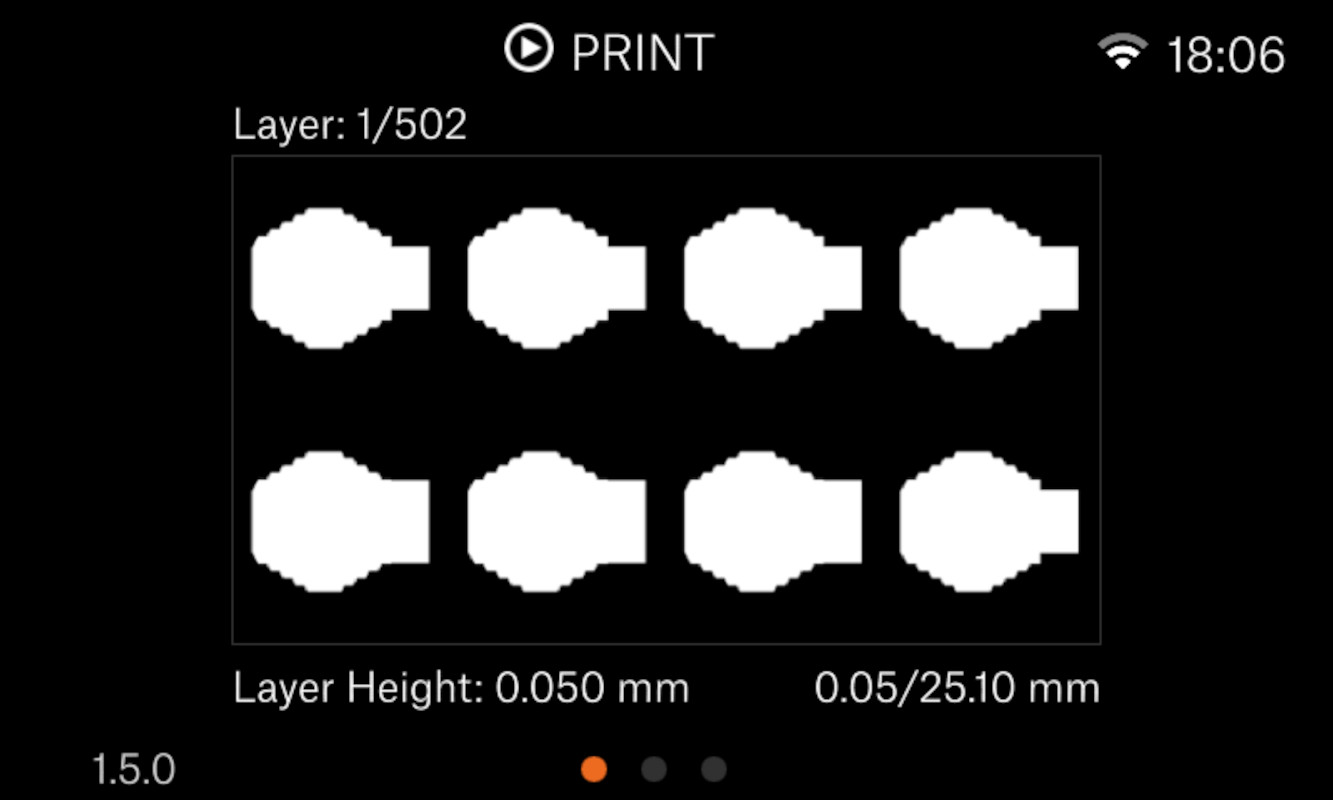
- At the fourth layer, the actual exposure times per object will be included as part of the model. Being physically printed with the object it makes the evaluation after the print is finished easier.
- As soon as the print is finished, wash and cure your print as normal, then take a closer look at the printed objects. You should look for:
-
-
- Missing elements/geometry
- Deformations
- Holes
- Merged parts of geometry
- Any other flaws
-
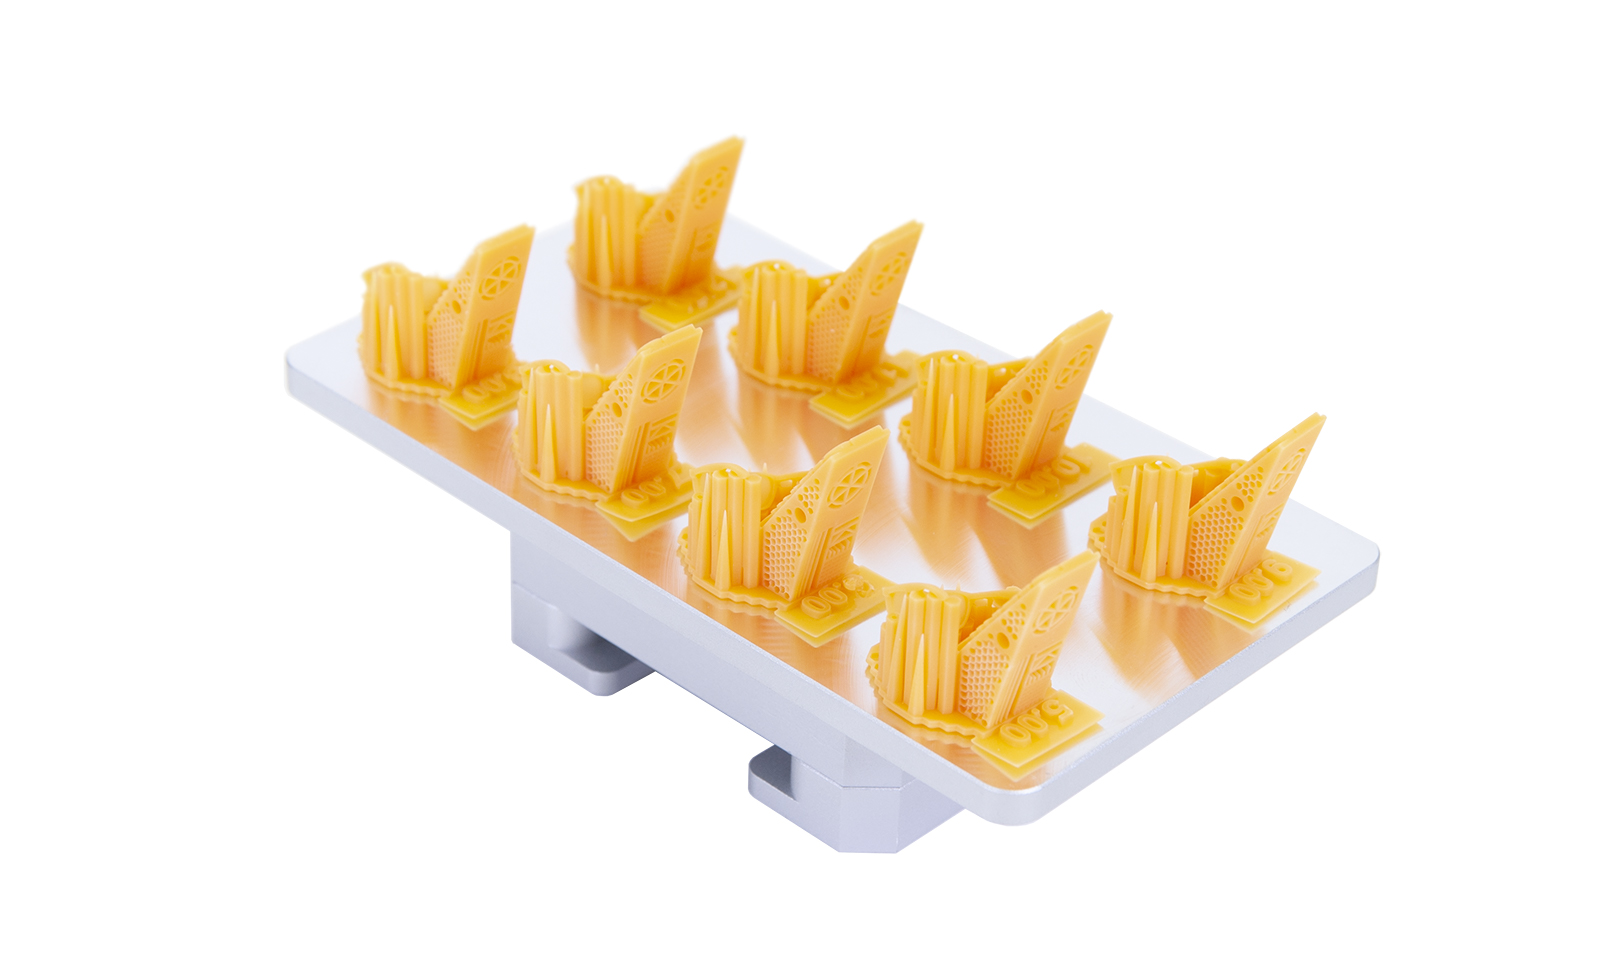
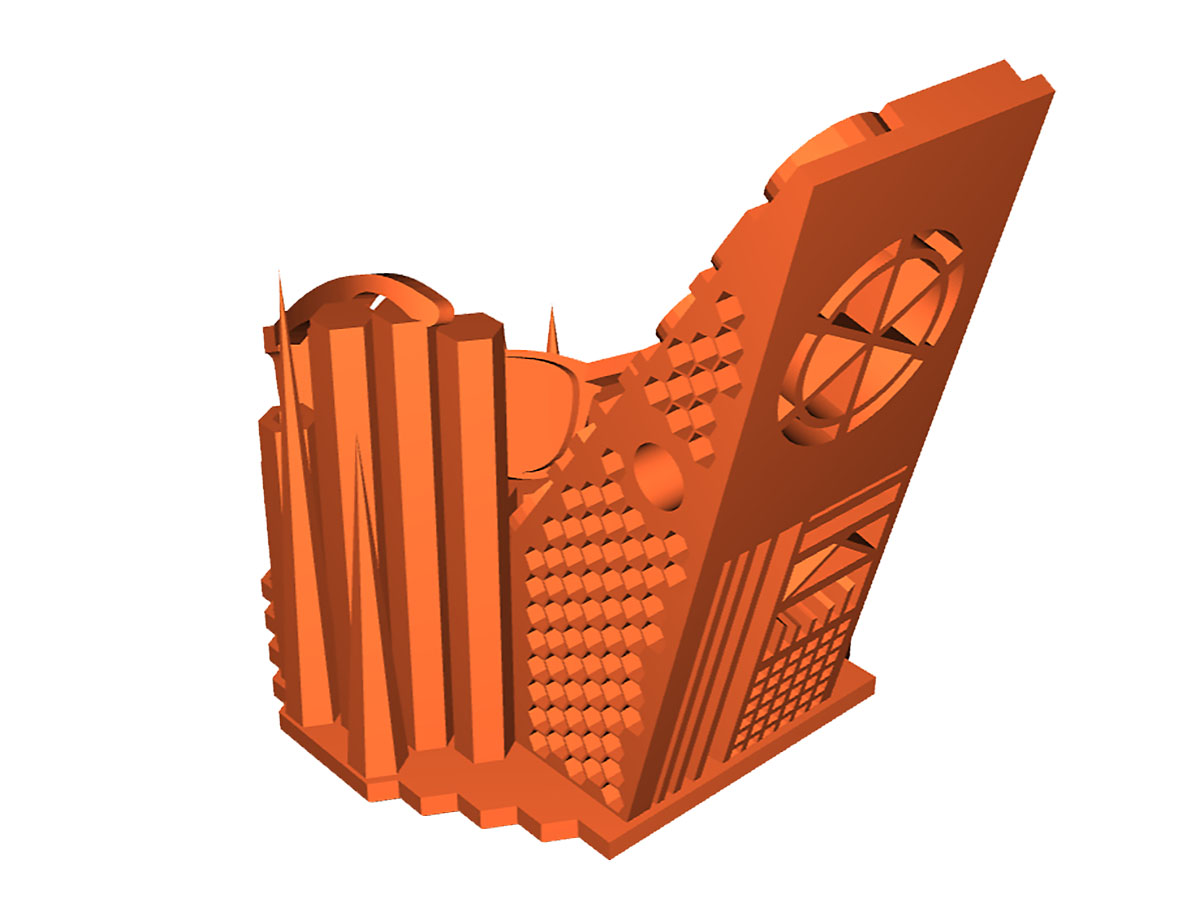
- Take a look at the picture below used as an example. Notice that the frame of the glasses and the lenses are damaged or completely missing with an interval between 6 to 9 seconds. The first useable exposure time is 10 and 11 seconds.

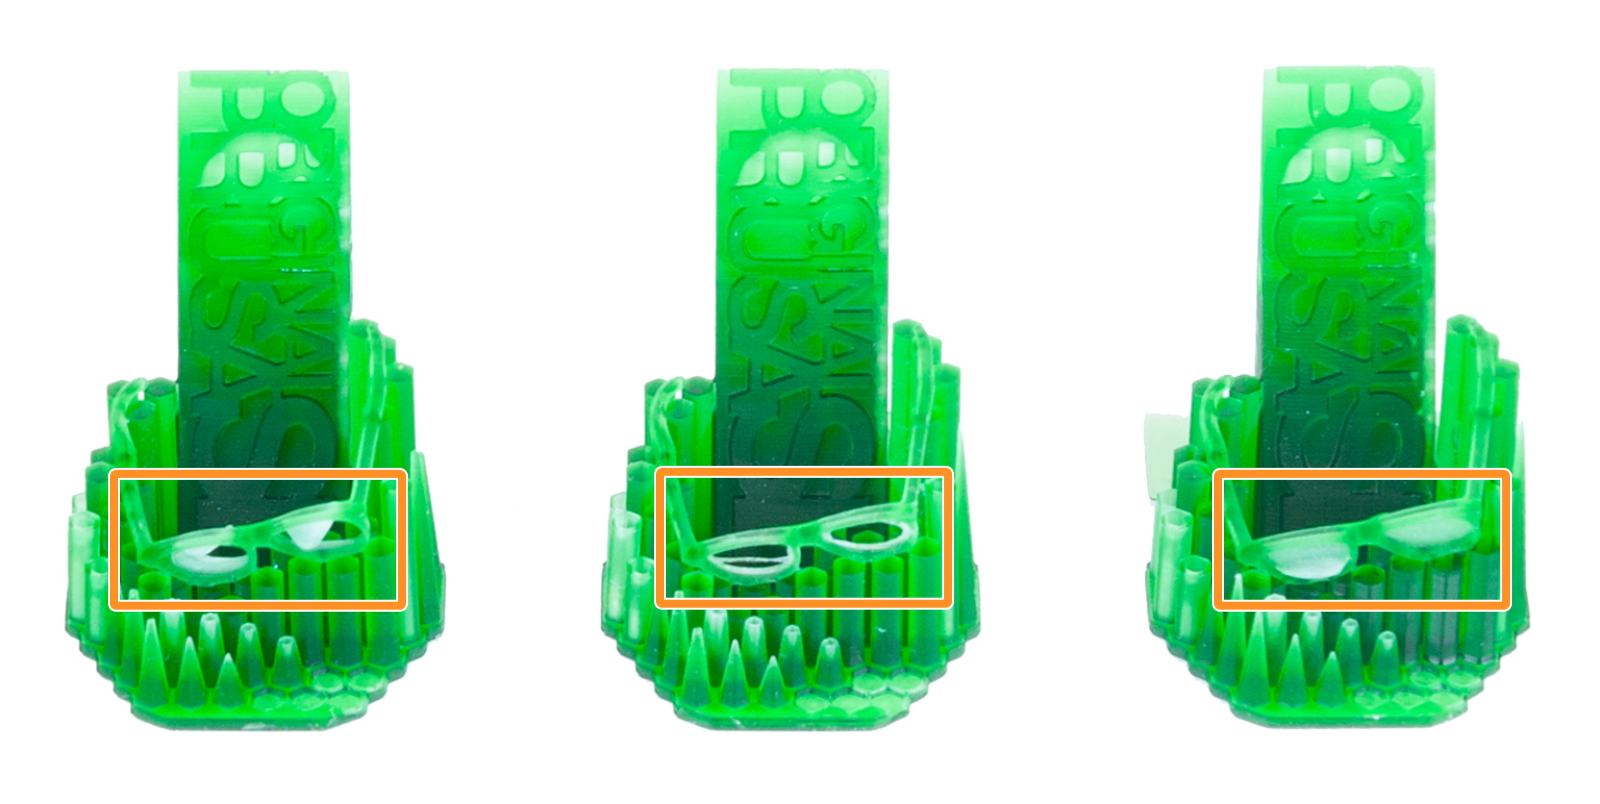 An example of how geometry forms can be found in the calibration object's glasses, where the actual glass within the frame will not be printed if exposure duration is set too low.
You can also use the 3D view of the 3D model itself at Printables.com (formerly PrusaPrinters.org), or download it to your computer and open it there for inspection. Here you will see all the tiny details that this model has. However, not all resins are made to print fine details. Undefined details are not always a sign of underexposure.
 3D view of the calibration object at Printables.com
Creating a PrusaSlicer preset
Did you find the best exposure time for your resin? Great! You can start a normal print right away, adjusting the exposure time on the printer's display before the print or you can create your own resin profile:
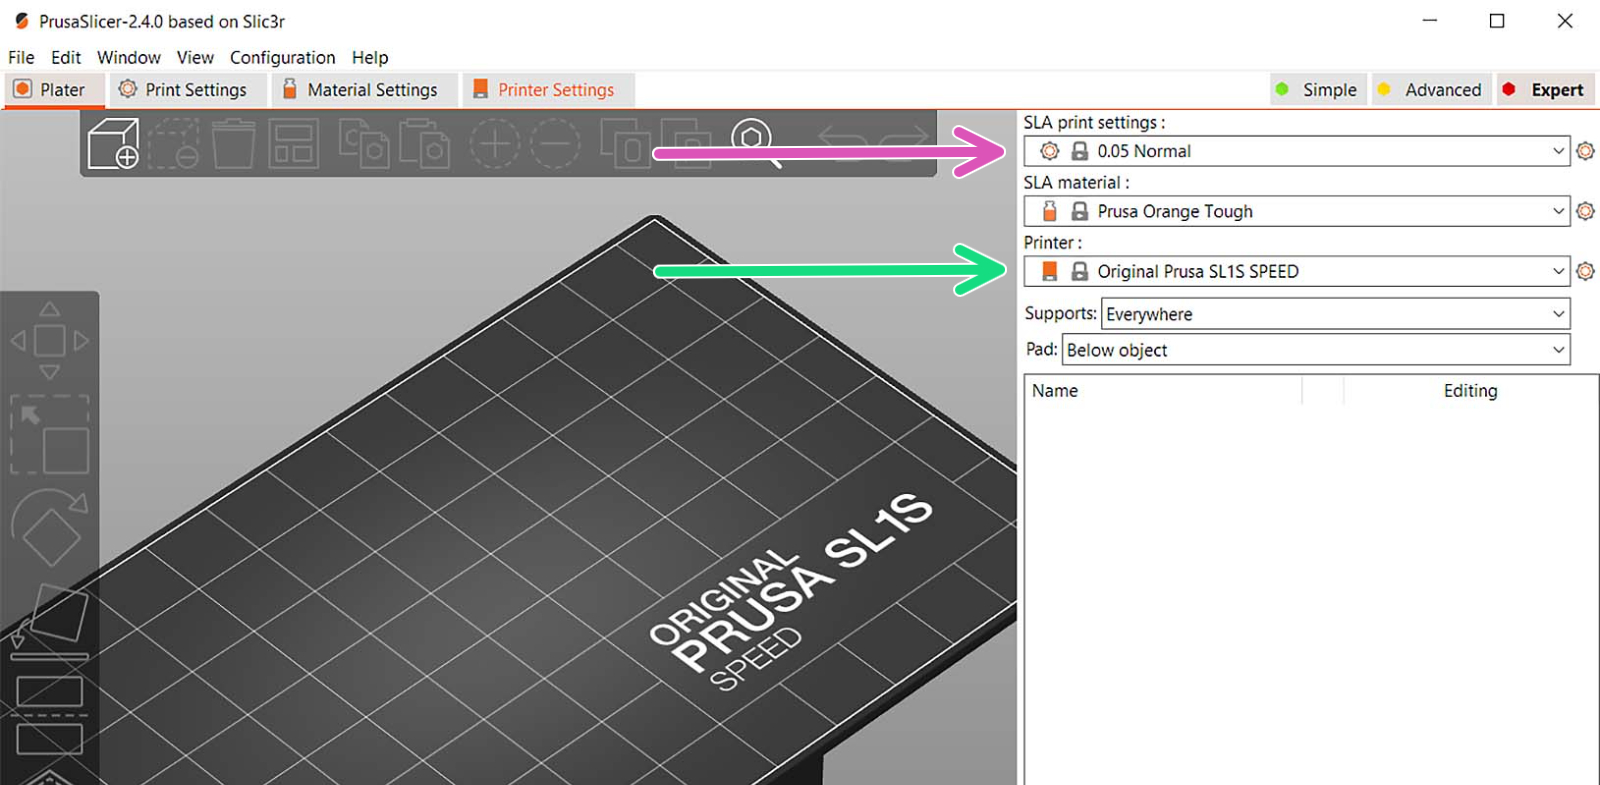
- Open PrusaSlicer and in the Plater view, select from the list of the printers (green arrow), Original Prusa SL1/SL1S SPEED, depending on which you have.
- From SLA print settings (purple arrow), select the layer height you want to calibrate the resin for. This will load all the available resins.
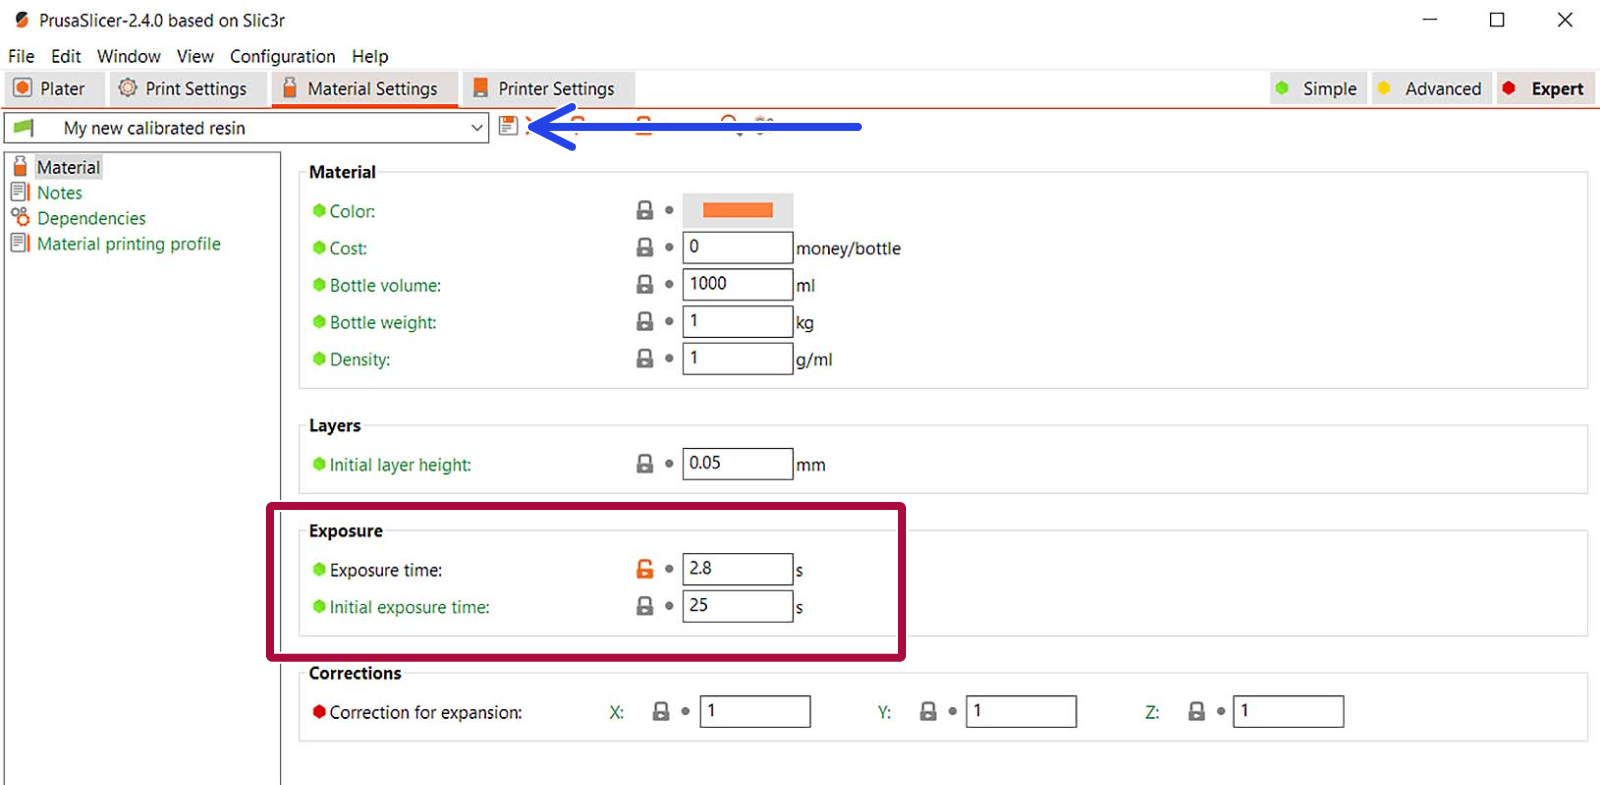
- Click on the "Material settings" tab on top.
- Select any resin from the dropdown list with the layer height you intend to calibrate for. It will be used as a base for your new profile. Then click on the "Save" icon (?) next to the list (blue arrow).
- A dialogue will open up where you name the preset (e.g. "My new calibrated resin") and hit "OK".
- In the new resin, the profile adjusts the fields "Initial Exposure time" and "Exposure time" (red square), which sets the time for which each layer of the sliced object is exposed to the UV light.
- Now, you are good to go. Slice your next model and Happy Printing!
Video
The video below covers the procedure on the Original Prusa SL1, but the procedure for the SL1S SPEED is almost the same.
1 コメント