Prusa
  • ショップ
    • 最新製品
    カテゴリー別
    • 3Dプリンター新着
    • 3Dプリンターアップグレード新着
    • 材料
    • アクセサリー
    • スペアパーツ
    • コース
    • グッズ
    • 見積もりを取得
    クイックリンク
    • 配送と配達
    • 返品と返金
    • 支払いと融資
    • 保証
    • VATと関税
    • よくある質問

    0 点の商品がカートに入っています点の商品がカートに入っています

    カートは空です

    カートを見る3Dプリンターを購入

    マイプロフィール

    ログイン すると注文や保存した商品を確認できます

    マイプロフィール

    ログイン中:

    • 注文
    • ログアウト
  • 3Dプリント
    • 3Dプリントを探る
    初心者向け
    • 3Dプリントの基礎
    • FDM印刷の仕組み
    • 初めてのプリンターを購入する
    • 3Dモデルカタログ
    用途別
    • ラピッドプロトタイピング
    • 製造
    • エンジニアリング
    • 研究
    • アートとデザイン
    さらに深く
    • 材料ガイド
    • コース
    • ウェビナー
    • 導入事例
    • カスタム3Dプリンティング
  • 3Dプリンター
    • すべての3Dプリンター
    用途
    • 自宅またはガレージ愛好家、改造愛好家、ホームプリンティング
    • ビジネス小規模チーム向けの社内生産
    • エンタープライズフリート、セキュリティ、大規模生産
    • どのPrusaが私に適していますか
    ショップと閲覧
    • CORE One+新着
    • CORE One+ INDX新着
    • CORE One L+新着
    • CORE One L+ INDX新着
    • XL+新着
    • MK4S
    • Prusa Pro HT90
    • Prusa Pro AFS
    • Prusa Pro SLX
    プリンターからさらに
    • 部品とアップグレード新着
    • Spare parts
    • 重要インフラ
    • 導入事例
    • シグネチャーオーク
    • キット
  • 材料
    • すべての材料
    用途別
    • 日常とデザイン
    • 機能工学
    • 複合材料
    • プロフェッショナル向け特殊材料
    • SLAレジン
    Prusament
    • PLA
    • PETG
    • ASA
    • PC
    • PA11
    • Flex
    • TPU
    材料からさらに
    • 材料ガイド
    • 自社製材料
    • サステナビリティ
    • ストアで注文
  • ソフトウェア
    • すべてのソフトウェア
    印刷の準備
    • PrusaSlicer 3.0新着
    印刷と監視
    • Prusa Connect
    • EasyPrint
    • iOS & Androidアプリ
    • Prusaファーム
    始める
    • ダウンロードとインストール
    • ナレッジベース
    その他のソフトウェア
    • 3Dモデルカタログ
  • サポート
    • サポートを探す
    回答を探す
    • ナレッジベース
    • トラブルシューティング
    • コース
    • ウェビナー
    ヘルプ
    • お問い合わせ
    • ライブチャット
    • 配送と配達
    • 保証
    • 返品と返金
    • サービスとスペアパーツ
    • サービスと修理
    コミュニティ
    • フォーラム
    • Reddit
    • Printables
  • トラストセンター
    • トラストセンター概要
    トピック別
    • GDPR
    • 証明書
    • セキュリティ
    • コンプライアンス
    コミットメント
    • サステナビリティレポート
    お問い合わせ
    • セキュリティチームに連絡
  • 会社
    • Prusaについて
    私たちについて
    • 私たちのストーリー
    • プリンターの製造方法
    • オープンソース
    • ブランド&メディアキット
    ニュース
    • ブログ
    • ニュースルーム
    • イベント
    信頼とパートナー
    • サステナビリティ
    • 再販業者と販売代理店
    • アフィリエイトプログラム
    • お問い合わせ
    • English
    • Čeština
    • Deutsch
    • Español
    • Français
    • Italiano
    • Polski
    • 日本語
  • ログイン中:

    • 注文
    • 住所
    • 在庫アラート
    • マイコース
    • サブスクリプション
    • アカウントを編集
    • ログアウト

ログイン すると注文や保存した商品を確認できます

ログイン中:
  • 注文
  • 住所
  • 在庫アラート
  • マイコース
  • サブスクリプション
  • アカウントを編集
  • English
  • Čeština
  • Deutsch
  • Español
  • Français
  • Italiano
  • Polski
  • 日本語
ショップ

0 点の商品がカートに入っています点の商品がカートに入っています

カートは空です

カートを見る3Dプリンターを購入

マイプロフィール

ログイン すると注文や保存した商品を確認できます

マイプロフィール

ログイン中:

  • 注文
  • ログアウト
ショップ
  • 最新製品
カテゴリー別
  • 3Dプリンター新着
  • 3Dプリンターアップグレード新着
  • 材料
  • アクセサリー
  • スペアパーツ
  • コース
  • グッズ
  • 見積もりを取得
クイックリンク
  • 配送と配達
  • 返品と返金
  • 支払いと融資
  • 保証
  • VATと関税
  • よくある質問

おすすめ製品

    人気のカテゴリー

      急上昇ワード

        記事

          ブログ

            製品

              カテゴリー

                検索候補

                  検索中…
                  結果がありません
                  エラーが発生しました。
                  ↑↓ 選択↵ 開くEsc 検索を閉じる
                  1. サポート
                  2. Octoprint
                  3. PrusaPrint (Rpi Zero and Octoprint)
                   

                  内容

                  • Parts and preparations
                  • Soldering the GPIO pins
                  • Installation of SD card
                  • Connecting the RPi Zero to your printer
                  • Checking if the RPi works
                  • Troubleshooting

                  ブログ

                  • Prusament PLA ColorMix:わずか5巻のフィラメントで45色以上をプリント
                  • PrusaSlicer 3.0プレビュー版 — 3Dプリントの未来を見据えた仕様
                  • より高品質なプリントを、もっと簡単に:Prusa XL+、CORE One L+、CORE One+(Gen 2)― 大規模製品アップグレード

                  ニュースレター

                  ご登録いただくと、毎月 新しいファームウェア、PrusaSlicerの新バージョン、3Dプリントプロジェクトの一般的なヒントなど、役立つ情報をお届けします。

                  クリックして、ニュースレターを受け取る。

                  このサイトはreCAPTCHA Enterpriseによって保護されており、Googleのプライバシーポリシーと利用規約が適用されます。

                  Heavy Duty Keyboard Holder (No Supports)
                  E-shop
                  • 3Dプリンター
                  • プリンターのアップグレード
                  • フィラメント
                  • アクセサリー
                  • Prusa 商品
                  Prusa

                  © Prusa Research a.s.

                  Printables
                  • 3Dモデル
                  • Store
                  • Clubs
                  • 3Dデザインコンテスト
                  • Brands
                  コミュニティ
                  • ワールドマップ
                  • フォーラム
                  • ユーザーグループ
                  • イベント
                  ヘルプ
                  • Prusa ヘルプ
                  • Prusa アカデミー
                  • 3Dプリンティング計算機
                  ソフトウェア
                  • PrusaSlicer
                  • Prusa.app
                  • Prusa Connect
                  • ドライバーとソフトウェア
                  会社概要
                  • 私たちについて
                  • Blog
                  • プルサ正規販売代理店
                  • お問い合わせ
                  • ISO 9001・ISO 14001・ISO 45001 認証取得済み
                  • 一般利用規約
                  • PRUSAウェブサイト利用のための一般利用規約
                  • プライバシーポリシー
                  • クッキーに関する情報
                  • お客様の苦情対応に関する方針
                  • Webサイトのステータスページ
                  • Cookie 設定
                  Prusa
                  • 一般利用規約
                  • PRUSAウェブサイト利用のための一般利用規約
                  • プライバシーポリシー
                  • クッキーに関する情報
                  • お客様の苦情対応に関する方針
                  • Webサイトのステータスページ
                  • Cookie 設定

                  © Prusa Research a.s.

                  JOSEF PRUSA®、PRUSA RESEARCH®、PRUSA POLYMERS®、PRUSA ORANGE®、PRUSA 3D ® および PRUSAMENT® は、Prusa Development a.s. の登録商標であり、Prusa Research a.s. が Prusa Development a.s. からのライセンスに基づき使用しています。

                  PrusaPrint

                  (Rpi Zero and Octoprint)

                  関連するもの

                  MK3
                  MK3S
                  MK3S+
                  記事 他の言語でもご覧になれます。
                  English
                  Čeština
                  Polski
                  Deutsch
                  Français
                  Español
                  Italiano
                  日本語
                  Raspberry Pi Zero W has no 5GHz Wi-Fi (only 2.4GHz), and a somewhat weak processor. It does not support using a large amount of Octoprint-plugins or streaming of video and is not officially recommended by the OctoPrint project. Use more powerful models like the 3B+ or the latest RPI 4 to take full advantage of Octoprint. However, they do need to be connected by USB, plus they need a separate PSU, which results in a less clean setup.

                  In this article, we will outline the preparations and configurations necessary to outfit your MK3S with Octoprint using a Raspberry Pi Zero. Here we will go through how to solder the correct GPIO pins and connecting the Raspberry Pi to the printer.

                  PRUSAPRINT (PRUSA'S CUSTOM OCTOPRINT IMAGE) IS NOW OUTDATED AND NO LONGER BEING MAINTAINED! This solution has been superseded by PrusaLink and Prusa Connect.
                  If you wish to use Octoprint, we recommend following the guide to creating your own Octoprint image.

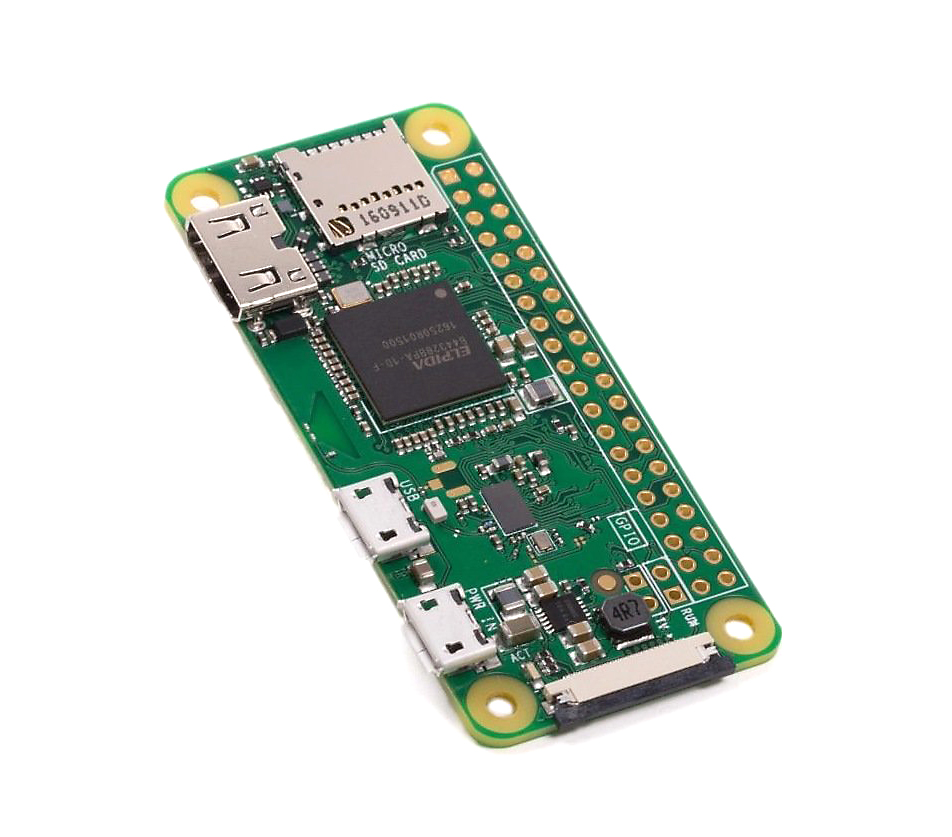
                  You can run Octoprint from most versions of the Raspberry Pi (Zero, 2, 3, 3B, etc.), but this is covered in a different article. We have chosen the Raspberry Pi Zero W for this tutorial, as it integrates neatly with the MK3s Einsy RAMBo with no need for an external power supply.

                  This guide is not covering any other fruit alternatives, like Banana Pi, Orange Pi, etc.

                  Distinguish between models Pi Zero W and Pi Zero. The letter "W" stands for Wireless. Buying a cheaper Pi Zero without WiFi will not work with this guide!

                  Parts and preparations

                  To complete this guide you need the following components:

                  • Raspberry Pi Zero W
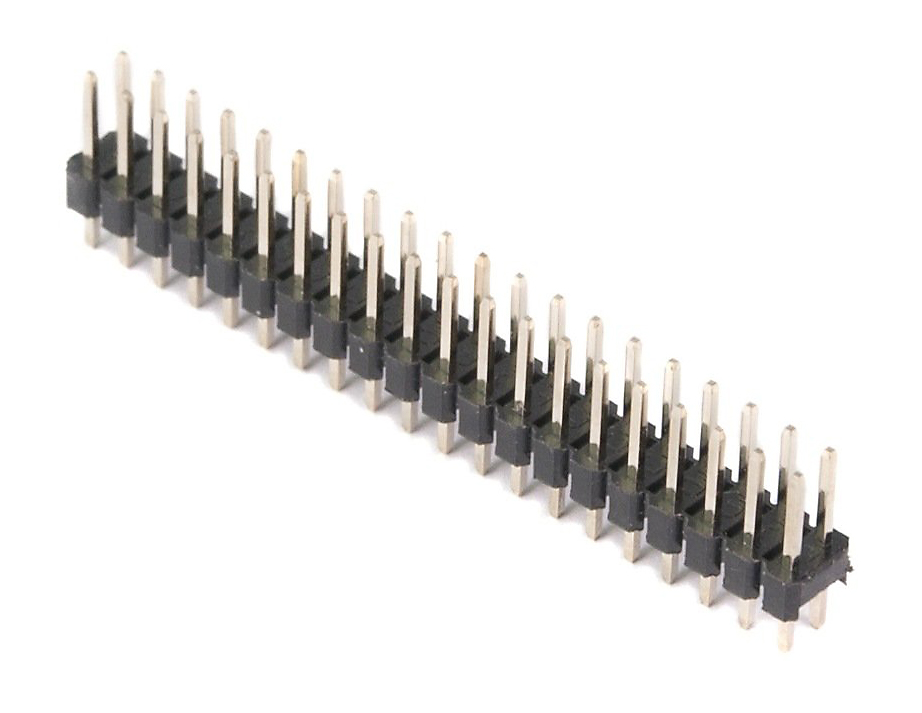
                  • 2x20-pin Strip Dual Male Header, with 18 mm pins.
                  • Micro SD card of at least 8GB (16 GB is recommended).
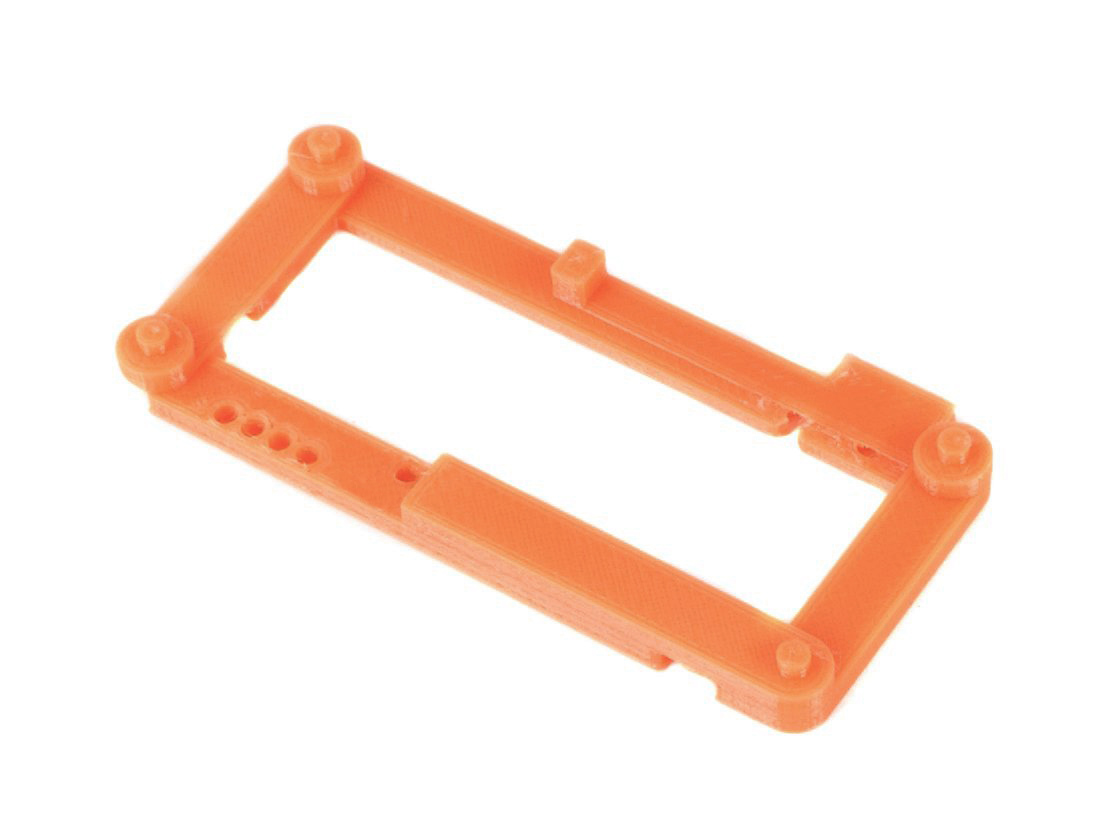
                  • Printed RPi Zero Frame.
                  To create a connection between RPi Zero W and EINSY board you need a GPIO header which you solder to the RPi board. You need a break-away 2x20-pin Strip Dual Male Header, the version with 18 mm pins. These types of headers come in different versions, but the crucial part is that they are 18 mm long.
                  2x20-pin Strip Dual Male Header
                   
                  Now that you have your Pi and the pins, they need to be installed to the Einsy Rambo. To ensure the correct position of pins and optimal distance, our developers created a printed part, the RPi Zero Frame, which is placed between RPi Zero and EINSY board. This is also used as a template when soldering the pins, ensuring they go where they should.
                  RPi Zero Frame
                   
                  RPi Zero Frame can be downloaded here. Recommended settings for print are profile 0.2 SPEED and material PETG or ABS.
                  The RPi Zero Frame is not fully compatible with the RPi Zero 2 layout. Be careful if using it or seek out a remix.

                  Soldering the GPIO pins

                  Certain parts of this guide require the usage of soldering and cutting tools. Please read carefully the instructions for such devices/tools and use personal protective equipment. Prusa Research does not assume responsibility, and expressly disclaim liability for loss, injuries, or damage.

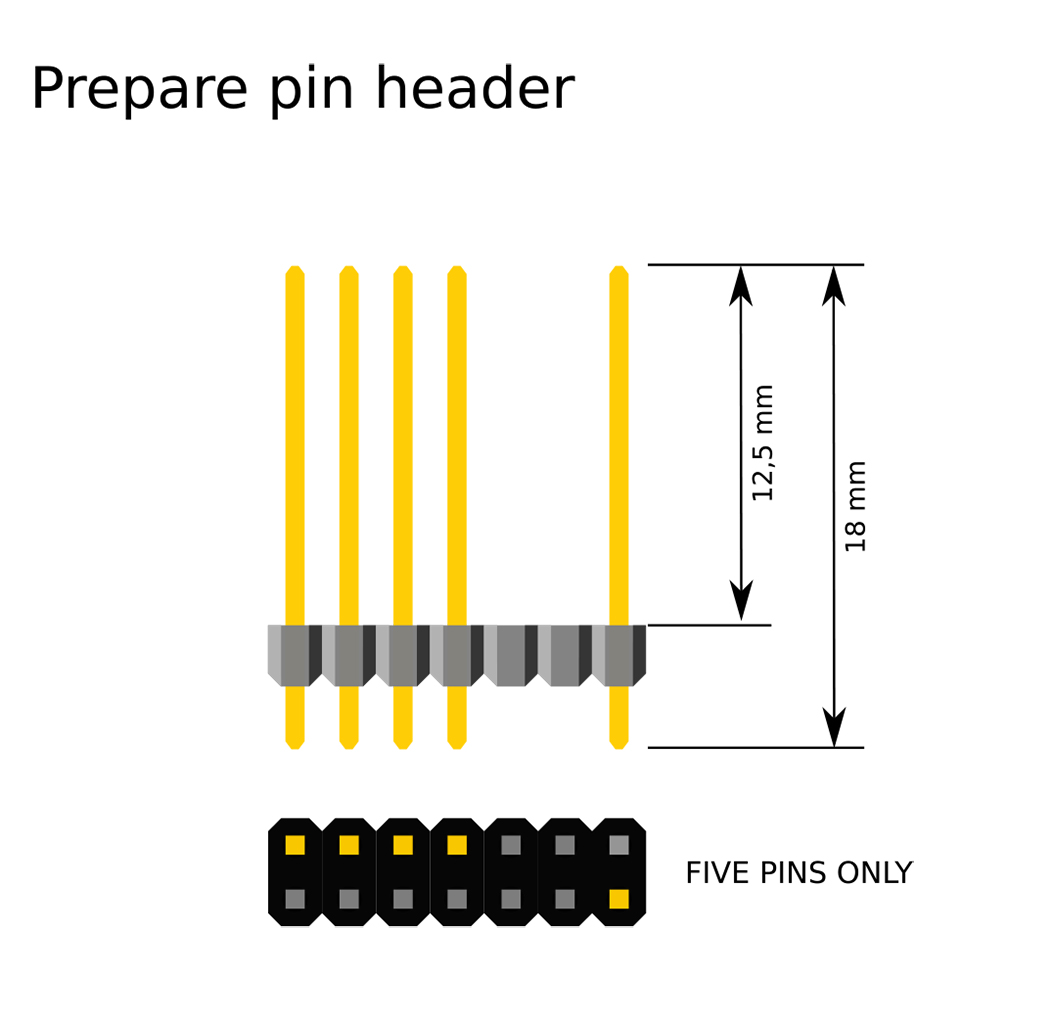
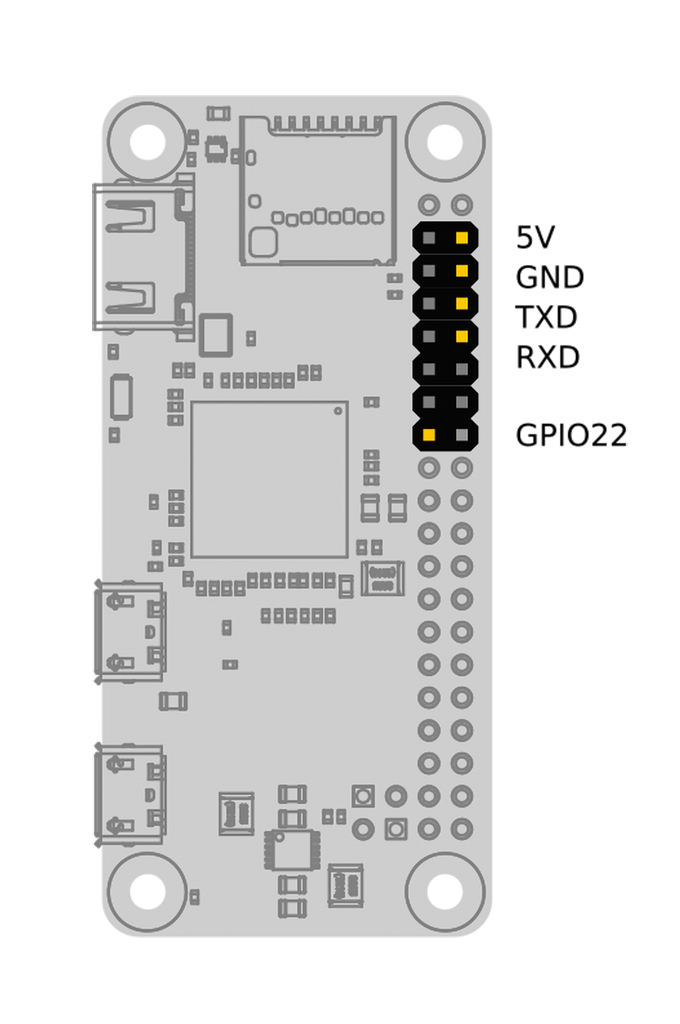
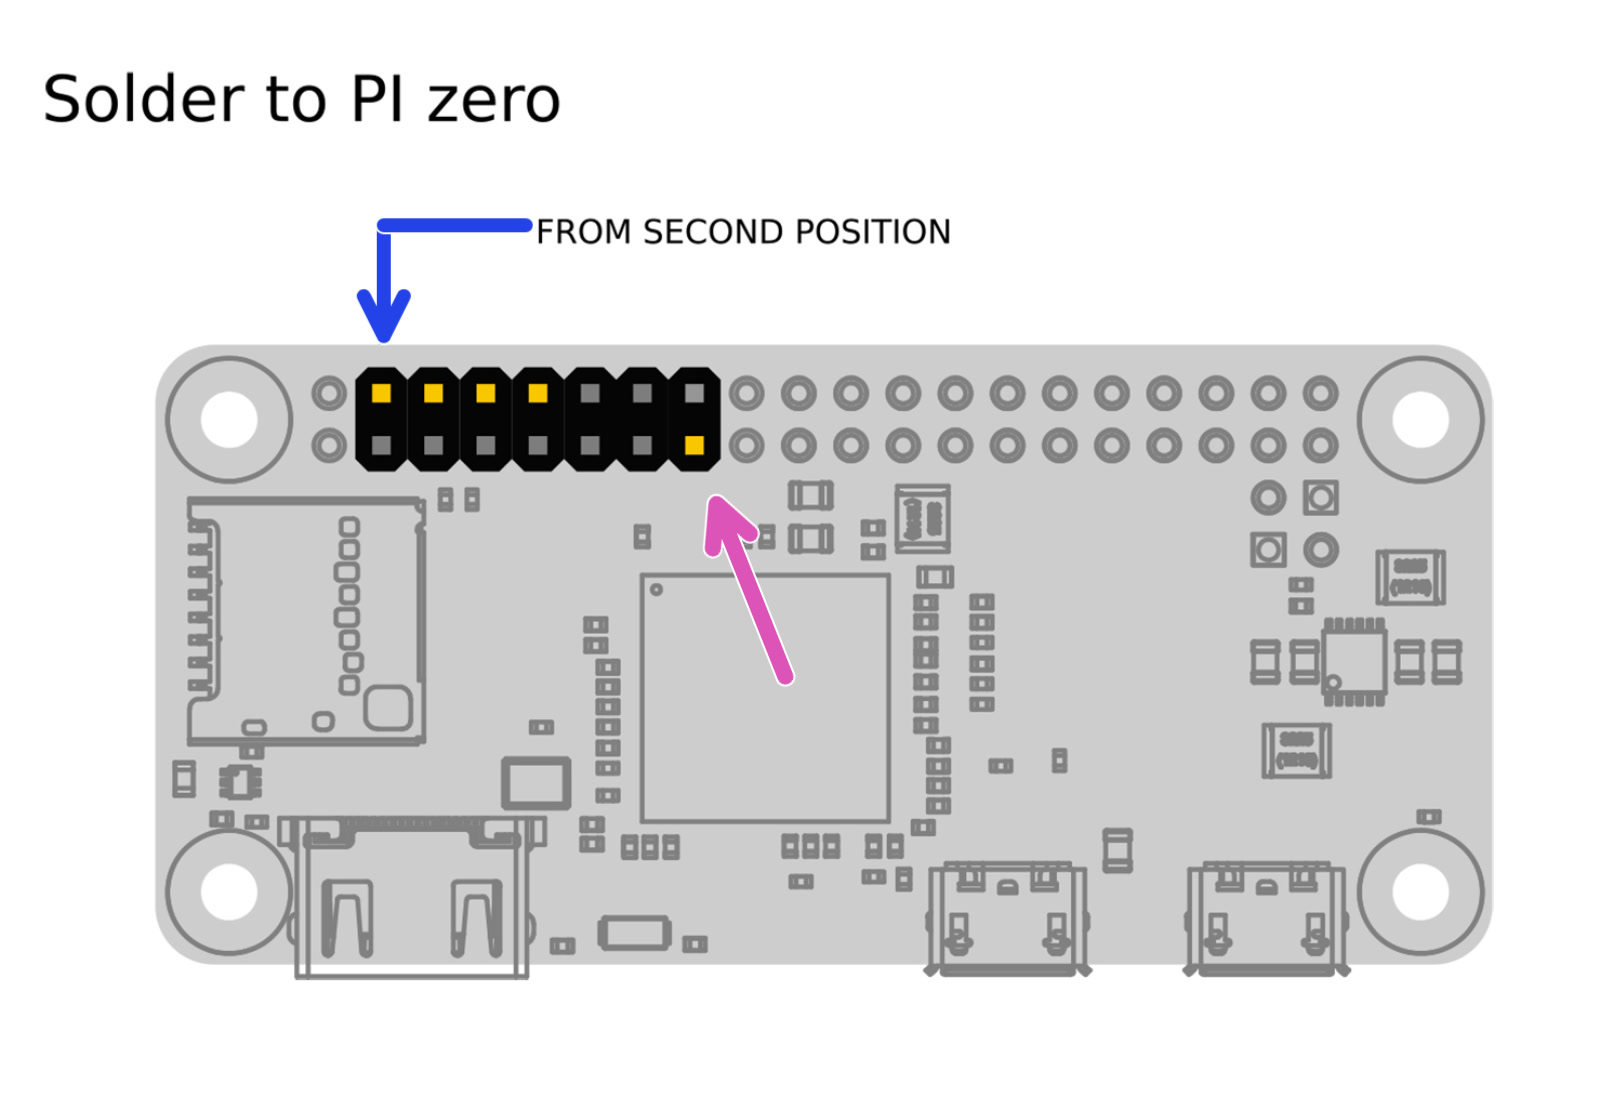
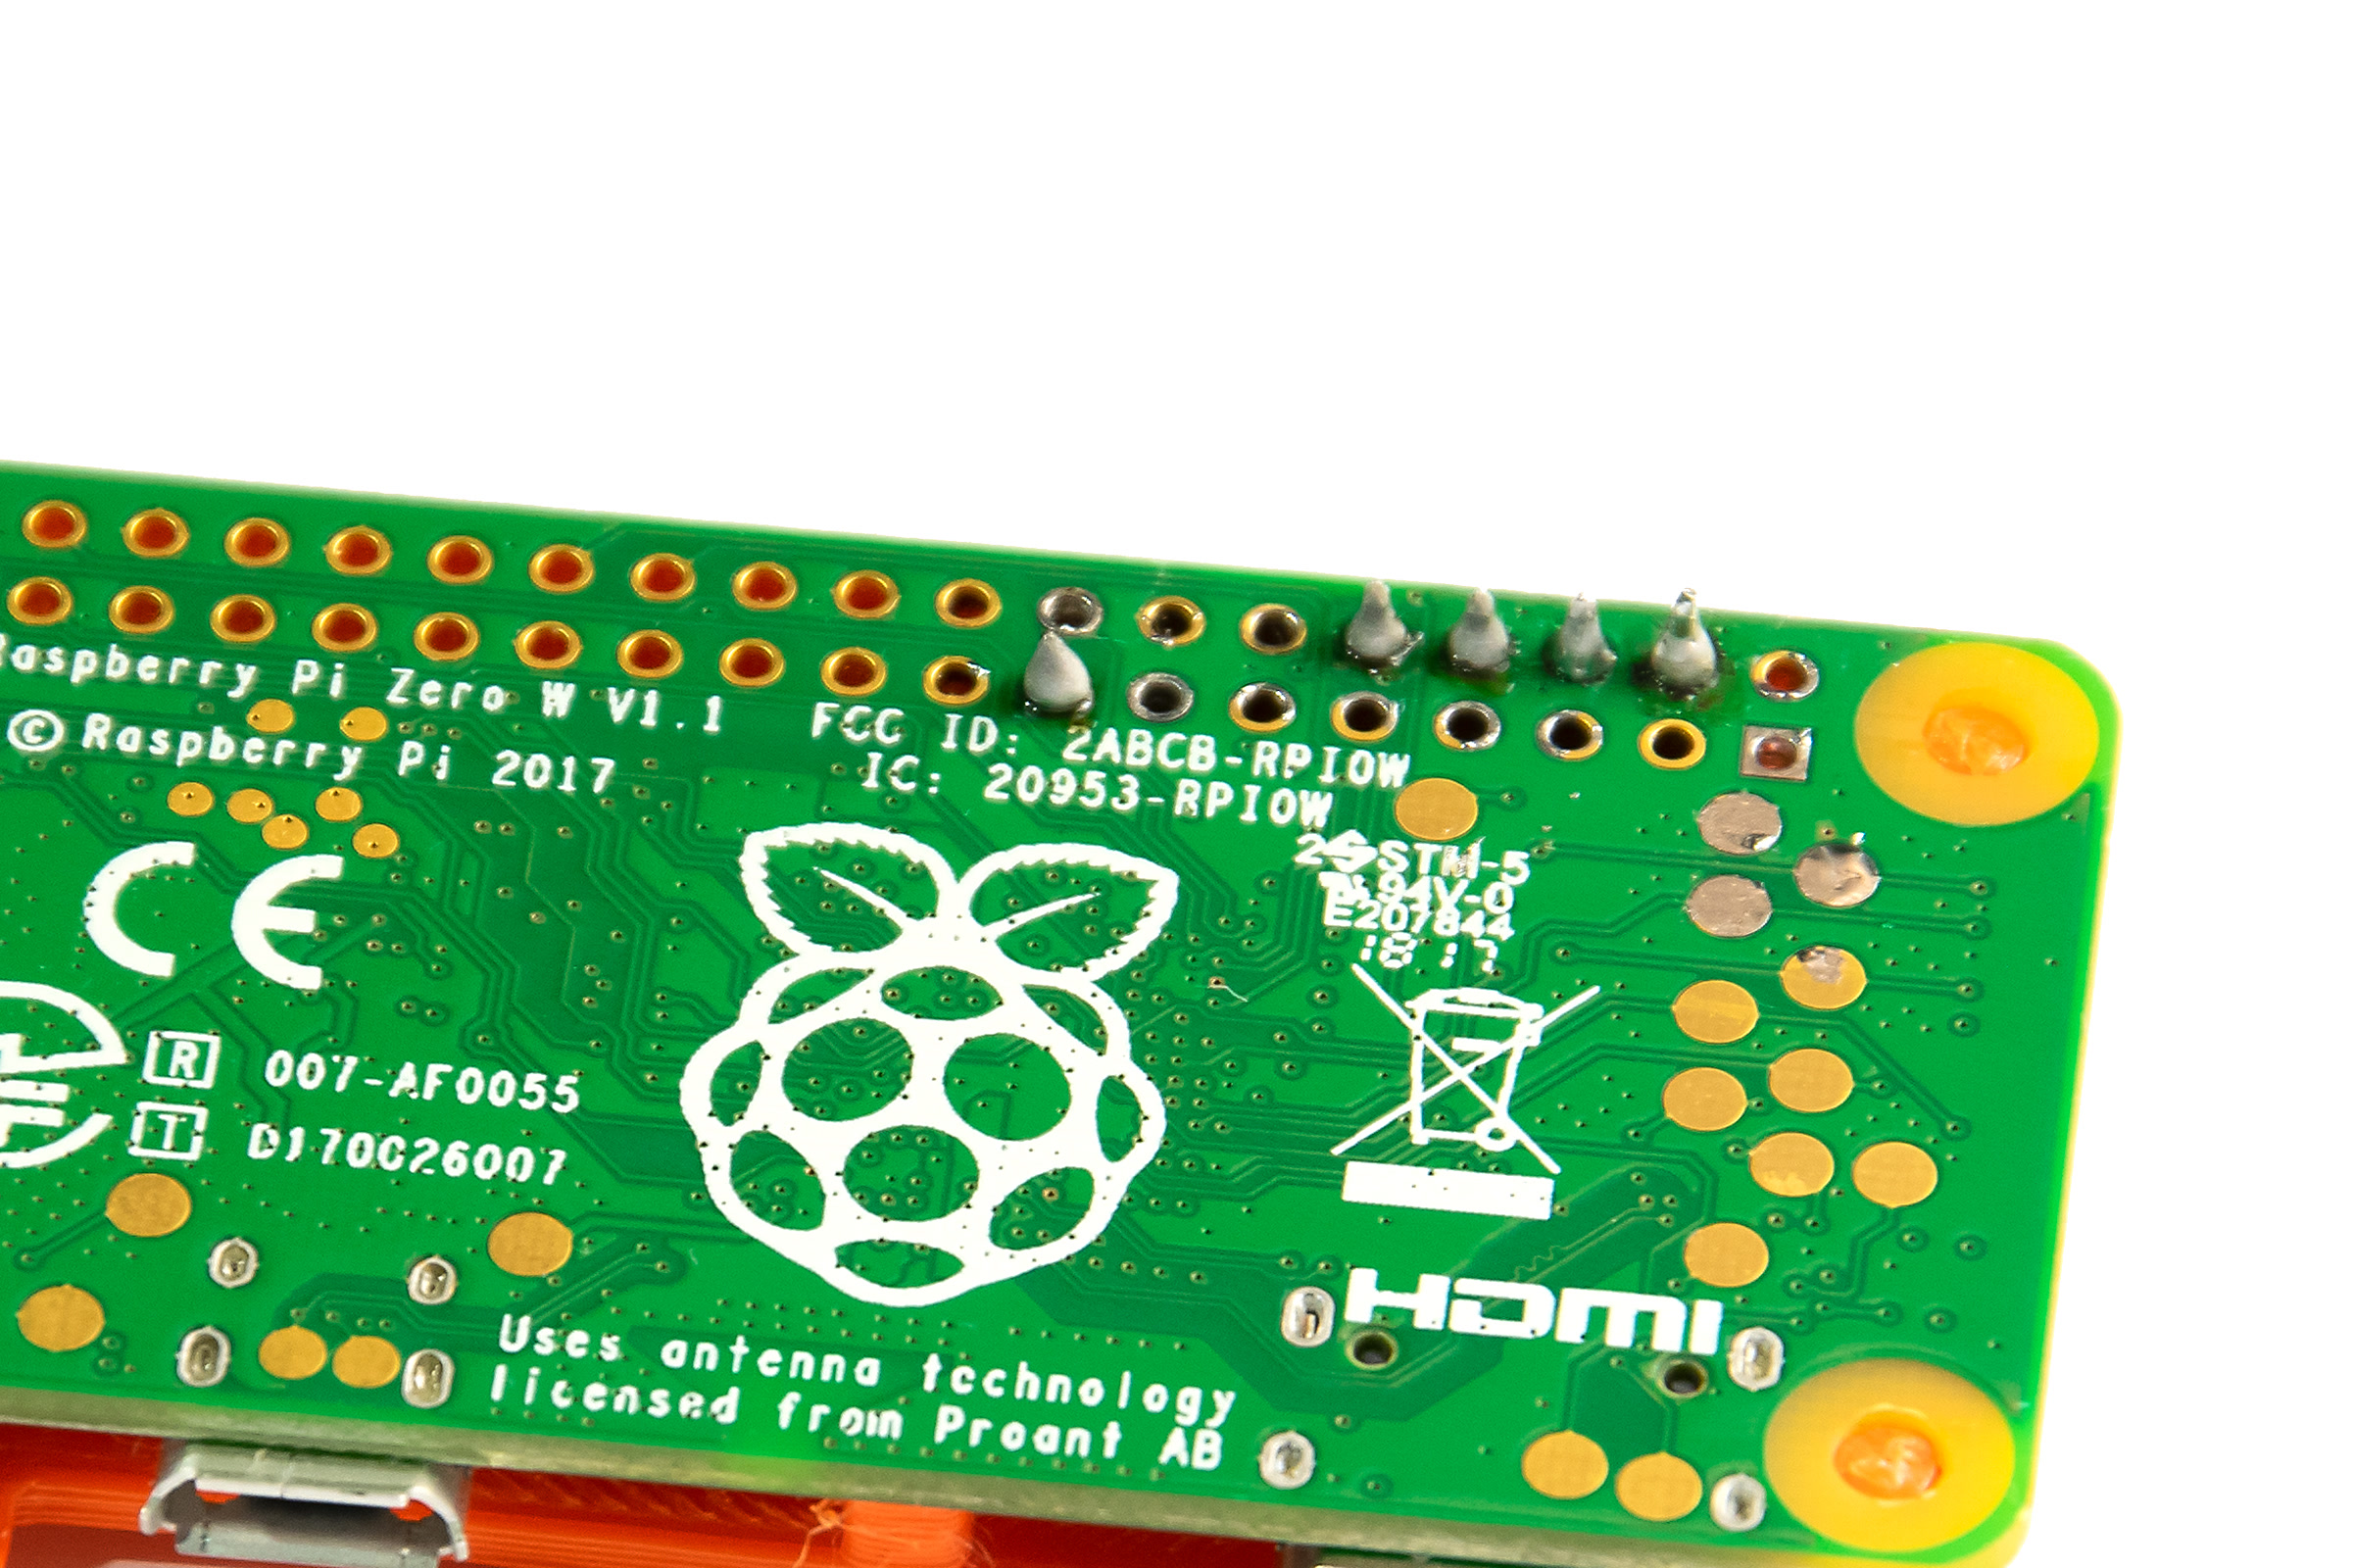
                  Prepare a piece of the GPIO-header, as in the illustration above, by simply breaking off the length you need and pulling out the pins you do not need with some pliers (right picture).

                  We are connecting this header to the UART pins (5V, GND, TXD, RXD) for serial communication, and to GPIO22 as mechanical support.
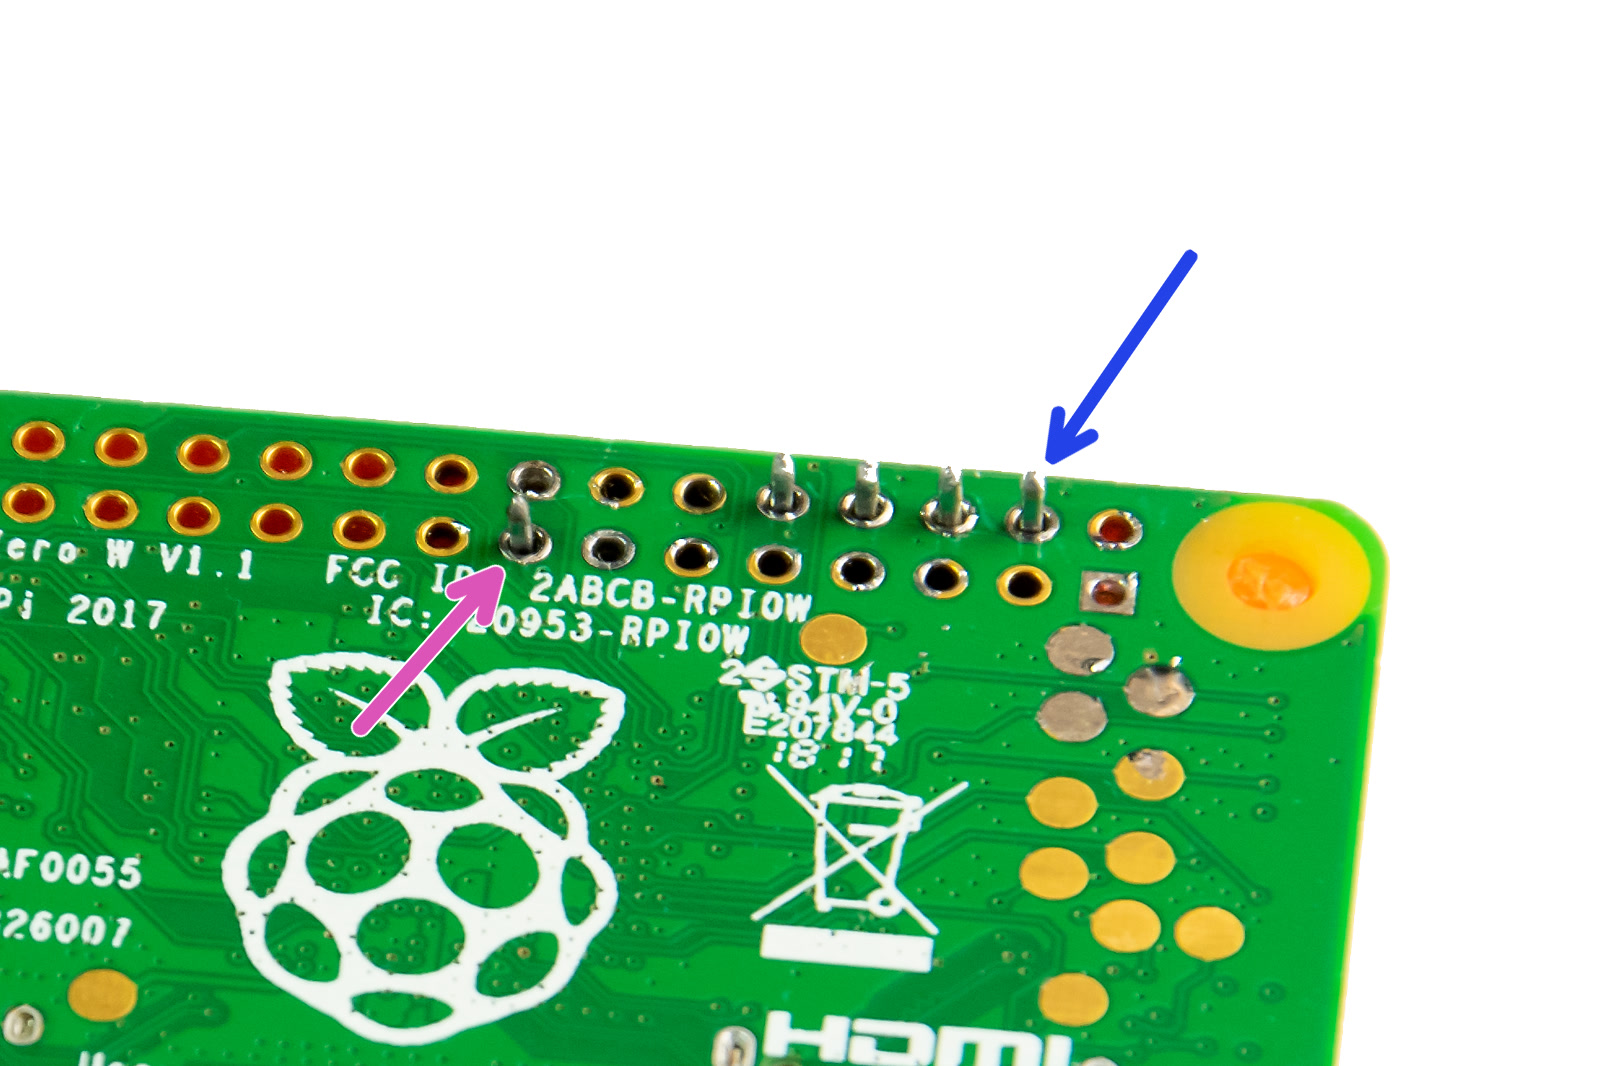
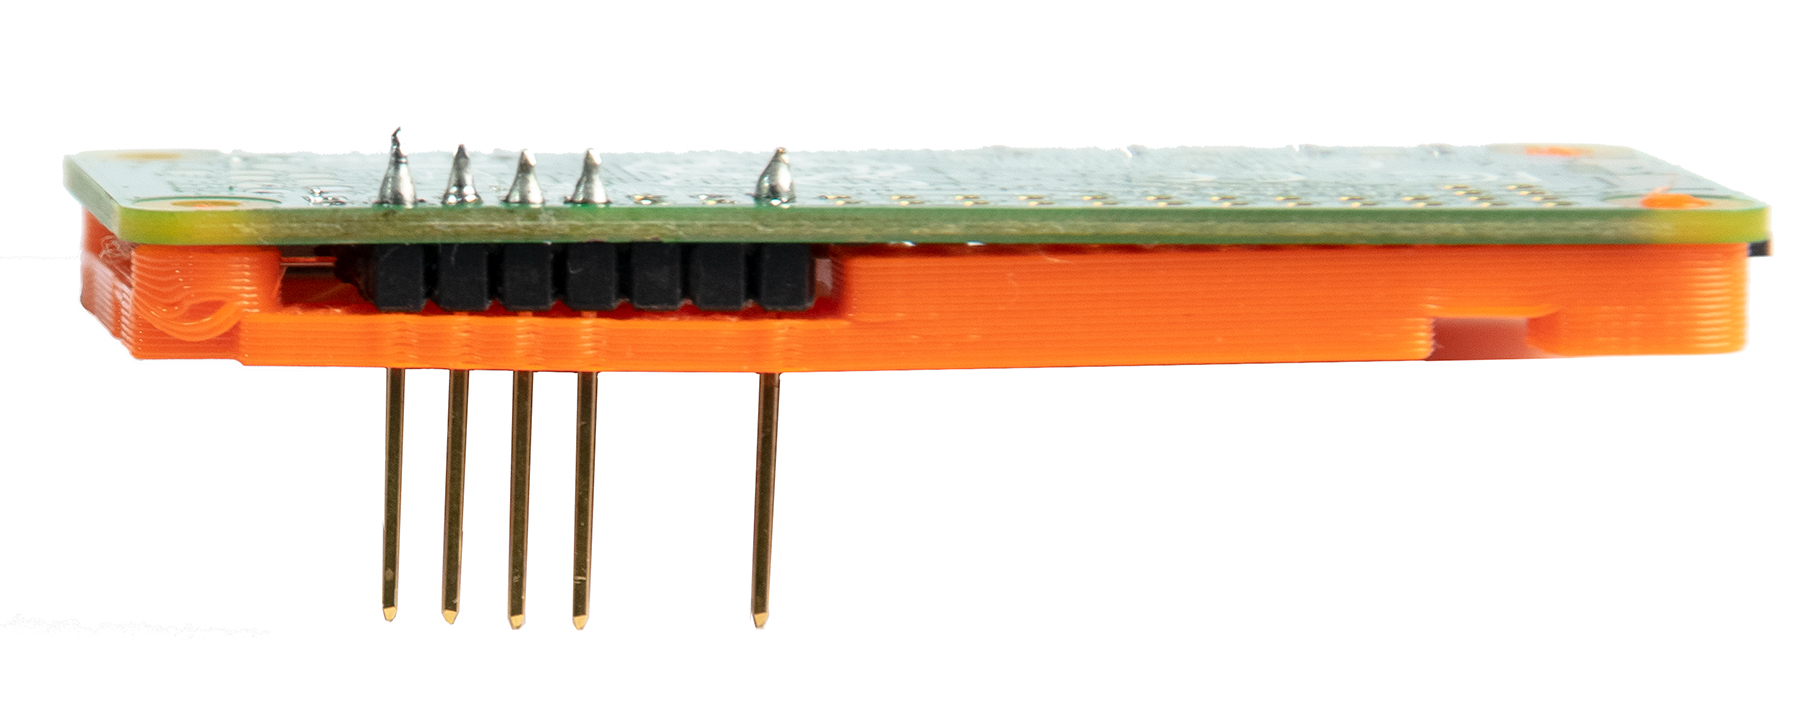
                  Sandwich the printed frame, the RPi Zero, and the GPIO pins together like is shown in the right picture below, Make sure the tips of the GPIO pins stick out about 1 mm, from the correct holes. You are now ready to solder the pins.

                  When soldering, you need the solder to "flow", creating a proper bond between the pins and the pads on the RPi Zero. If you end up with balls and blobs you need to reflow it for a proper bond. The solder needs to be clinging to the pins and the pads. You want "cones" as in the pictures above and below. Most solder will also turn shiny if done correctly. If you have no experience soldering we recommend looking up some videos on the basics.

                  Installation of SD card

                  The RPi Zero W hardware is now ready to be installed to the Rambo case, but for the lack of access once installed, you first need to prepare the SD-card which runs its operating system.
                  • Build and configure your own image from scratch
                  PRUSAPRINT (PRUSA'S CUSTOM OCTOPRINT IMAGE) IS NOW OUTDATED AND NO LONGER BEING MAINTAINED! This solution has been superseded by PrusaLink and Prusa Connect. If you wish to use Octoprint, we recommend following the guide to creating your own Octoprint image.

                  Connecting the RPi Zero to your printer

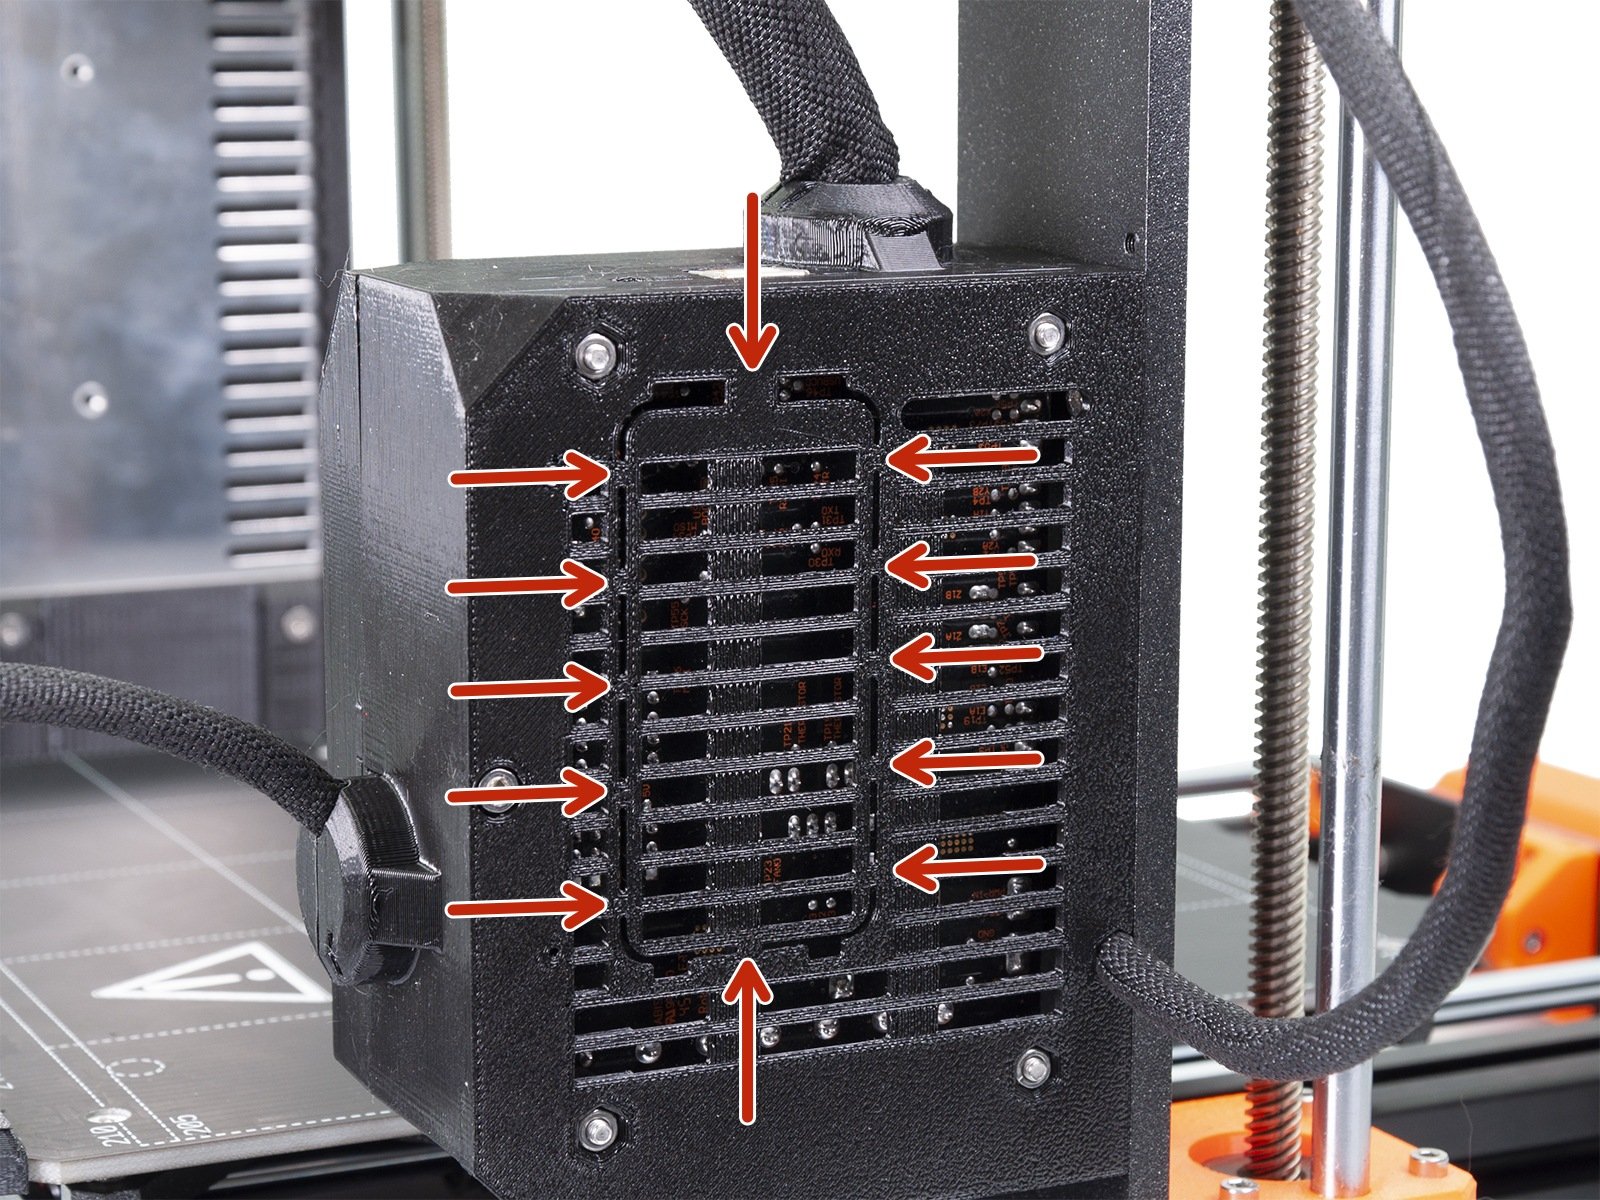
                  1. Make sure the printer is turned off and carefully cut all the indicated plastic parts and remove the cut-out part. During the cutting process, MAKE SURE YOU DON'T CUT the Einsy board!!!
                  On the MK3 (non S) there might not be this prepared area to cut. You can still cut it out, but this is a bit scary and you won't have the protective cover. We recommend printing the latest version of the Rambo-case.
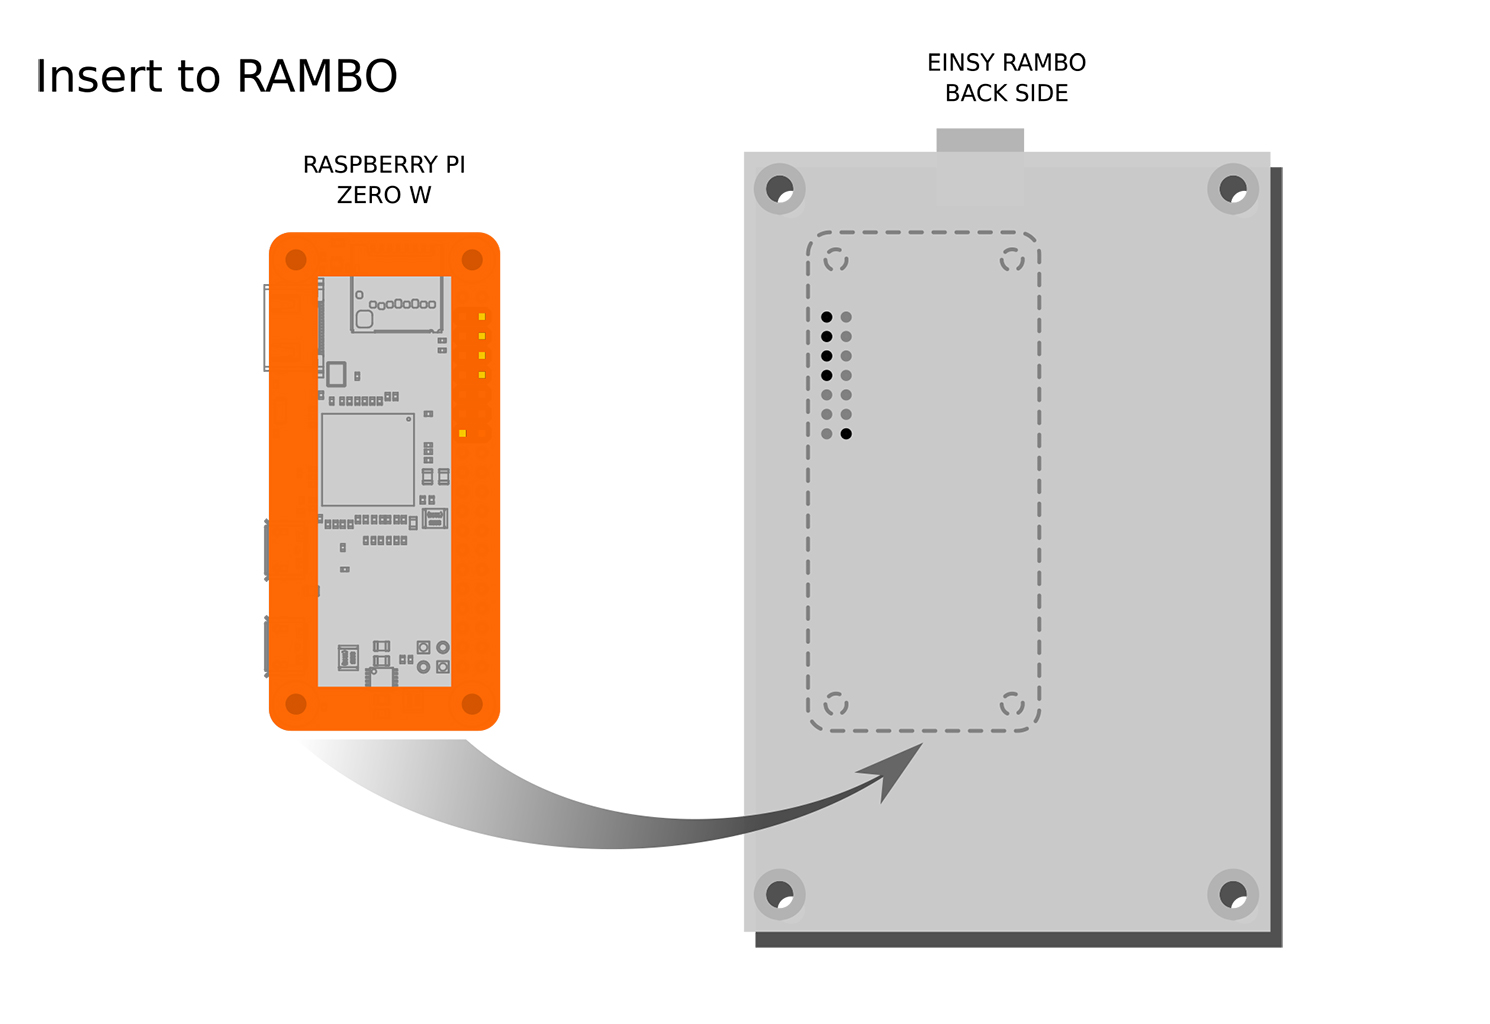
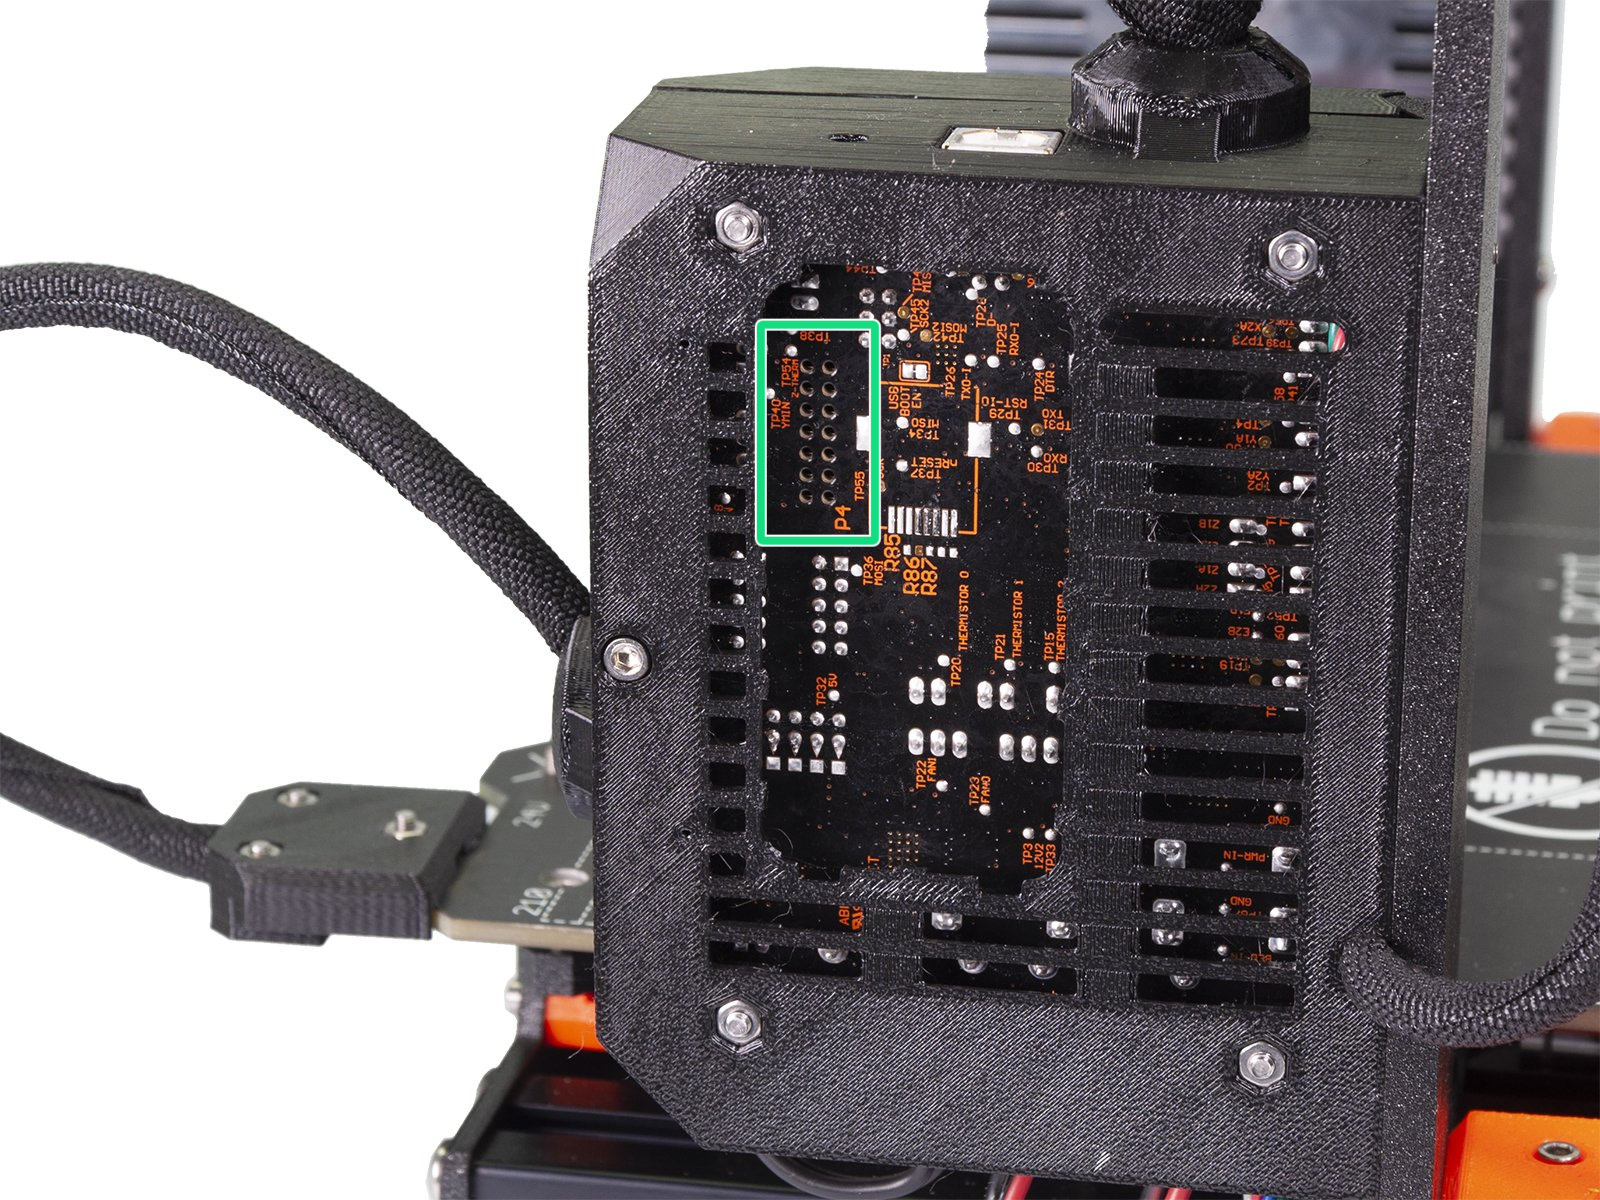
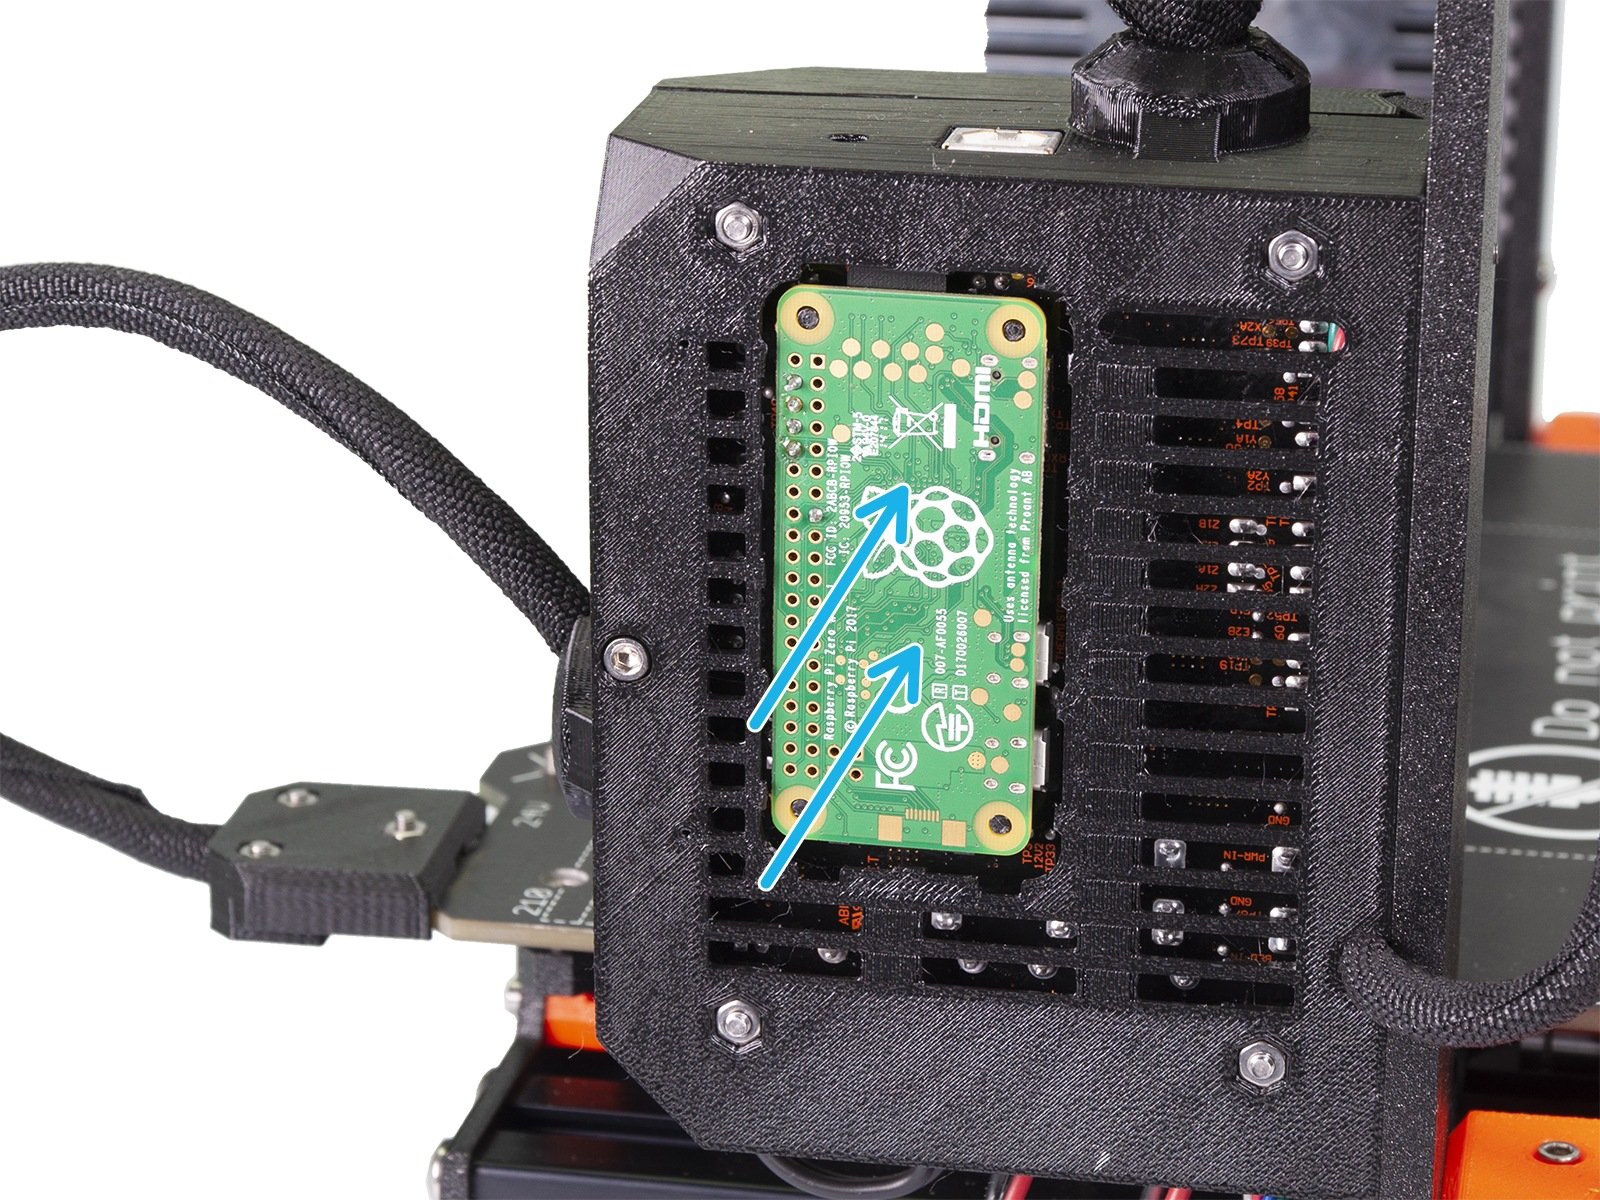
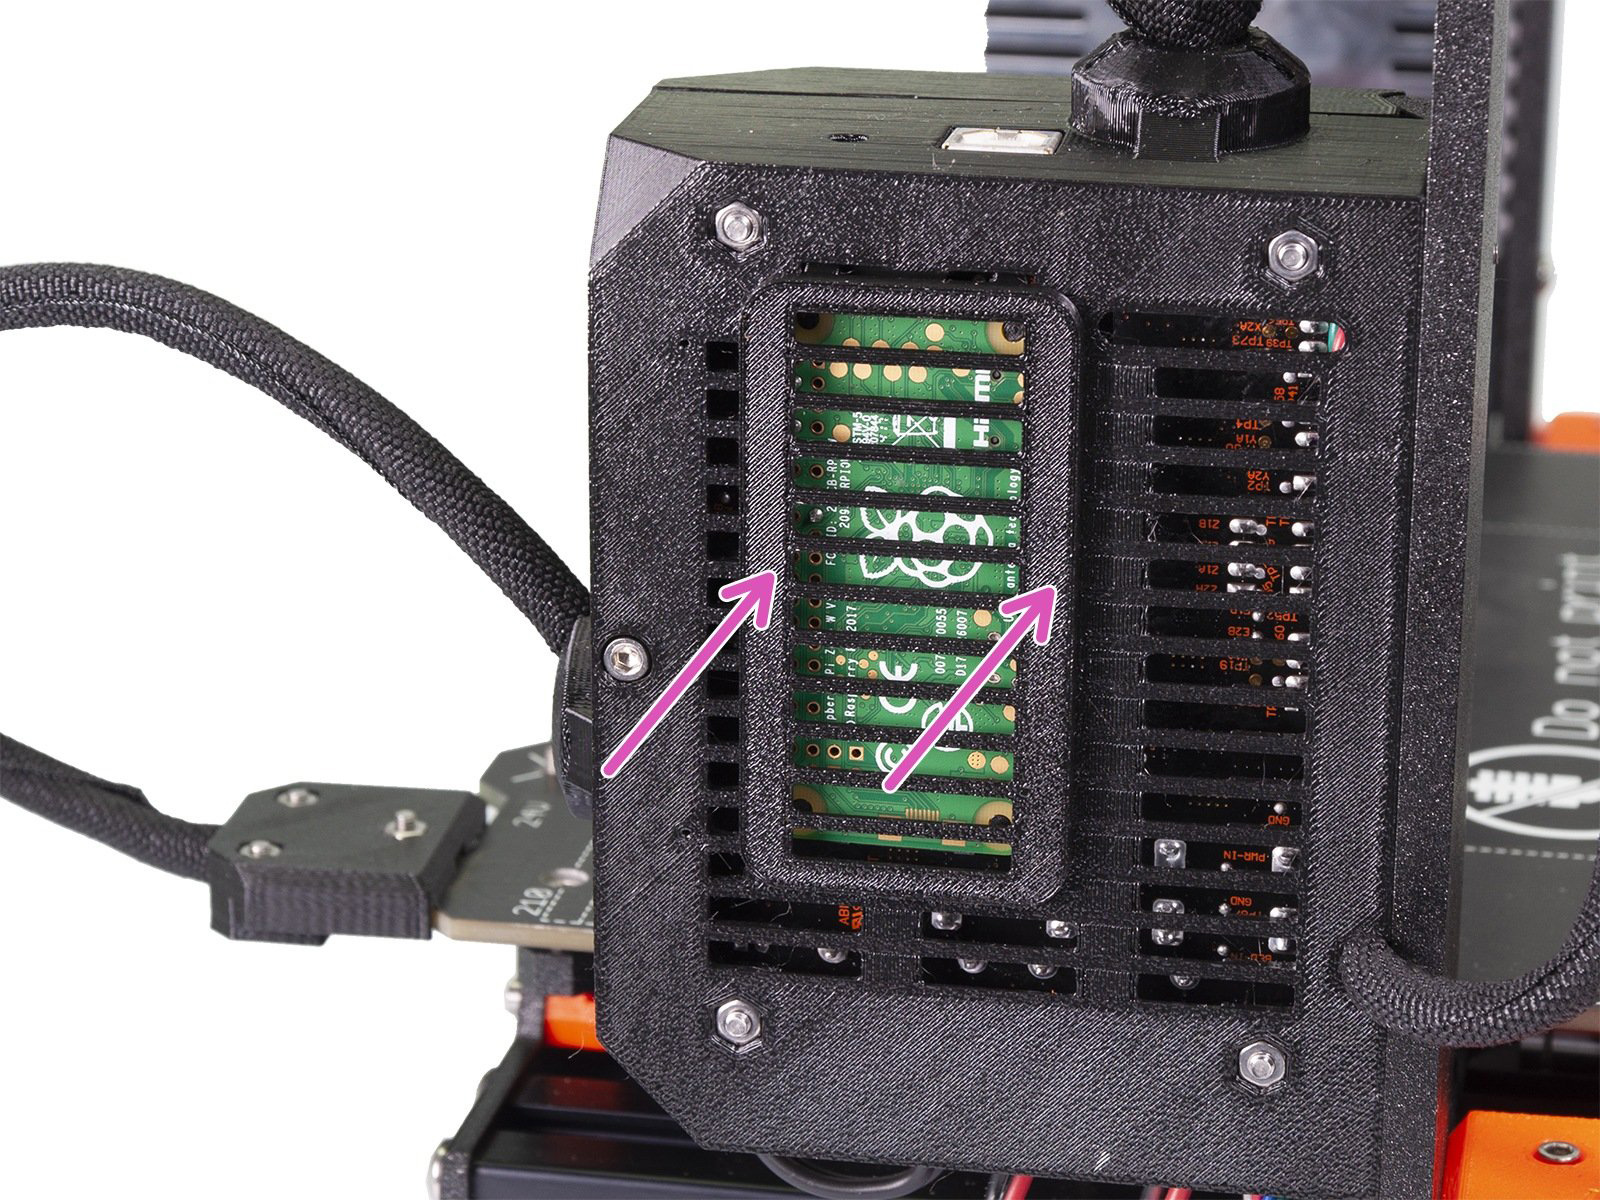
                  1. Slot the RPi Zero, with its frame, into the connector holes indicated below (green square). Then fit the cover to protect the RPi Zero W (purple arrows).
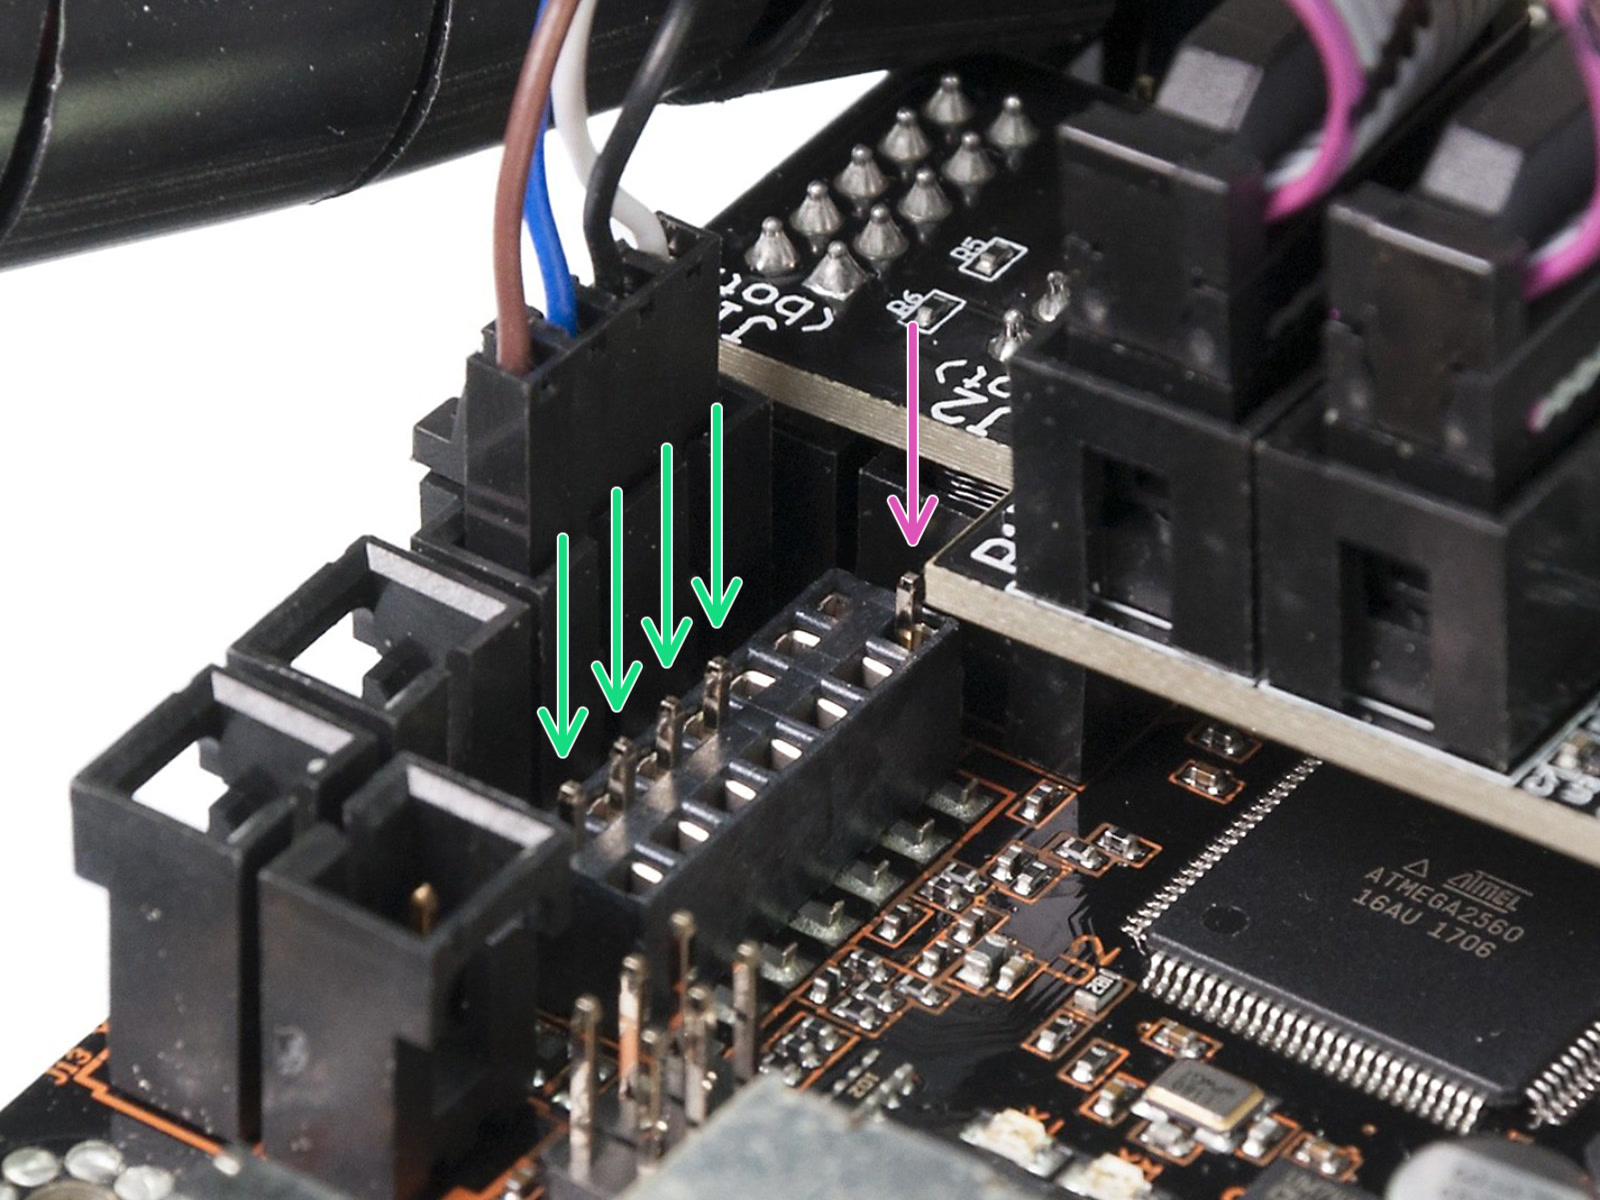
                  1. Make sure the RPi Zero is properly installed by inspecting the connector on the other side of the Einsy Rambo (green arrows). Notice that the position of the support pin is in the corner (purple arrow).

                  Checking if the RPi works

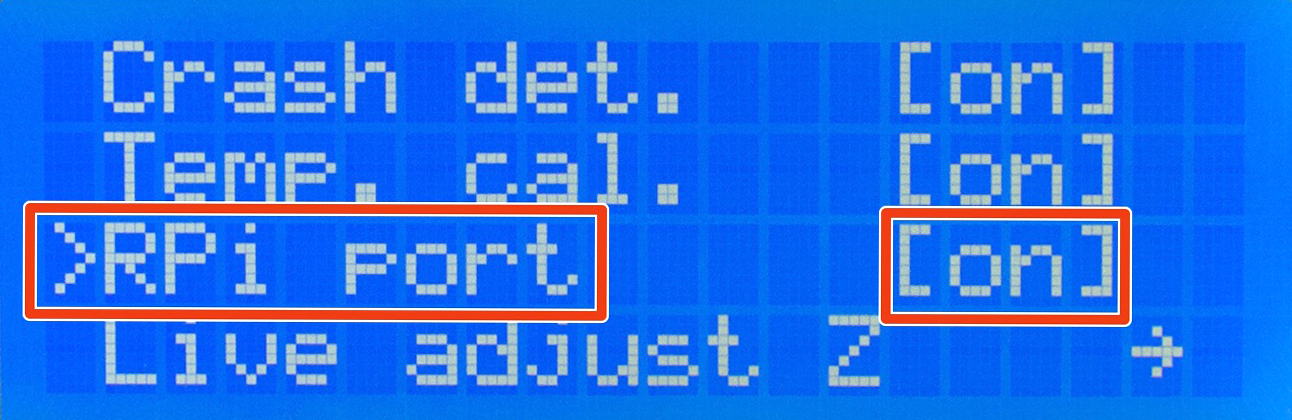
                  Go to the printer's LCD menu -> Settings -> RPi port, and make sure it is set to ON. Return to the printer's home screen. Now, wait for a few minutes. The RPi Zero is not a superfast computer and it needs time to boot.

                  Then open the browser and try opening a website: octopi.local. If octopi.local doesn't work, please use the following steps: Check your router for a new IP address, using an app like Fing, or wait until the address is displayed on the printer's display.

                  As soon as you have the IP, open a web browser on your PC, type it in, and hit Enter. If the Octoprint webpage loads, you can continue.

                  Troubleshooting

                  OctoPrint provided by Prusa Research is tested and is confirmed to be booting correctly. If you can't access the web interface, check the following:

                  • Is the RPi port enabled on your printer?
                  • Did you enter the correct Wi-Fi name (SSID) and password?
                  • Is the RPi Zero W correctly plugged in the EINSY RAMBo board?
                  • Are you connected to the same Wi-Fi network?

                  この記事は役に立ちましたか?
                  この操作は登録ユーザーのみが利用できます。ログインしてください。
                  ログイン してコメントを投稿する
                  コメントなし

                  トピックス

                  • 3rd party accessories [進行中の翻訳]
                    • Octoprint
                      • Octoprintについて
                      • PrusaPrint (Rpi Zero and Octoprint)
                      • Octoprint - オクトプリントの設定とインストール
                    • ノズル
                    • Protective Shields [進行中の翻訳]