EN
  • Čeština
  • Español
  • Italiano
  • Deutsch
  • Polski
  • Français
Login

1. Introduction

1. Introduction
Relevant for:
Last updated 12 days ago
1. Introduction
 Difficulty
Very easy
 Steps
15
 Available languages
CSPLDEESITFR
Enclosure variations info
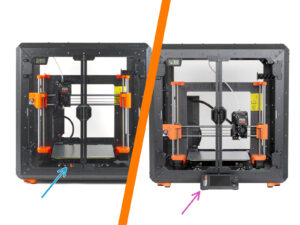
This manual is for the Enclosure with the external printer display mount. Printed parts for external display mounting are no longer included from the end of May 2024). If you purchased before, you can continue with this manual.
If you prefer to keep the display inside (on the printer), refer to the Original Prusa Enclosure (display inside) assembly manual.
Do you want to install the display externally and have a new package without the required parts? You can download and print them.
Required Parts for external display mount:
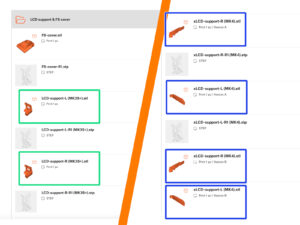
MK3S+: ENCLOSURE LCD SUPPORT LEFT, RIGHT
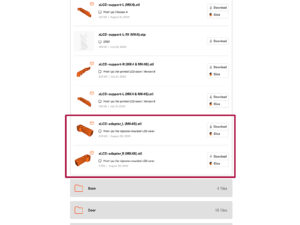
MK4, MK3.9, MK3.5: ENCLOSURE XLCD SUPPORT LEFT, RIGHT - for the MK4, you need to check A or B version according the MK4 assembly manual.
MK4S: xLCD-adapter_R (MK4S), xLCD-adapter_L (MK4S)
Parts files available on Printables.com.
To confirm your package: check the ENCLOSURE 1/2 Plastic Parts package label to see if it includes the ENCLOSURE LCD SUPPORT or ENCLOSURE XLCD SUPPORT parts.
Important information
Important notice: the package contains metal sheet profiles that have sharp edges. Handle the parts very carefully.
If children are involved in assembly, always supervise them to avoid injury.
Tools required for the printer preparation (not included)
The following tools are needed in the next chapter to prepare the printer, some of them were included with the printer:
Needle-nose or cutting pliers (to trim the zip ties)
Phillips screwdriver PH2
Cardboard box at least 15 x 15 x 8 cm (e.g. Prusament box)
Snip-off knife or a pocket knife
Piece of cloth (to protect the heatbed, min. 15 x 15 cm)
3.0mm Allen key (MK3S+ Silver PSU only)
Labels guide
Labels guide
Labels guide
All the boxes and bags including parts for the build are labelled.
The FASTENERS A and FASTENERS B bags include an extra spare of each part contained in the bag. The amount of spare parts is always written on the label under the individual part. This number is included in the total number of each type of part.
The amount of the nylon rivet spare might slightly differ, but never less than the amount indicated on the label.
Use labels for reference
Fasteners on the labels has a scale of 1:1 and can be used to identify parts :-)
The numbers in parentheses below the fastener picture indicate the number of extra pieces added to the SPARE package.
For the most common screws and nuts you can also use the enclosed letter, which contains Prusa Cheatsheet on the other side.
You can download it from our site help.prusa3d.com/cheatsheet. Print it at 100 %, don't rescale it, otherwise, it won't work.
View high resolution images
When you browse the guide on help.prusa3d.com, you can view the original images in high resolution for clarity.
Just hover your cursor over the image and click the Magnifier button ("View original") in the top left corner.
Reward yourself
Reward yourself
Reward yourself
From the experience of building Original Prusa printers, we know that Haribo Bears are an integral and important part of every kit. Although it's not entirely about building a printer now, we've got your safety in mind, and added some amount of gummy bears to your kit as well.
Do not eat the whole bag right at the beginning of the assembly! It is VERY IMPORTANT to distribute the amount correctly during assembly. We tried all sorts of combinations of quantities. Finally, we reached a successful result.
Open the package and arrange the gummy bears according to the picture. Don't eat anything now! Always wait for instructions.
Your package might contain fewer bears. In such a case, run immediately to the nearest candy store! The exact dosage is absolutely critical!!!
Eat the first gummy bear to boost your energy. Really, just one!
How to successfully finish the assembly
For a better handling, it is recommended to prepare a clean workbench with a space of at least 0.8 m x 0.8 m (31.5 in x 31.5 in). With access from two sides or more.
We're recommending a bright light above your workbench. Some parts inside the enclosure are dark and inadequate light could make a very difficult procedure.
Always read all the instructions at the current step first. This will help you to understand, what you need to do. Don't cut or trim unless you are told to!!!
Don't follow pictures only! It is not enough, the written instructions are as brief as they can be. Read them.
Read the comments from the other users. They are a great source of ideas. We read them too and based on your feedback improve the manual and the entire assembly.
Use a reasonable force. The printed parts are tough, but not unbreakable. If it doesn't fit, check your approach twice.
Most important: Enjoy the build, have fun. Cooperate with your kids, friends or partners. However, we take no responsibility for possible fights ;)
Optional parts
Optional parts
Optional parts
We have designed enhancements that are not shipped by default in the kit, but you can print them out and add them to the enclosure during assembly. Fasteners are already included in the kit.
Print out the parts before you start assembly.
To see the full list of the parts, please visit our collection at Printables.com.
Upgraded to MK4/S & MK3.9/S?
If you've upgraded your printer to the MK4/S or MK3.9/S, you'll need to print a pair of xLCD supports for the Enclosure.
First, print the xLCD supports. Then, proceed with the Enclosure assembly.
You can find the xLCD support on our Printables
Note: xLCD supports are available for the xLCD versions A and B, as described in the MK4 upgrade instructions (chapter xLCD assembly). The MK3.9 upgrade includes only version A.
Add-ons
Add-ons
If you’ve purchased any of the add-ons together with the enclosure, read all the chapters on the assembly of the enclosure and the specific add-on first. Some steps must be omitted during the enclosure assembly and proceed with the add-on instruction.
Because there can be possibly tens of different add-on combinations, there is no way to navigate you with a specific add-on installation directly from assembling the enclosure.
Spool holder
Spool holder
Spool holder
The instructions in this manual are intended for the original injection molded spool holder ("T" design) shipped with your printer.
If you don't have the injection molded design, print the spool holder from our collection at Printables.com.
Print out the part before you start assembly.
We are here for you!
Lost in the instructions? Missing screw or cracked printed part? Let us know!
You can contact us using following channels:
Using comments under each step.
Using our 24/7 live chat at prusa3d.com
Writing an email to [email protected]
MK3S+ or MK4/S & 3.9/S
Before beginning any partial disassembly of the printer, ensure that you have printed all the necessary parts.
The MK3S+ has two types of the PSU (Power Supply Unit). There are different instructions for each type of the PSU.
Carefully check which type of the PSU you have on the printer and then choose the appropriate instructions:
MK3S+ Black PSU: go to the next chapter 2A. Preparing the printer (MK3S+ Black PSU)
MK3S+ Silver PSU: Before proceeding to the next chapter, print the SILVER-PSU-retainer. Download that part from Printables.com
Go to the next chapter 2B. Preparing the printer (MK3S+ Silver PSU)
Got MK4/S & 3.9/S? Now follow the chapter 2C. Preparing the printer (MK4/S & 3.9/S
Was this guide helpful?

Comments

Still have questions?

Still have questions?

If you have a question about something that isn't covered here, check out our additional resources.
And if that doesn't do the trick, you can send an inquiry to [email protected] or through the button below.

Contact us