Français
Login
Imprimantes 3D
Matériaux
Pièces & accessoires
Pour les Entreprises
Logiciel
Modèles 3D
Communauté
Aide
Cours
Blog
Entreprise
Support
Prusa CORE One+
Kit de conversion de la Prusa CORE One+ (1.00)
7. Bodywork & Electronics | Tools necessary for this chapter
1. Tools necessary for this chapter
Étape 1 sur 44 (Chapitre 10 sur 13)
Contenu
Commentaires
⬢
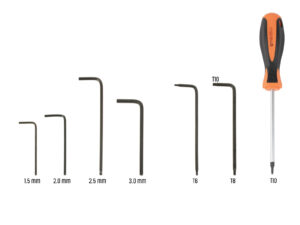
For the following steps, please prepare:
⬢
Clé Allen de 2,5 mm
⬢
Clé Allen de 1,5 mm
⬢
Clé Torx T10
⬢
Pince à bec fin
⬢
Pince coupante (optionnelle)
Loading...
Suivant
Contenu
Kit de conversion de la Prusa CORE One+
1A. Introduction
1B. Inspection de la MK4S
1C. Démontage de l'imprimante
1D. Préparation des composants
2. Assemblage de la base
3. Assemblage de l'arrière
4. Assemblage du plateau chauffant
5. Assemblage du CoreXY
6. Assemblage du Nextruder
7. Bodywork & Electronics [Traduction en cours]
Tools necessary for this chapter
Front profiles: parts preparation
Installing the front right profile
Installing the front left profile
Top profiles: parts preparation
Assembling the top profiles I.
Assembling the top profiles II.
Aligning the top profiles
Installing the top profiles
CoreXY fixing screws: parts preparation
Fixing the CoreXY assembly
Side sensor base: parts preparation
Assembling the side sensor base
Test du levier
Assemblage du commutateur
IR Sensor: parts preparation
Connecting the IR sensor
Installing the IR sensor
Installing the side sensor cover
Side filament sensor: parts preparation
Installing the side filament sensor
Guide the filament sensor cable
Connecting the side filament sensor
NFC Antenna: parts preparation
Applying the adhesive film
Installing the NFC Coil
Connecting the NFC Coil
Vérification du câblage
Preparing the electronics cover
Installing the electronics cover
Remarque sur la caméra Buddy3D
xBuddy cover: parts preparation
Installing the xBuddy cover
Installing the rear cover
Right side: parts preparation
Installing the spoolholder puck
Right handle: parts preparation
Installation du collet
Montage de la poignée
Fixing the right side
Left side: parts preparation
Installing the left side
C'est l'heure des Haribo
Fini
8. Trim, Door & xLCD
9. Calibration & First run
Journal des modifications
Commentaires
Se connecter
pour poster un commentaire
Aucun commentaire