Español
Login
Impresoras 3D
Materiales
Piezas y accesorios
Para Empresas
Software
Modelos 3D
Comunidad
Ayuda
Cursos
Blog
Empresa
Soporte
Prusa CORE One
Kit conversión Prusa CORE One (1.0)
5. CoreXY assembly | Herramientas necesarias para este capitulo
1. Herramientas necesarias para este capitulo
Paso 1 de 82 (Capítulo 8 de 13)
Contenidos
Comentarios
⬢
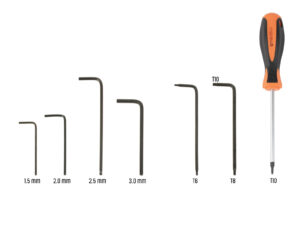
Para este capítulo, prepara por favor:
⬢
Alicates de punta fina
⬢
Llave Allen de 2.0mm
⬢
Llave Allen de 2.5mm
⬢
Llave Torx T10 / Destornillador T10 torx
Loading...
Siguiente
Contenidos
Kit conversión Prusa CORE One
1A. Introducción
1B. Inspección MK4S
1C. Desmontaje de la Impresora
1D. Preparación componentes
2. Montaje de la base
3. Montaje trasera
4. Montaje de la base calefactable
5. Montaje CoreXY
Herramientas necesarias para este capitulo
Soportes varillas: preparación de las piezas
Montando los soportes de las varillas
Preparando los soportes de varilla delanteros
Instalando los soportes de varilla delanteros
Carro XY: preparación de las piezas
Montando los XY-carriages
Montando el soporte lineal izquierdo
Montando el soporte lineal derecho
Fijando los conjuntos de los soportes lineales
INFO varillas lisas
Montando las varillas lisas
Fijando los soportes de varilla traseros
Fijando los soportes de varilla delanteros
Soportes de motores: preparación de las piezas
Soportes de motores: preparación de las piezas
Ensamblando el XY-motor-mount-right I.
Ensamblando el XY-motor-mount-right II.
Ensamblando el XY-motor-mount-left I.
Ensamblando el XY-motor-mount-left II.
Tensores correas: preparación de las piezas I.
Tensores correas: preparación de las piezas II.
Preparando las poleas tensoras
Montando el tensor de la correa izquierdo I.
Montando el tensor de la correa izquierdo II.
Montaje del tensor derecho de la correa
Instalando los tensores de las correas: preparación de las piezas
Instalando el soporte motor izquierdo
Instalando el soporte motor derecho
Instalando el belt-tensioner-left
Instalando el belt-tensioner-right
Guías lineales: preparación de las piezas
Colocando la guía lineal
Fijando la guía lineal
Instalando la guía lineal: preparación de las piezas
Instalando el conjunto de la guía lineal
Guía lineal: retirando los pines de seguridad
Bed-stop: preparación de las piezas
Montando el bed-stop
Montando el bed-stop
Motores X e Y: preparación de las piezas
Instalando la polea del eje X
Instalando la polea del eje Y
Correas XY: preparación de las piezas
INFO correas XY
Guiado de la correa Y: polea motor Y
Asegurando el motor del eje Y
Guiado de la correa Y: soporte motor Y
Guiado correa Y: tensor correa
Guiado de la correa Y: soporte motor X
Guiado de la correa Y: asegurando la correa
Guiado de la correa X: polea motor X
Asegurando el motor del eje X
Guiado de la correa Y: soporte motor X
Guiado correa X: tensor correa
Guiado de la correa X: soporte motor Y
Guiado de la correa X: asegurando la correa
Comprobando el guiado de la correa
Guía bowden: preparación de las piezas
Fijando el soporte del Nextruder
Asegurando el cable del motor Y
Asegurando el cable del motor X
Instalando la guía bowden
Tira LED blanca: preparación de las piezas
Colocando la tira de LEDs Blancos
Instalando el conjunto del LED blanco
Sensor de puerta y tira LED blanca: preparación de las piezas
Inserción de las bridas
Instalando el sensor de la puerta
Asegurando el cable del sensor de la puerta
Guiado de los cables: LED y sensor de puerta
Varillas lisas: preparación de las piezas
Instalación del conjunto CoreXY
Asegurando las varillas lisas
Alineando la guía lineal
Guiando los cables corexy
Guiado de los cables del ventilador de refrigeración
Fijando el bed-stop
Conectando los cables de los ventiladores de refrigeración
Conectando los cables corexy
Momento Haribo
Listo
6. Montaje Nextruder
7. Estructura y Electrónica
8. Embellecedor, Puerta y xLCD
9. Calibración y Primer uso
Lista de cambios del manual
Comentarios
Inicia sesión
para publicar un comentario
Sin comentarios