English
Login
Prusa Research a.s.
Prusa Research a.s.

1. Heatbed cable assembly (part 1)

Step 1 of 25 (Chapter 8 of 11)
Contents
Comments
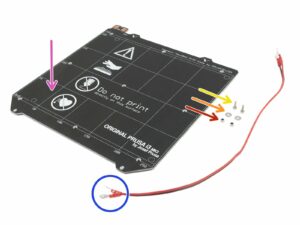
For the following step please prepare:
Heatbed MK52 24V (1x)
Power cable (1x)
M3x10 screw (2x)
M3/3,2/9/0,8 washer (2x)
M3nN nylock nut (2x)
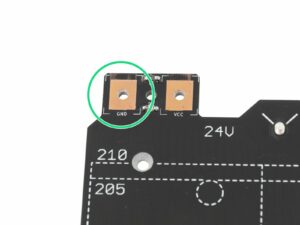
IT IS VERY IMPORTANT to connect the power cable correctly. Before you start the assembly have a look at the pins. The one on the left with "GND" sign must be connected to the BLACK WIRE.
Heatbed cable assembly (part 1)

Comments

Log in  to post a comment
FEW
I now always add strips of 1/2" polyimide tape over the magnets. Avoid putting tape close to the holes, to avoid messing up the standoff heights. The brand name for polyimide tape is 'Kapton' tape; it's the same high temperature yellow tape as is used over the thermistor. After several years of use the adhesive on the magnets can fail, particularly for higher temperature materials like ASA. If the magnet adhesive fails, then the magnets fall out the bottom when the steel sheet is removed. It's really easy to add Kapton tape over the magnets before installing the heated bed. Then the tape will keep the magnet in place even when the steel sheet is removed (the magnets will always hold in place via magnetism once the steel sheet is attached). Kapton tape is the only tape I know that won't degrade at higher temperatures.
Chklnk
I want to encourage everyone to follow FEW's advice.  I am refurbishing a 2017 MK3 and several magnets have fallen off the back of the heatbed. If you see magnets attached to the Y rails or the frame, collect them to reattach later!One long strip of high-temperature Kapton tape will hold down several magnets at once. Just trim it close to the edge so it doesn't stick out the sides. I used a stainless steel alloy razor blade (only weakly attracted to magnets).One WARNING, though: Do NOT scratch the underside of the heatbed - that is the actual heater! Also do not use any kind of metallic tape due to the risk of shorting out the heater. And as FEW said, avoid taping near the 9 mounting holes, so that you don't raise the height of the bed anywhere. If needed, use a fingernail to push the tape away from the holes, or remove and apply a new piece.
alexGS
Wow - look at all those magnets! :o Each one as strong as the big one inside the extruder... this sure beats the fridge-magnet sticker used on other printers!
VINNIE3000
I took the Haribos off of the heatbed, they left a somewhat greasy residue, is that okay? Tried cleaning, looks stained?
David

Hi Vinnie! Try using a dish-soapy water, clean and dry it up ;)

KTB
I'd suggest a note to NOT MESS WITH THE THERMISTOR CABLE TAPED TO THE HEATBEAD. Not everyone will know what that bit is.
aerodynamo
The last message with the green bullet point confuses the hella out of me. Should I be connecting wires on this step? Should they already be connected? What exactly am I verifying?
Ugh, this guide is either perfectly detailed or confusingly bouncing between steps...
vojtz.

It's just a reminder. Keep in mind...

samscowm
I think the green bullet point should be rewritten for clarity. It should probably say: 
 
IT IS VERY IMPORTANT to connect the power cable correctly. Before you start the assembly have a look at the pins. In the next step (Step3), the one on the left with "GND" sign must be connected to the BLACK WIRE.