EN
  • Čeština
  • Español
  • Italiano
  • Deutsch
  • Polski
  • Français
  • 日本語
Login

6. Electronics and MMU2S unit assembly

6. Electronics and MMU2S unit assembly

6. Electronics and MMU2S unit assembly
Relevant for:
Last updated a year ago
6. Electronics and MMU2S unit assembly
 Difficulty
Difficult
 Steps
32
 Available languages
CSPLESDEITFRJA
Tools necessary for this chapter
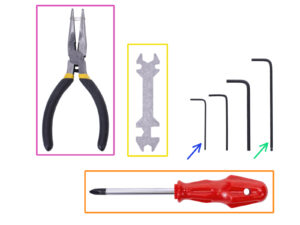
Please prepare tools for this chapter:
2.5mm Allen key for M3 screws
2mm Allen key for nut alignment
Needle-nose pliers for zip tie trimming
Philips screw-driver for power cable assembly
Universal wrench to tighten the QSM fittings
Older units may include a side wrench 8 mm.
Electronics assembly
Insert three M3n nuts in the ele-cover. Use a flat surface to push them in if necessary.
Slide in the MMU2S control board. Make sure the three buttons are all the way through on the other side.
Secure the board with three M3x6 screws. Tighten carefully.
Tip: If you can't press the nuts in, use a M3x6 screw to pull the nuts in before you slide in the board.
Cables preparation
Cables preparation
Cables preparation
Cables preparation
For the following steps, please prepare:
Power cable for the MK3S/+ (1x)

OR
Power cable for the MK2.5S (1x)
Use the correct power cable for your printer type!
Signal cable (1x)
Note the signal cable has two different connectors! One is smooth without safety latch and the other one has a latch. Use the latch for the MMU2S board.
Connecting the cables
Prepare the MMU2S unit and the board assembly as in the picture. Follow the cables to connect them correctly. Start from the left:
Signal cable (use side with safety latch)
Power cable
SuperFINDA sensor cable
Pulley motor cable
Selector motor cable
Idler motor cable
Cable management (part 1)
Prepare the MMU2S unit and the electronics assembly like in the picture. Position the side with two motors to the left and signal cable to the left as well.
Place the electronics on the MMU2S unit. The connectors must be facing towards you.
Secure the electronics assembly with two M3x18 screws.
Cable management (part 2)
Make sure the selector with SuperFINDA is all the way to the side as in the picture!
We will do the cable management starting from the SuperFINDA sensor and proceed counter-clockwise. Note the arrows.
Tighten the cables firmly, but gently at the same time. You can damage (break) the wires.
Carefully guide the cable from the SuperFINDA sensor and couple it with the cable from the Selector motor. Use the first zip tie.
Continue with the cable bundle and add the Pulley motor cable. Tighten these three cables using a second zip tie near the edge of the printed part (idler-body).
Cable management (part 3)
Take the signal and power cable (first two from the left). Bundle them together and wrap around 10 cm (3.94 inch) in the textile sleeve.
Slide the sleeve towards the MMU2S unit as much as the cable allows.
Take the bundle from the motors and SuperFINDA add the textile sleeve above it, and tighten it using the third zip tie.
Finish wrapping the cables in the textile sleeve.
Cable management (part 4)
Now using the left hand take the cable from the Idler motor and pull it gently to the left.
Using the right hand take the cable from SuperFINDA sensor (black) and pull it gently to the right.
Use the fourth zip tie and bundle all the cables together.
Final cable management should be similar to the last picture.
Note: for the MK2.5S, there will be different connectors at the end of the cable bundle.
PTFE tubes parts preparation
For the following steps, please prepare:
mmu2-rear-PTFE-holder (1x)
M3x18 screw (4x)
M3n nut (4x)
PTFE tube 4x2x650 (5x)
PTFE tubes are installed as the last item to avoid damage to them. Be careful during the assembly ;)
PTFE tubes assembly (part 1)
Carefully turn the entire MMU2S unit upside-down.
Slide in the M3n nuts. Use a M3x18 screw to press them in. Use your hand, hammer shouldn't be necessary.
The hole for each nut is slightly narrower on the other end, therefore the nut should have a snug fit.
PTFE tubes assembly (part 2)
Take the first PTFE tube and slide it inside the MMU2S unit. All five tubes are bent in one direction, make sure the free end is now pointing up.
There is a circular hole for each PTFE tube, you should be able to press at least 0.5 to 1 mm (0.02 - 0.04 inch) of the tube inside the hole.
Continue by pressing in remaining four PTFE tubes.
PTFE tubes assembly (part 3)
Place the rear-PTFE-holder on the top of the PTFE tubes. Notice the printed part has thicker side, which must be facing out.
Secure the rear-PTFE holder using four M3x18 screws. Tighten the screws fully only after you ensure proper alignment of the printed part! Otherwise, you risk squishing the tubes and future filament jams.
Frame holder parts preparation
For the following steps, please prepare:
mmu2-frame-holder (2x)
M3x12 screw (4x)
Be extra careful with the holders from now on. If you break them, you won't be able to mount the MMU2S unit on the frame.
Frame holder assembly
While the MMU2S unit is turned upside down, be EXTRA careful with the SuperFINDA cable, which can get broken, if you tilt the unit on the SuperFINDA sensor.
Turn the MMU2S unit upside down like in the first picture. Locate the four holes for the M3 screws. Make sure there are nuts in them.
Place both frame-holder parts on the MMU2S unit. The longest inclined part should be in the direction of the PTFE tubes.
Ensure once again the correct orientation of the frame holders.
Secure the holders using four M3x12 screws.
MMU2S unit is finished!
Great job, the MMU2S unit is finished!
Compare the picture to your assembly.
DO NOT ATTACH the MMU2S unit onto the printer FRAME yet!!! Wait for the instructions.
PTFE tube parts preparation
For the following step, please prepare:
PTFE tube 4x2x360 (1x)
Fitting QSM-M5 (2x)
Note this tube, can be also white. The dimensions and properties are the same.
PTFE tube assembly
PTFE tube assembly
Take one QSM-M5 fitting and slide the PTFE tube inside. You should feel the tube snapped in.
Repeat this procedure on the other end.
As an alternative, you can first screw the fittings in the printer and then slide the tube in.
Assembling the MMU2S unit (part 1)
For the following steps, please prepare:
Original Prusa i3 MK3S/+ or MK2.5S printer
MMU2S unit
PTFE tube
8mm wrench
Before you plug in the MMU2S unit to the printer, please make sure the printer is TURNED OFF!
Assembling the MMU2S unit (part 2)
The MMU2S unit should be placed in the middle on the top part of the aluminium frame (next to the Prusa logo).
Place the unit on the frame, do not try to fix it for now.
Look from behind the printer, there are "clamps" on the MMU2S unit, which must be snapped (locked) to the frame. Don't do it now, wait for the next step!
Assembling the MMU2S unit (part 3)
Make sure once more the unit is in the middle of the frame, once we engage the clamps, you won't be able to move it!
Using both hands, apply equal pressure along the top part of the MMU2S unit. Press downwards and slightly towards the frame. Press until the clamps lock to the frame.
Check on the front side of the frame, both clamps of the holder are fully engaged.
That's it for the MMU2S unit ;)
Connecting the extruder and MMU2S unit
Take the PTFE tube you prepared earlier and connect it to the extruder. Both ends of the tube are the same. Use fingers to tighten the thread.
Take the second end of the tube and connect it to the MMU2S unit. Tighten the fitting using fingers.
Check both fittings on the tube are perpendicular to the surface of the extruder and the MMU2S unit. Make sure the tube is not distorted or twisted.
Tighten both fittings using the 8mm cutout of the wrench, be very careful when tightening, don't use an excessive force!
Connecting the electronics
WARNING: we need to cut part of the plastic. Make sure you wear protective eyewear!
Release and remove the M3x10 screw in the upper hinge. Then remove the hinge and the door.
Using pliers carefully cut the corner of the door. We need to create a space for the MMU2S unit cable bundle.
Comparison between the trimmed door (left) and the original shape (right).
Connecting the electronics
Place the door back.
Insert back the hinge.
Tighten the M3x10 screw.
Insert the cable bundle from the MMU2S unit.
Place back the clip and tighten it.
Attach the extruder cable bundle to the hooks on the inside of the Einsy-base by using two zip-ties.
Now, let's connect the cables to the board. Select the next steps based on the printer that you have.
Connecting the extruder MK3S/+ (optional)
Connections differ depending on the printer you have. For the MK3S/+, please use this step. For the MK2.5S please skip to the following one.
Follow the diagram in case you need to reconnect the extruder cables into the Einsy Rambo board.
In case you upgraded from the MK3 printer, you have to reconnect the entire extruder cable bundle.
Connecting the electronics MK3S/+
Connecting MMU2S unit to the printer differs depending on the printer you have. For the MK3S/+, please use this step. For the MK2.5S please skip to the next.
MMU2S Signal cable (upper row of the pins, brown wire in the connector facing left)
IR filament sensor cable (white wire facing left)
Make sure the signal cable is properly connected to all pins!
Power cable (add it to the first two clamps from the left, leave the PSU cables connected). Red wire is positive and in the first slot, black wire is negative and in the second.
The power cable connector "fork" has bended ends, make sure they point up, see the picture.
Make sure the power cables are tightened firmly!
Use the Philips screw-driver to release the screws on the EINSY Rambo board.
Connecting the electronics MK2.5S
This step is for the MK2.5S owners, in case you have MK3S/+, please skip the following two steps.
Signal cable (upper row of the pins, brown wire in the connector facing left)
IR-sensor cable (white wire facing to the left)
Make sure the signal cable is connected to all pins! You can use the filament sensor connector to verify the alignment.
Follow the cables from the PSU and unplug one connector from the RAMBo board (both are the same).
Connect the PSU cable to the power cable from the MMU2S unit. See the picture and ensure the connector is all the way in.
Plug the power cable from the MMU2S unit to the board, where the PSU cable was plugged previously.
Make sure the power cables are connected firmly!
Connecting the electronics MK2.5S (optional)
In case you upgraded from MK2.5 printer, you have to reconnect the entire extruder:
P.I.N.D.A. probe (v-cable, 4 wires)
Left hotend fan (v-cable, 3 wires)
Extruder motor (yellow label with "E")
Extruder heater
Extruder thermistor (yellow/green heat shrink, orientation does not matter)
Front print fan (red heat shrink, ensure that the red wire is closer to the extruder thermistor connector)
It's Haribo time!
It's Haribo time!
Your sweets are well deserved, this was a tough part!
Electronics assembly is the last chapter with high level of difficulty, consume 25 %.
Was this guide helpful?

Comments

Still have questions?

Still have questions?

If you have a question about something that isn't covered here, check out our additional resources.
And if that doesn't do the trick, you can send an inquiry to [email protected] or through the button below.

Contact us