Deutsch
Login
3D-Drucker
Materialien
Teile & Zubehör
Für Unternehmen
Software
3D Modelle
Community
Hilfe
Kurse
Blog
Unternehmen
Support
Prusa CORE One+
Prusa CORE One+ Umrüstsatz (1.00)
7. Bodywork & Electronics | Benötigte Werkzeuge für dieses Kapitel
1. Benötigte Werkzeuge für dieses Kapitel
Schritt 1 von 44 (Kapitel 10 von 13)
Inhalt
Kommentare
⬢
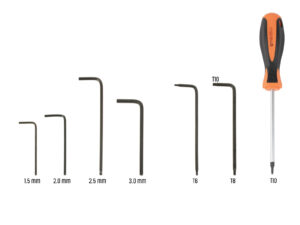
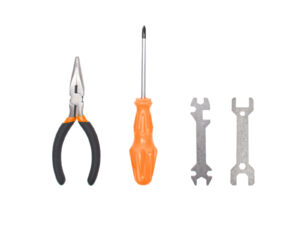
Bereiten Sie bitte für die folgenden Schritte vor:
⬢
2,5mm Innensechskantschlüssel
⬢
1,5mm Innensechskantschlüssel
⬢
T10 Innensechsrund Schlüssel
⬢
Spitzzange
⬢
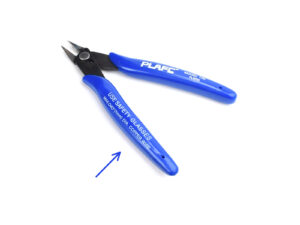
Seitenschneider (optional)
Loading...
Weiter
Inhalt
Prusa CORE One+ Umrüstsatz
1A. Einleitung
1B. MK4S Inspektion
1C. Demontage des Druckers
1D. Komponenten Vorbereitung
2. Zusammenbau der Basis
3. Rückseite Montage
4. Zusammenbau des Heizbetts
5. CoreXY Montage
6. Zusammenbau des Nextruders
7. Gehäuse und Elektronik
Benötigte Werkzeuge für dieses Kapitel
Vorderprofile: Vorbereitung der Teile
Installieren des rechten vorderen Profils
Installieren des linken vorderen Profils
Obere Profile: Vorbereitung der Teile
Montage der oberen Profile I.
Montage der oberen Profile II.
Ausrichten der oberen Profile
Installieren der oberen Profile
CoreXY Befestigungsschrauben: Vorbereitung der Teile
Befestigen der CoreXY-Baugruppe
Seitensensor-Basis: Vorbereitung der Teile
Montage der seitlichen Sensorbasis
Testen des Hebels
Zusammenbauen des Schalters
IR Sensor: Vorbereitung der Teile
Anschließen des IR-Sensors
Installieren des IR-Sensors
Installation der Seitensensorabdeckung
Seiten-Filament-Sensor: Vorbereitung der Teile
Installation des Seiten-Filament-Sensors
Führen des Filament-Sensorkabels
Anschließen des seitlichen Filament-Sensors
NFC-Antenne: Vorbereitung der Teile
Anbringen der Klebefolie
Installieren der NFC-Spule
Anschließen der NFC-Spule
Verdrahtung prüfen
Vorbereiten der Elektronik-Abdeckung
Installieren der Elektronik-Abdeckung
Buddy3D Kamera Hinweis
xBuddy cover: Vorbereitung der Teile
Installieren der xBuddy Abdeckung
Installieren der hinteren Abdeckung
Rechte Seite: Vorbereitung der Teile
Installieren des Spulenhalter-puck
Rechter Griff: Vorbereitung der Teile
Einbau der Spannzange
Montieren des Griffs
Befestigung der rechten Seite
Linke Seitenwand: Vorbereitung der Teile
Einbau der linken Seite
Haribo Zeit!
Abgeschlossen
8. Verkleidung, Tür & xLCD
9. Kalibrierung & Erster Lauf
Änderungsprotokoll der Anleitung
Kommentare
Einloggen
um einen Kommentar zu schreiben
Keine Kommentare