EasyPrint ist ein Cloud-basiertes Slicing-Dienstprogramm, mit dem Sie schnell ein Modell für den 3D-Druck von Ihrem Telefon, Tablet oder Computer vorbereiten und es über Prusa Connect an Ihren Drucker senden können. Es ist kostenlos auf der Printables-Website und in der Prusa App verfügbar.
Im Gegensatz zum leistungsstarken, aber komplexen PrusaSlicer ist EasyPrint von vornherein in seinem Umfang begrenzt. Der Benutzer muss nur einige wenige wichtige Einstellungen vornehmen, wie z. B. die Voreinstellung der Druckqualität und das Filamentmaterial. Alle anderen Einstellungen nimmt die Anwendung automatisch vor. Der grundlegende Arbeitsablauf wird im Folgenden beschrieben.
Technisch gesehen ist EasyPrint nur ein vereinfachtes Front-End für PrusaSlicer, das auf unseren Servern installiert ist und das eigentliche Slicing übernimmt. Sie können Ihre Projektdatei auch von EasyPrint als 3MF-Datei herunterladen und sie auf Ihrem Computer in PrusaSlicer öffnen. Auf diese Weise können Sie bei Bedarf eine Feinabstimmung der Einstellungen vornehmen oder das Projekt zur späteren Verwendung speichern.
Die Screenshots unten zeigen EasyPrint hauptsächlich auf einem Computer im Breitbildformat. Auf einem Tablet oder Smartphone ist das Layout etwas anders, um dem kleineren Bildschirm gerecht zu werden, aber die Gesamtfunktionalität ist die gleiche. Der Zugriff auf alle Funktionen erfolgt ausschließlich über die Touch-Steuerung.
Zugang zu EasyPrint
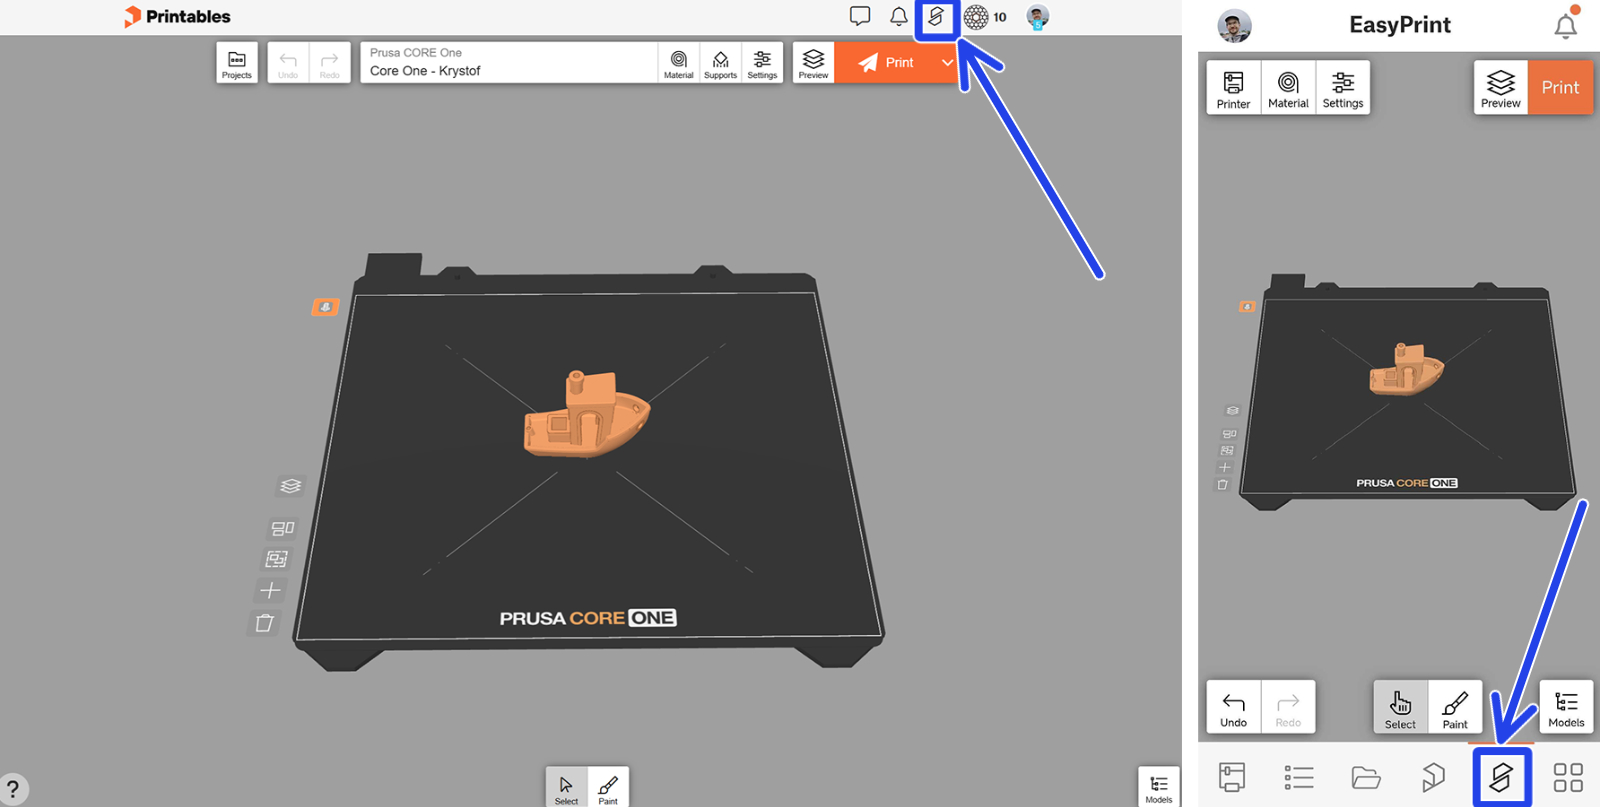
Klicken Sie beim Durchsuchen von Printables auf die Schaltfläche EasyPrint im oberen Menü, um die EasyPrint-Schnittstelle zu öffnen. Innerhalb der Prusa App befindet sich diese Schaltfläche im unteren Menü.
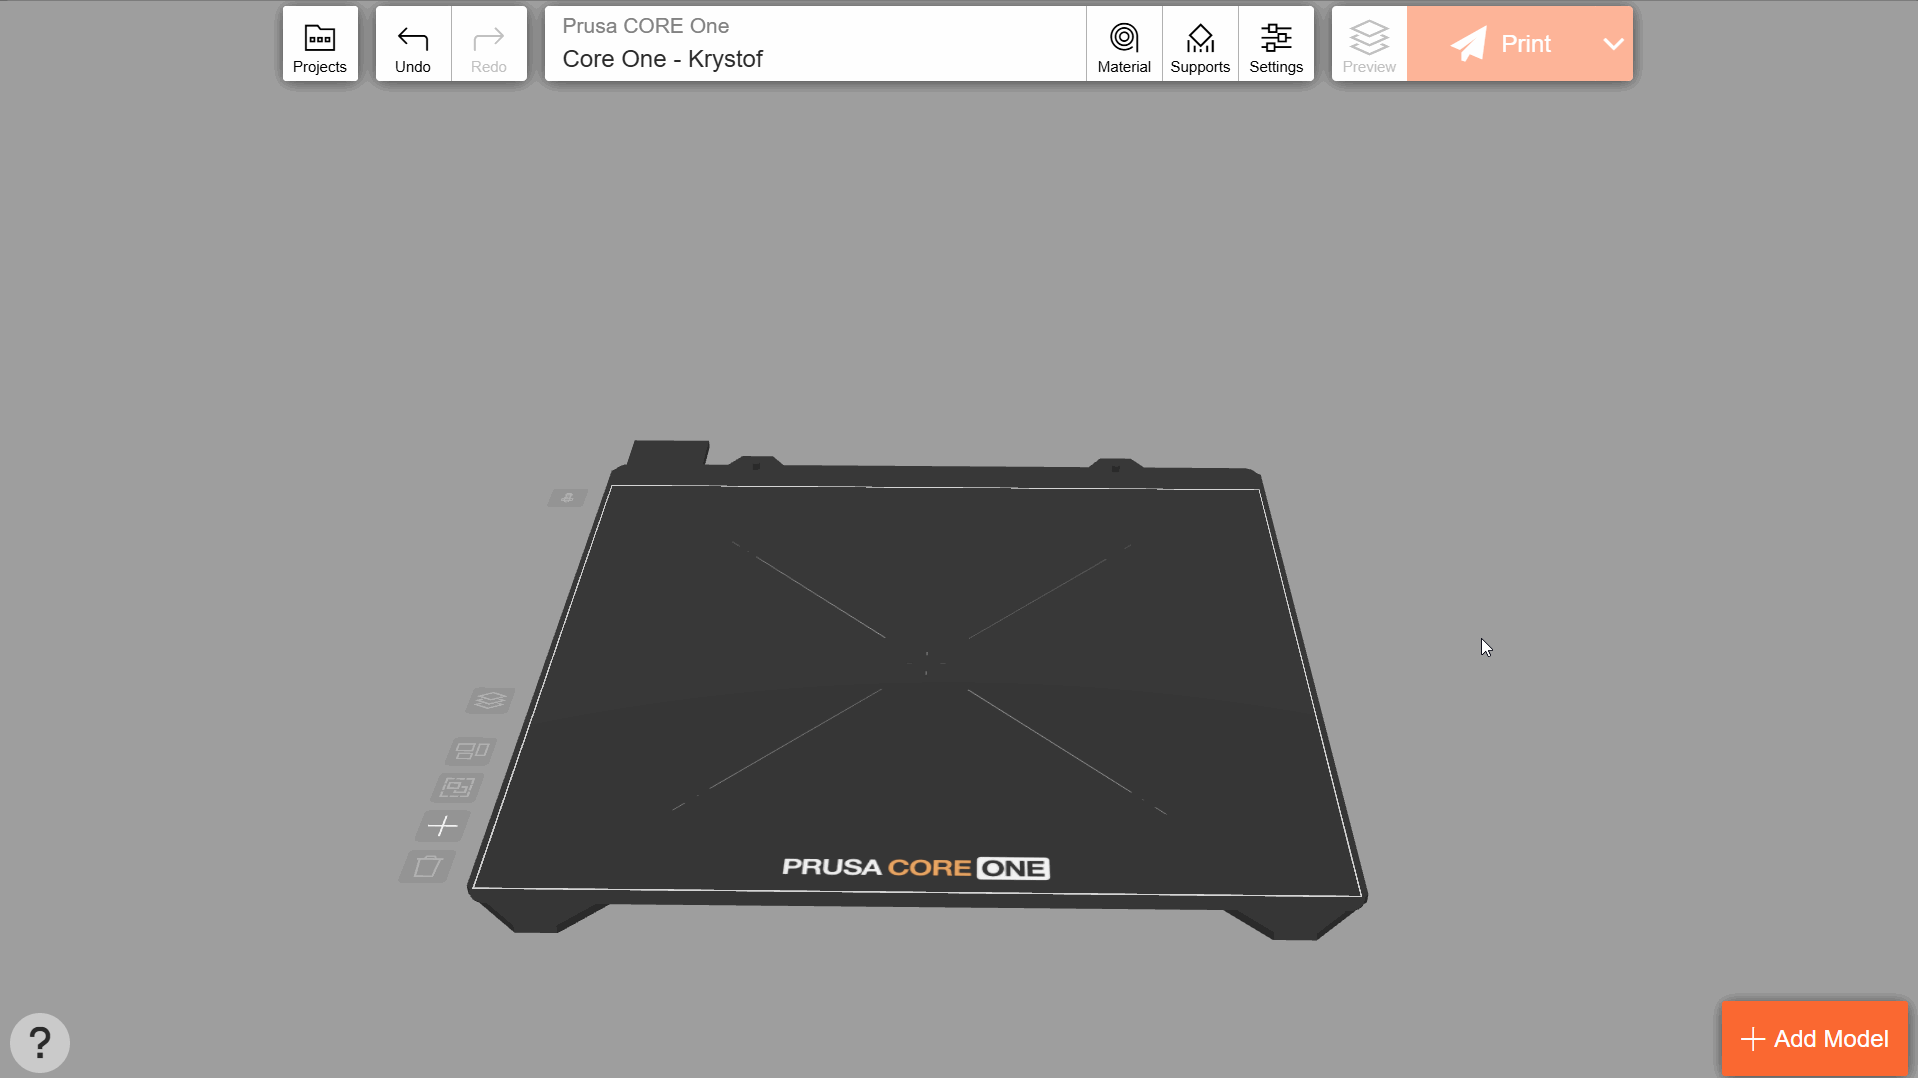
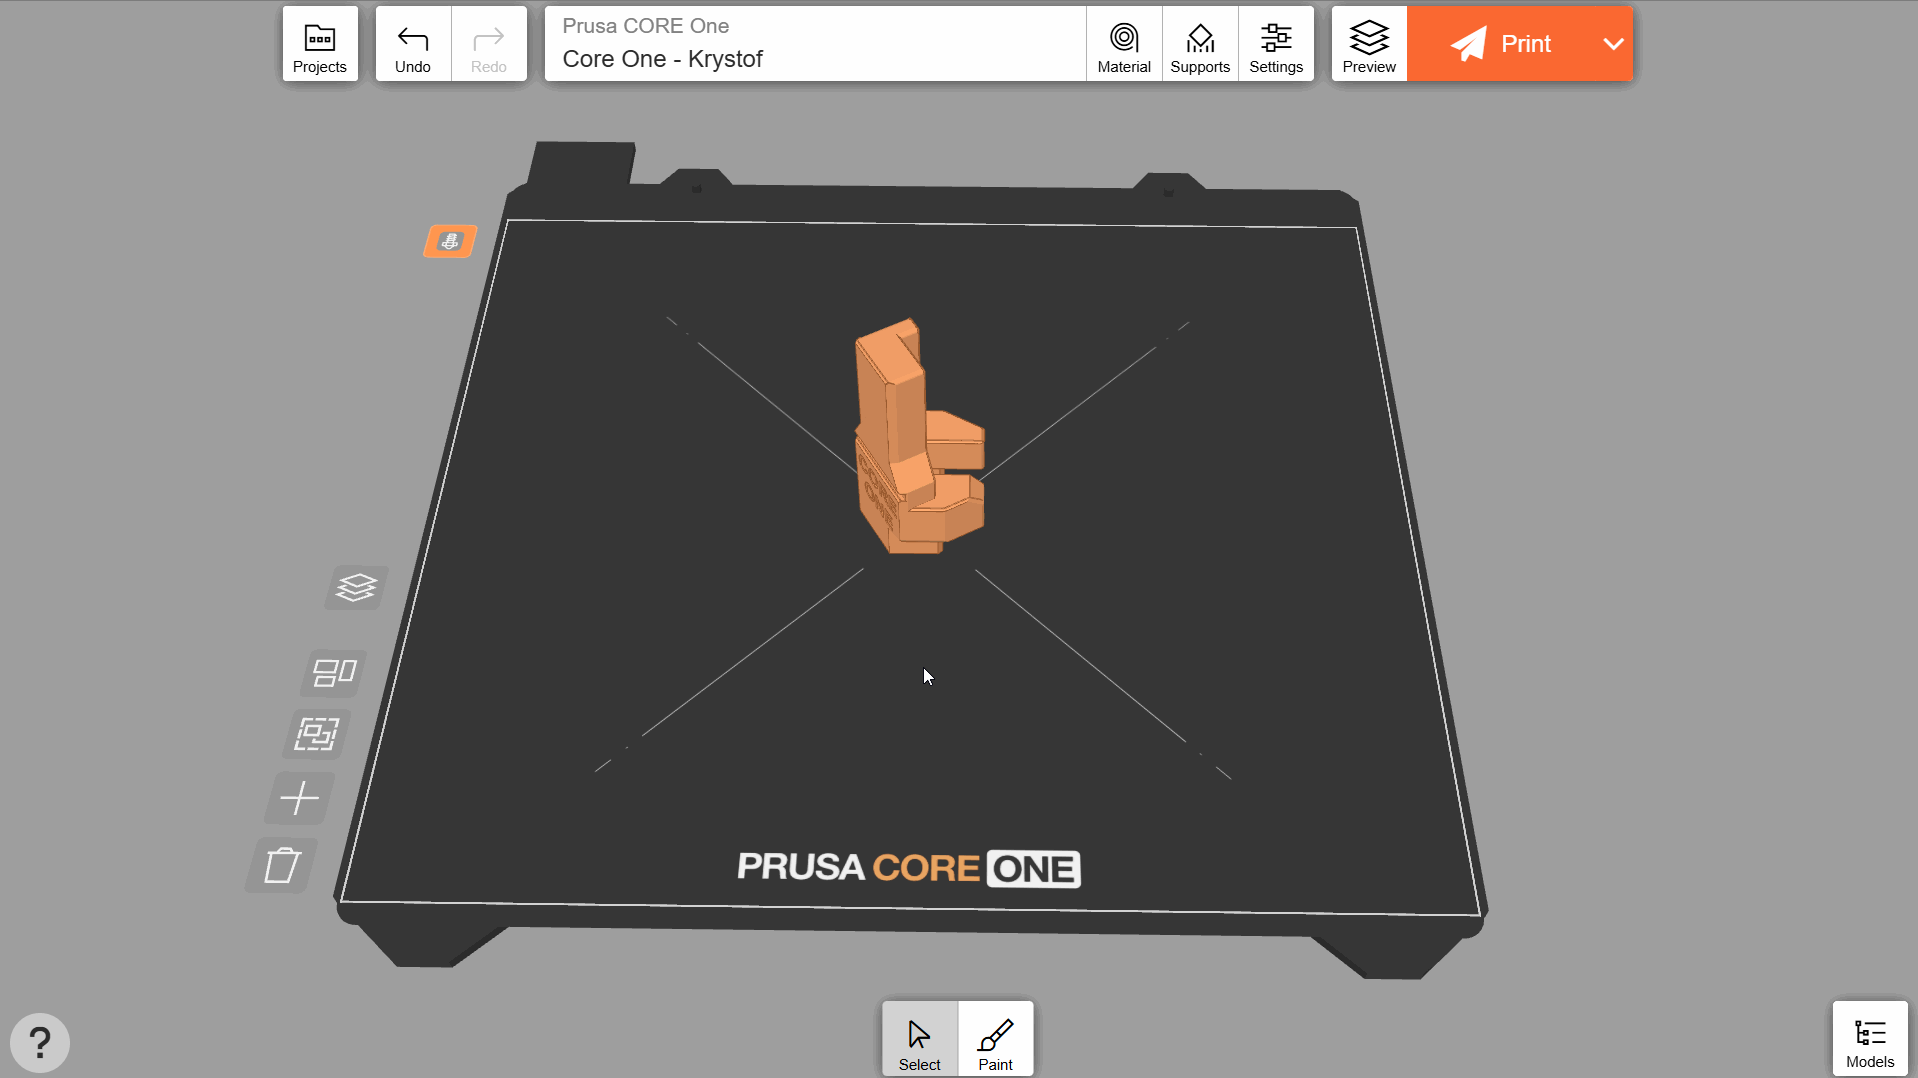
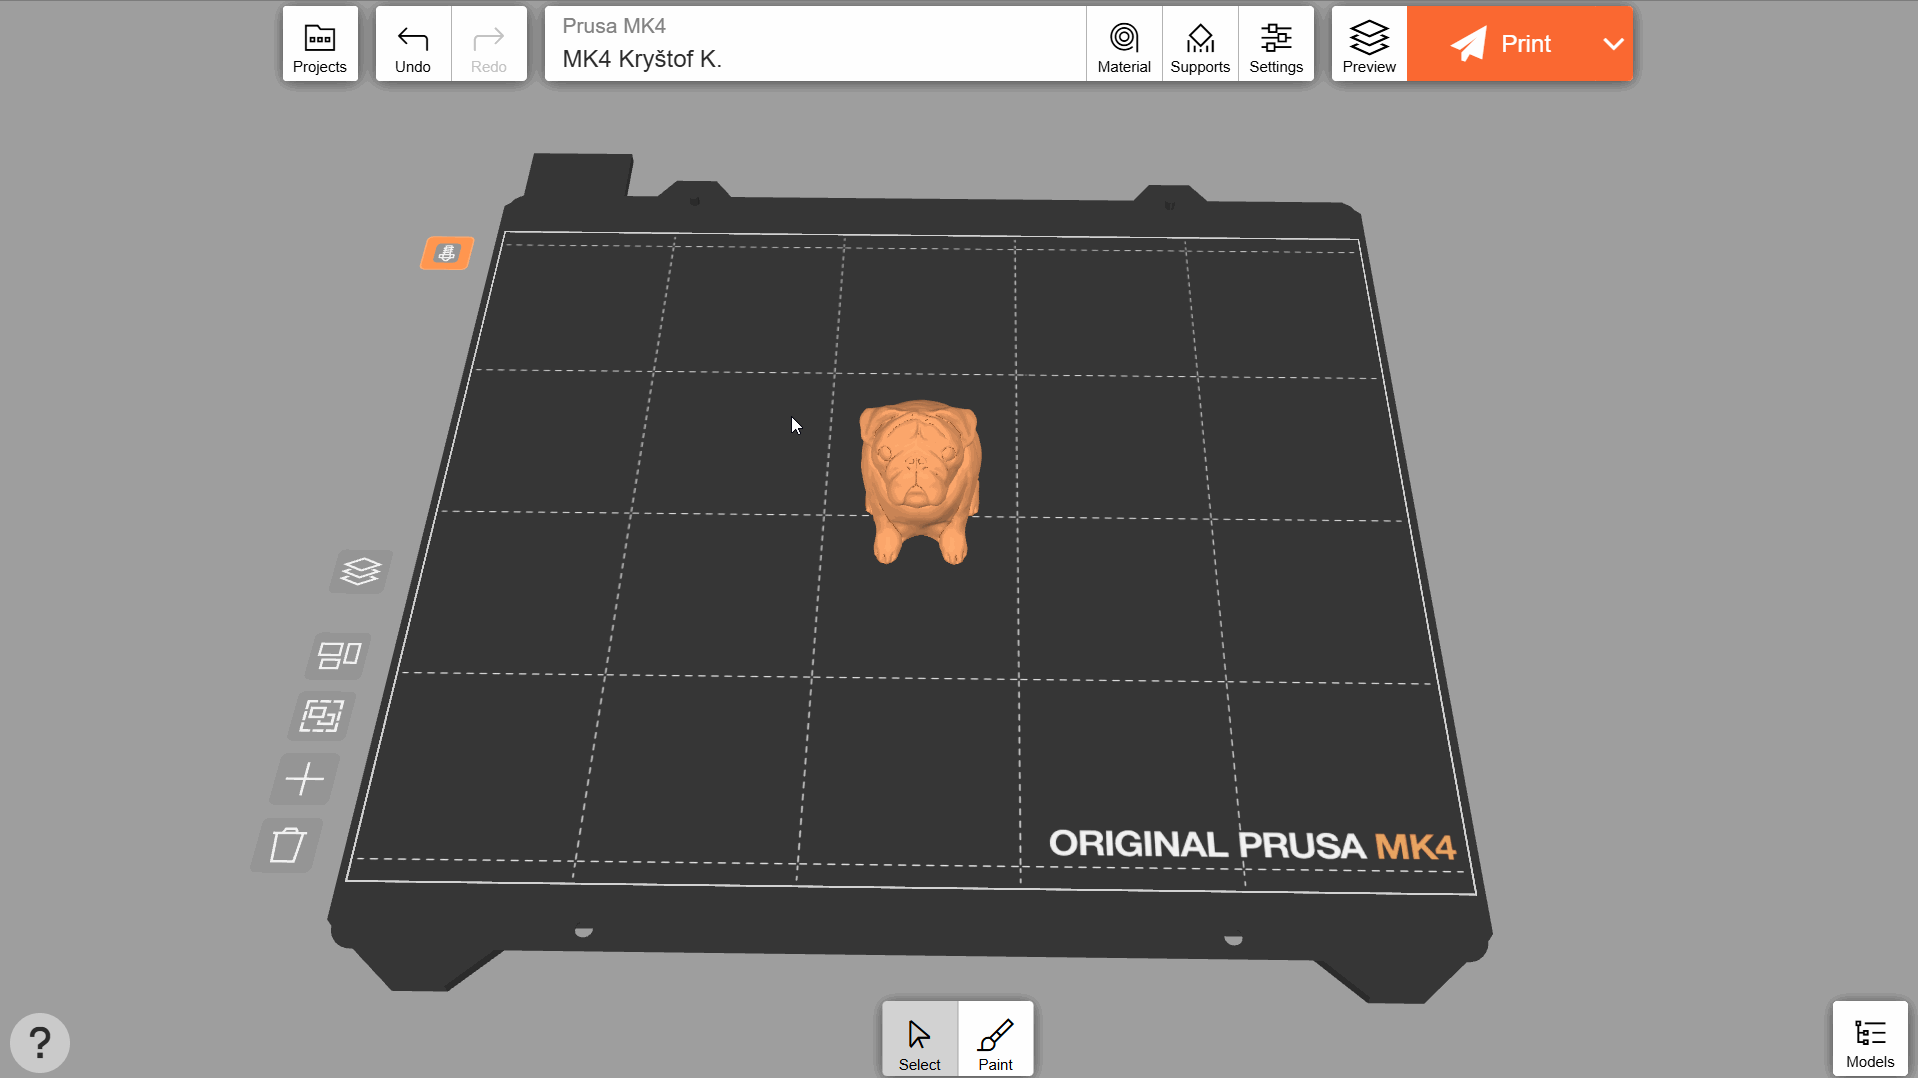
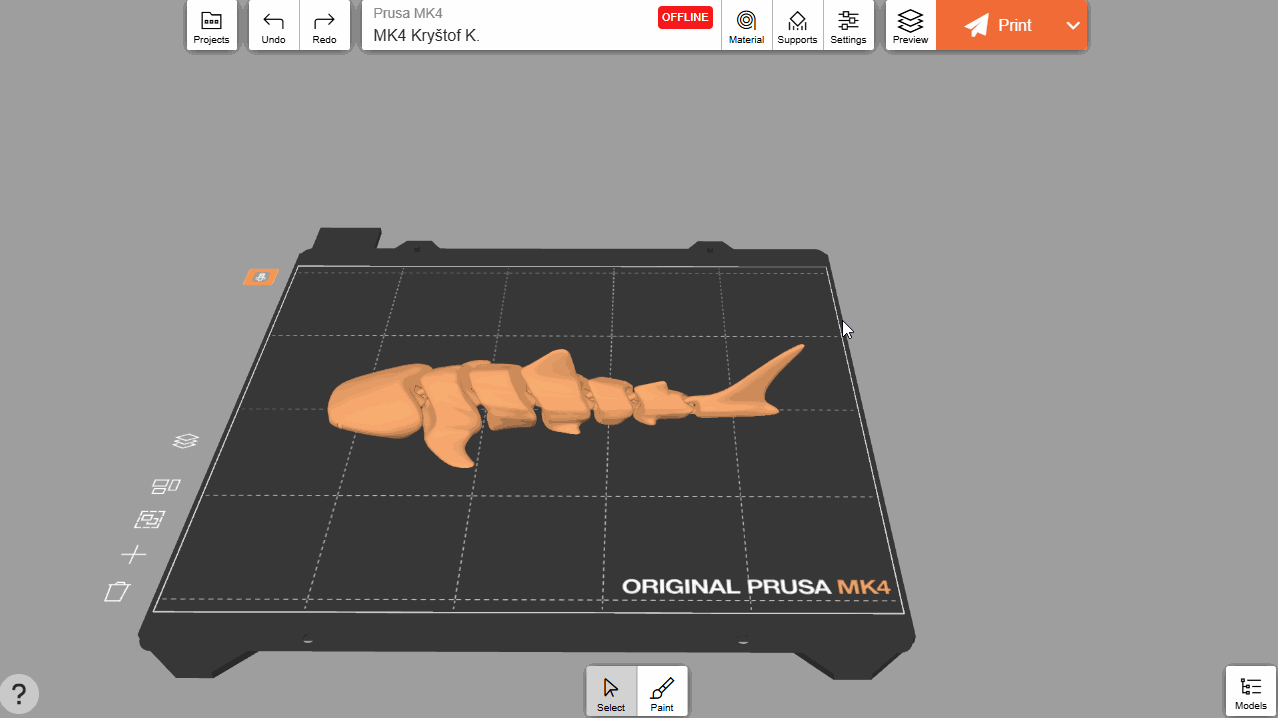
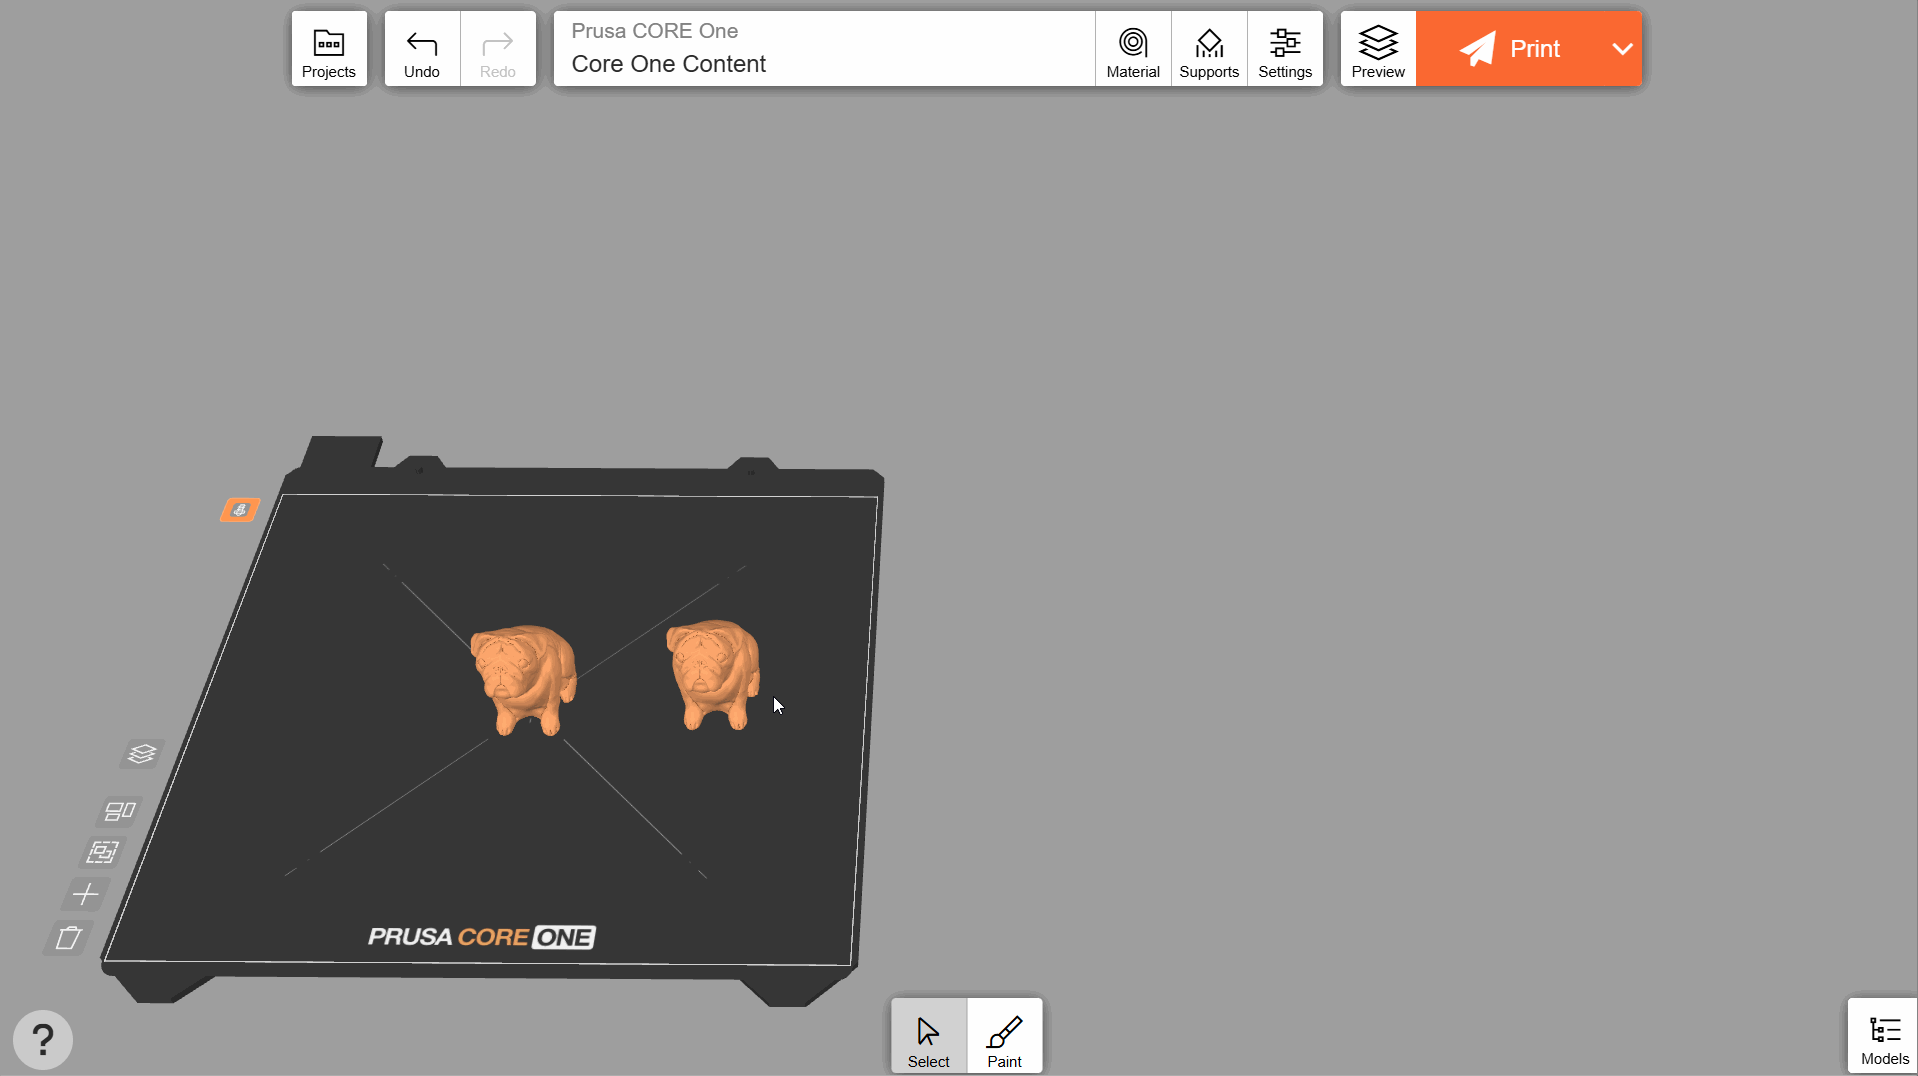
Die EasyPrint-Basisoberfläche enthält alle notwendigen Werkzeuge.
- Die Registerkarte „Projekte“;
- Schaltflächen „Rückgängig“ (undo) und „Wiederherstellen“ (redo);
- Druckeinstellungen;
- Export-Einstellungen.
- Schaltflächen speziell für die Objekte auf diesem Bett: Vorschau umschalten, Objekte anordnen, alles auswählen, Modell hinzufügen und alles löschen;
- Werkzeugeinstellungen (zum Zuweisen von Farben für Multi-Werkzeug-Drucker, z.B. Original Prusa XL);
- Tastaturkürzel Übersicht (nicht verfügbar auf Smartphones und Tablets);
- der Malwerkzeug und Fuzzy Skin Umschalter;
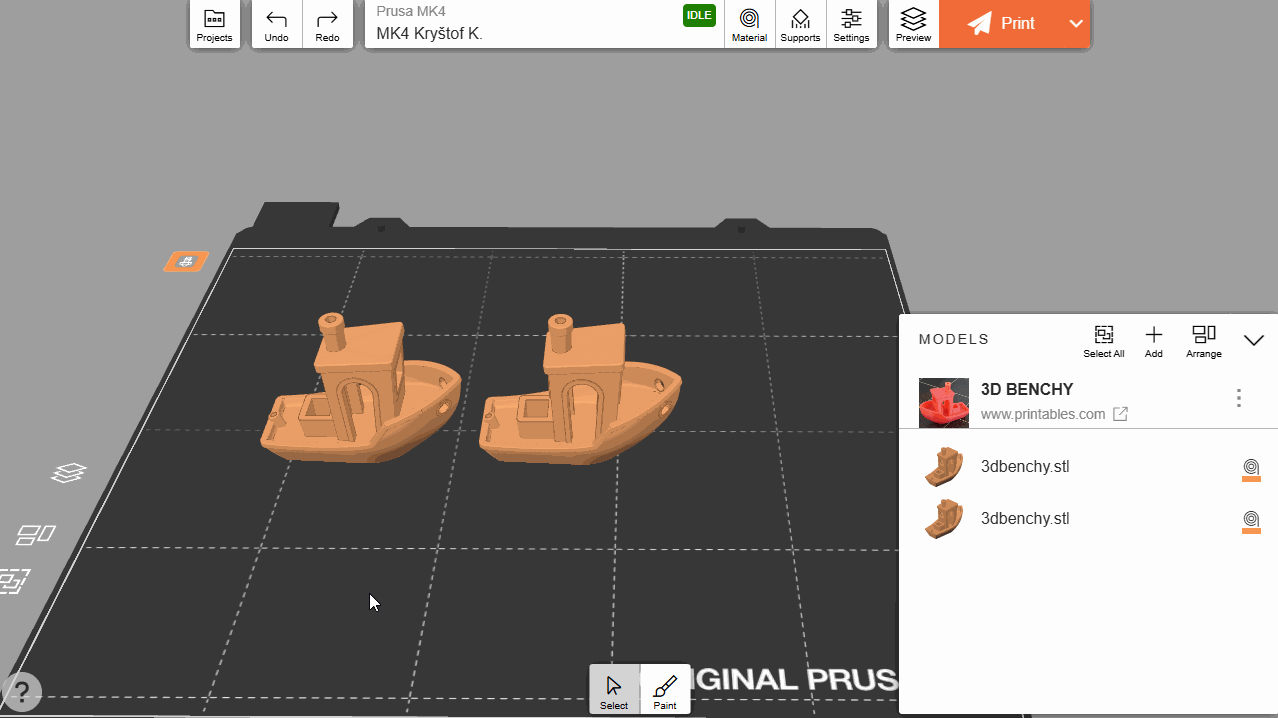
- eine Liste der Modelle im Projekt;

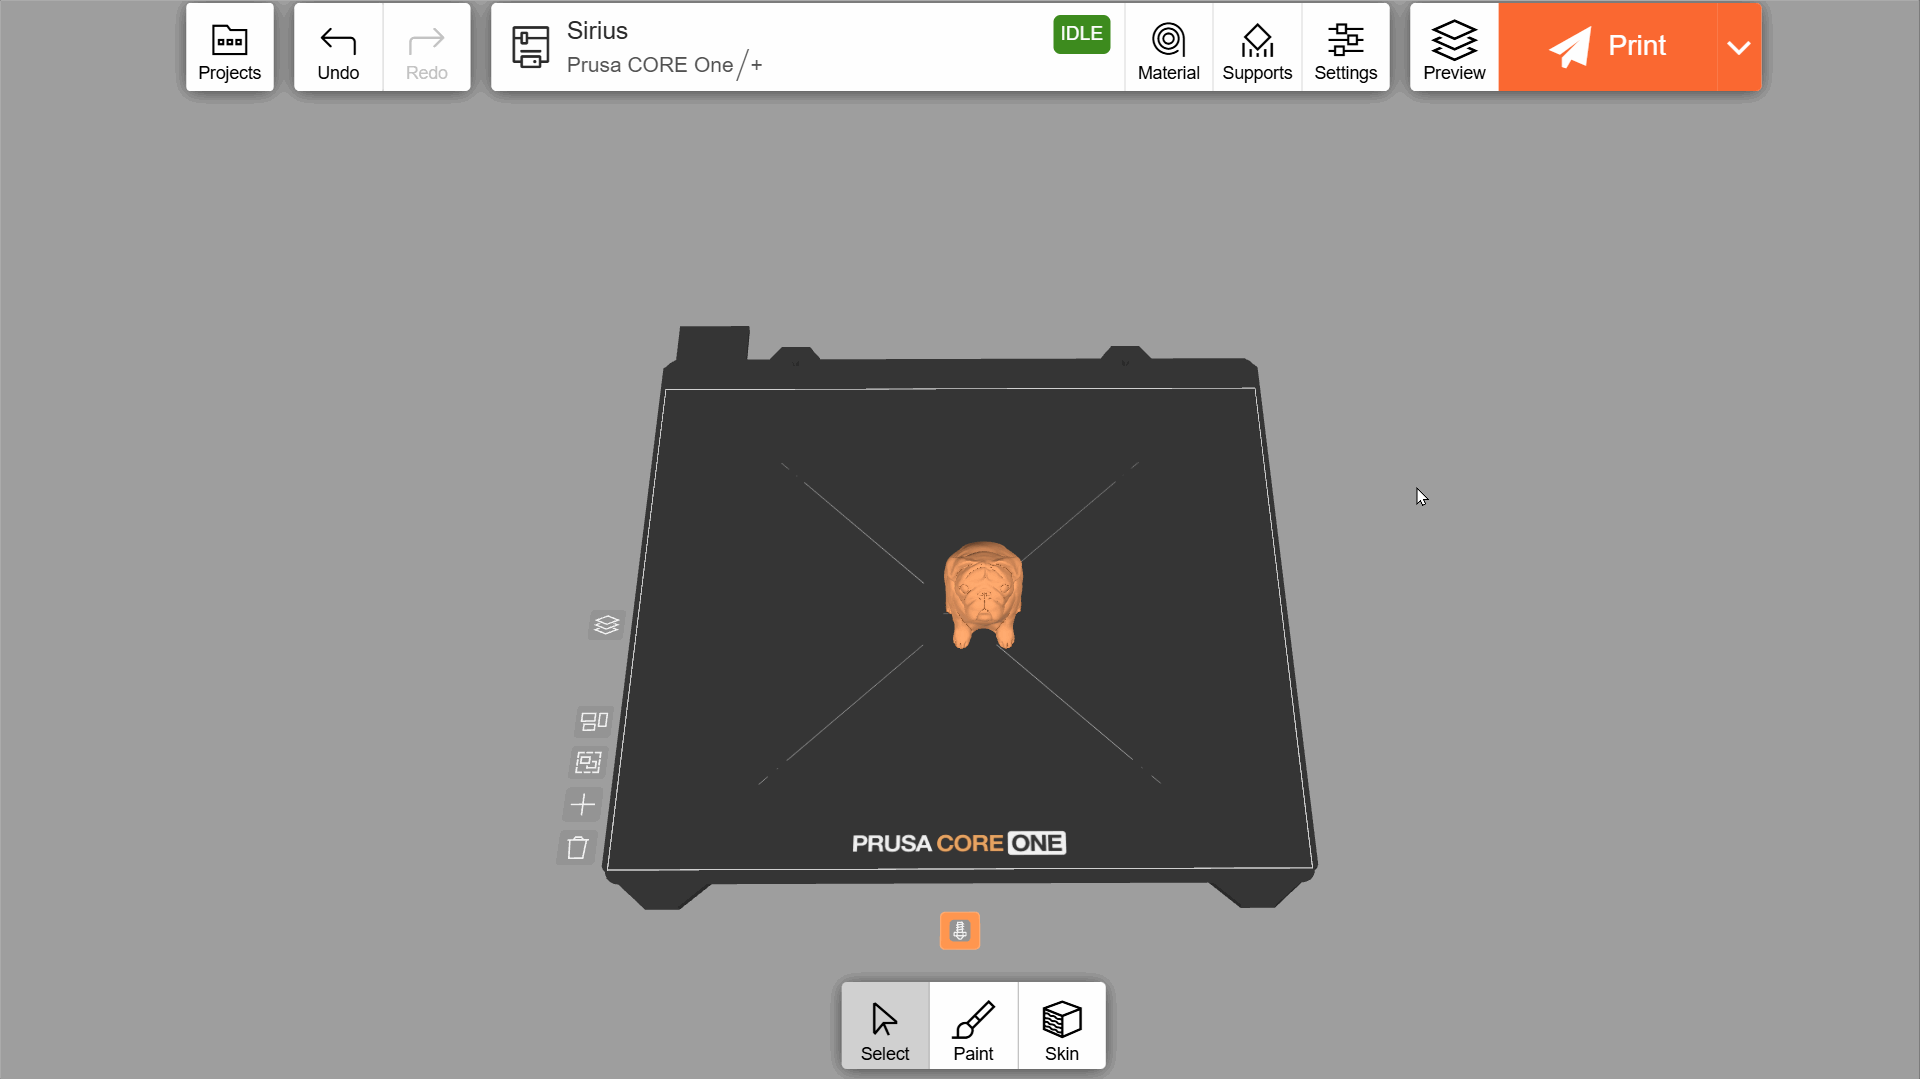
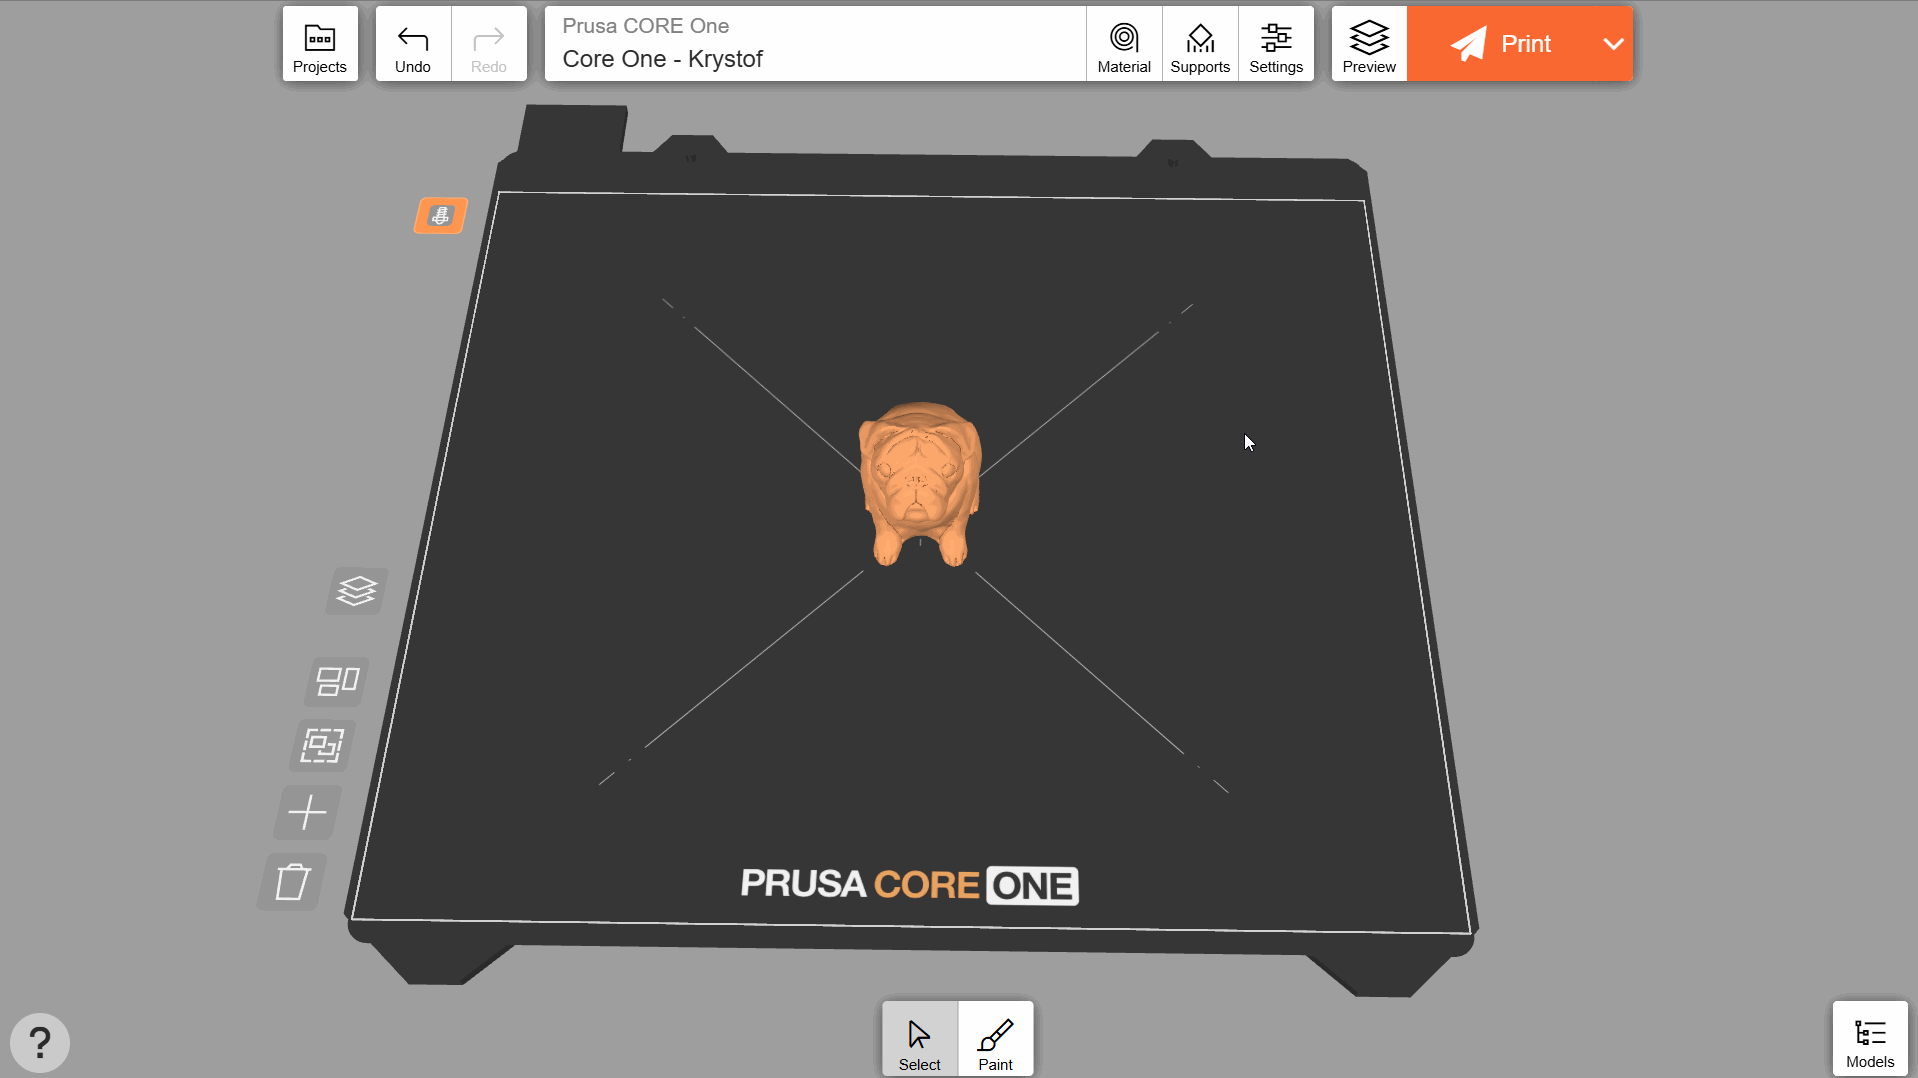
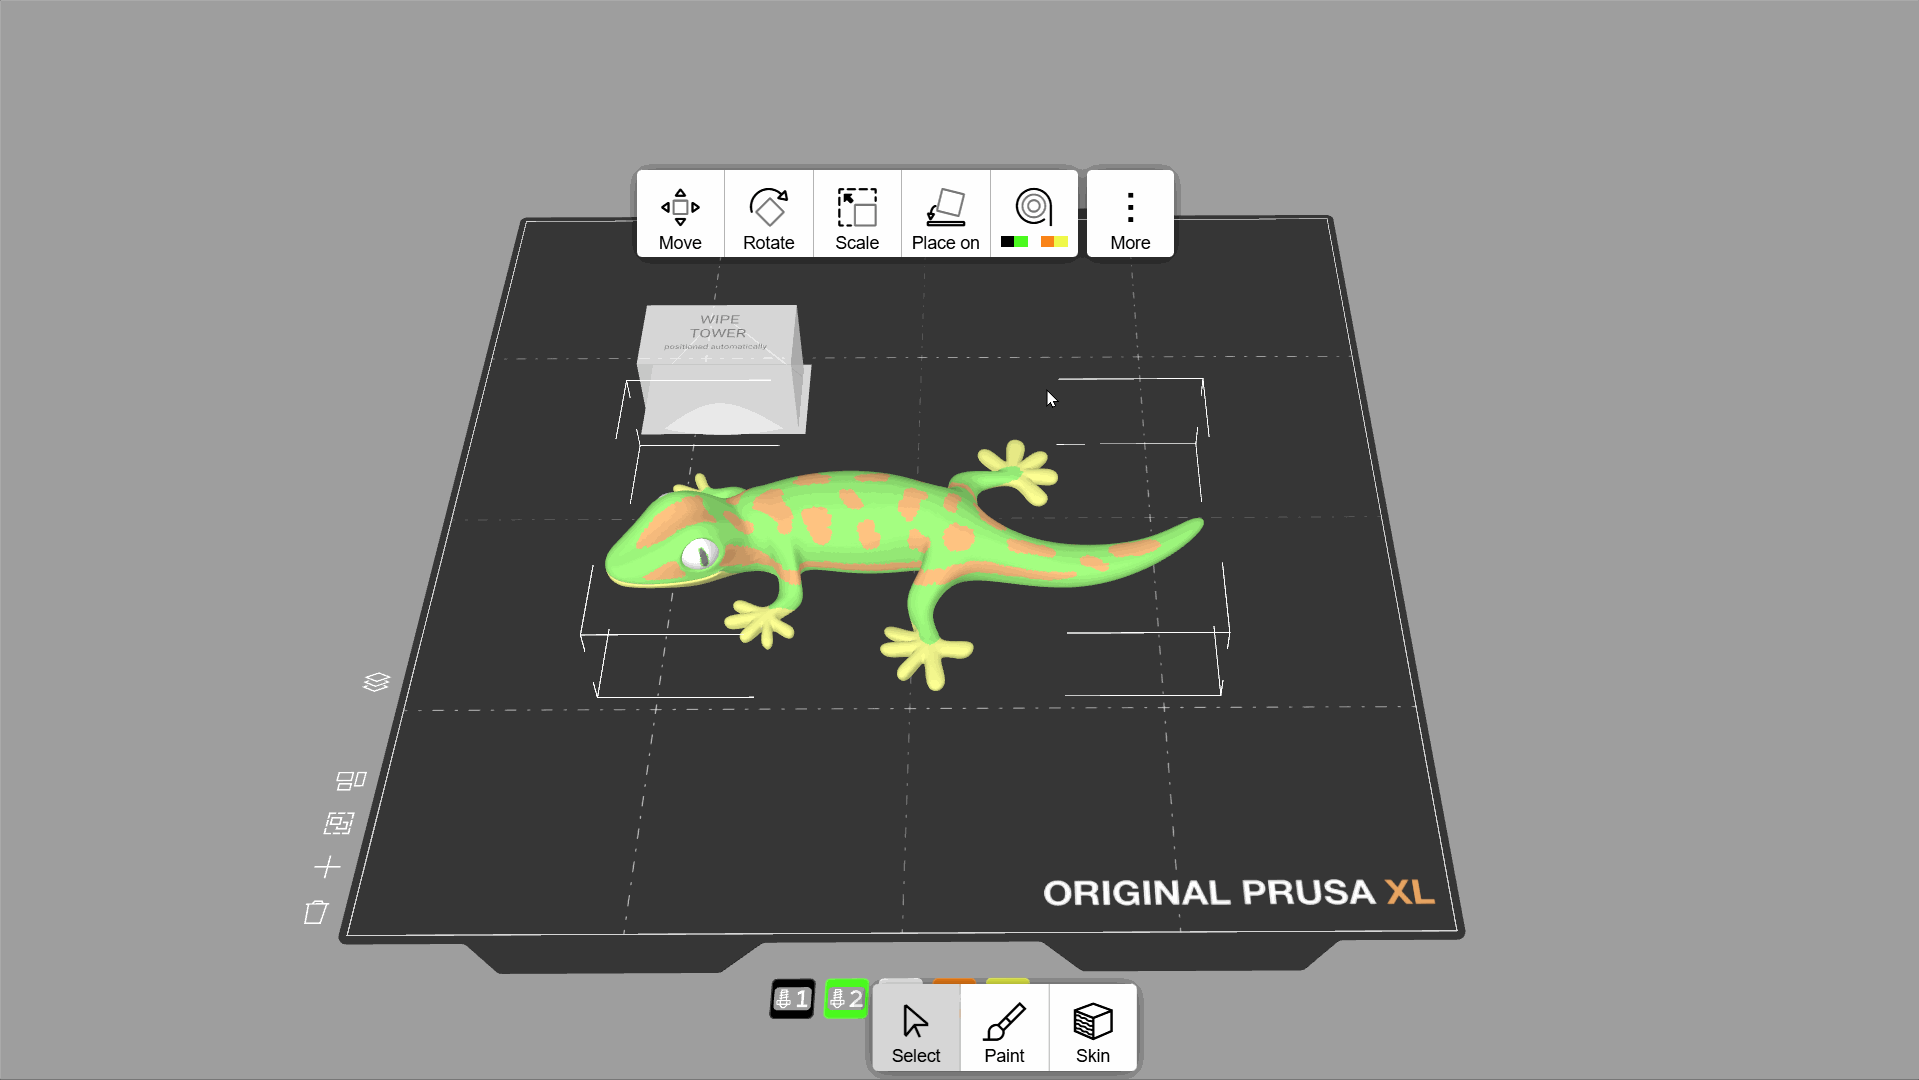
Der Hauptteil des Bildschirms besteht aus einer maßstabsgetreuen Darstellung des Druckblechs, auf dem Sie die Modelle, die Sie drucken möchten, verschieben und anpassen können.
Tooltips
Die meisten Werkzeuge und Einstellungen in EasyPrint verfügen über kurze Tooltips , die durch ein Absolventenhut-Symbol dargestellt werden. Rufen Sie den Tooltip auf, indem Sie mit der Maus über das Symbol fahren (auf Ihrem Computer) oder auf das Symbol tippen (auf einem Mobilgerät).
Modellimport und Upload
Beim Durchsuchen von Printables wird neben allen kompatiblen Modellen die Schaltfläche EasyPrint angezeigt. Ab Apil 2026 werden STL- und 3MF-Dateien unterstützt. Klicken Sie auf die Schaltfläche, um das Modell zu Ihrer Druckliste hinzuzufügen, die als „Warenkorb“ für Modelle dient, die Sie drucken möchten.
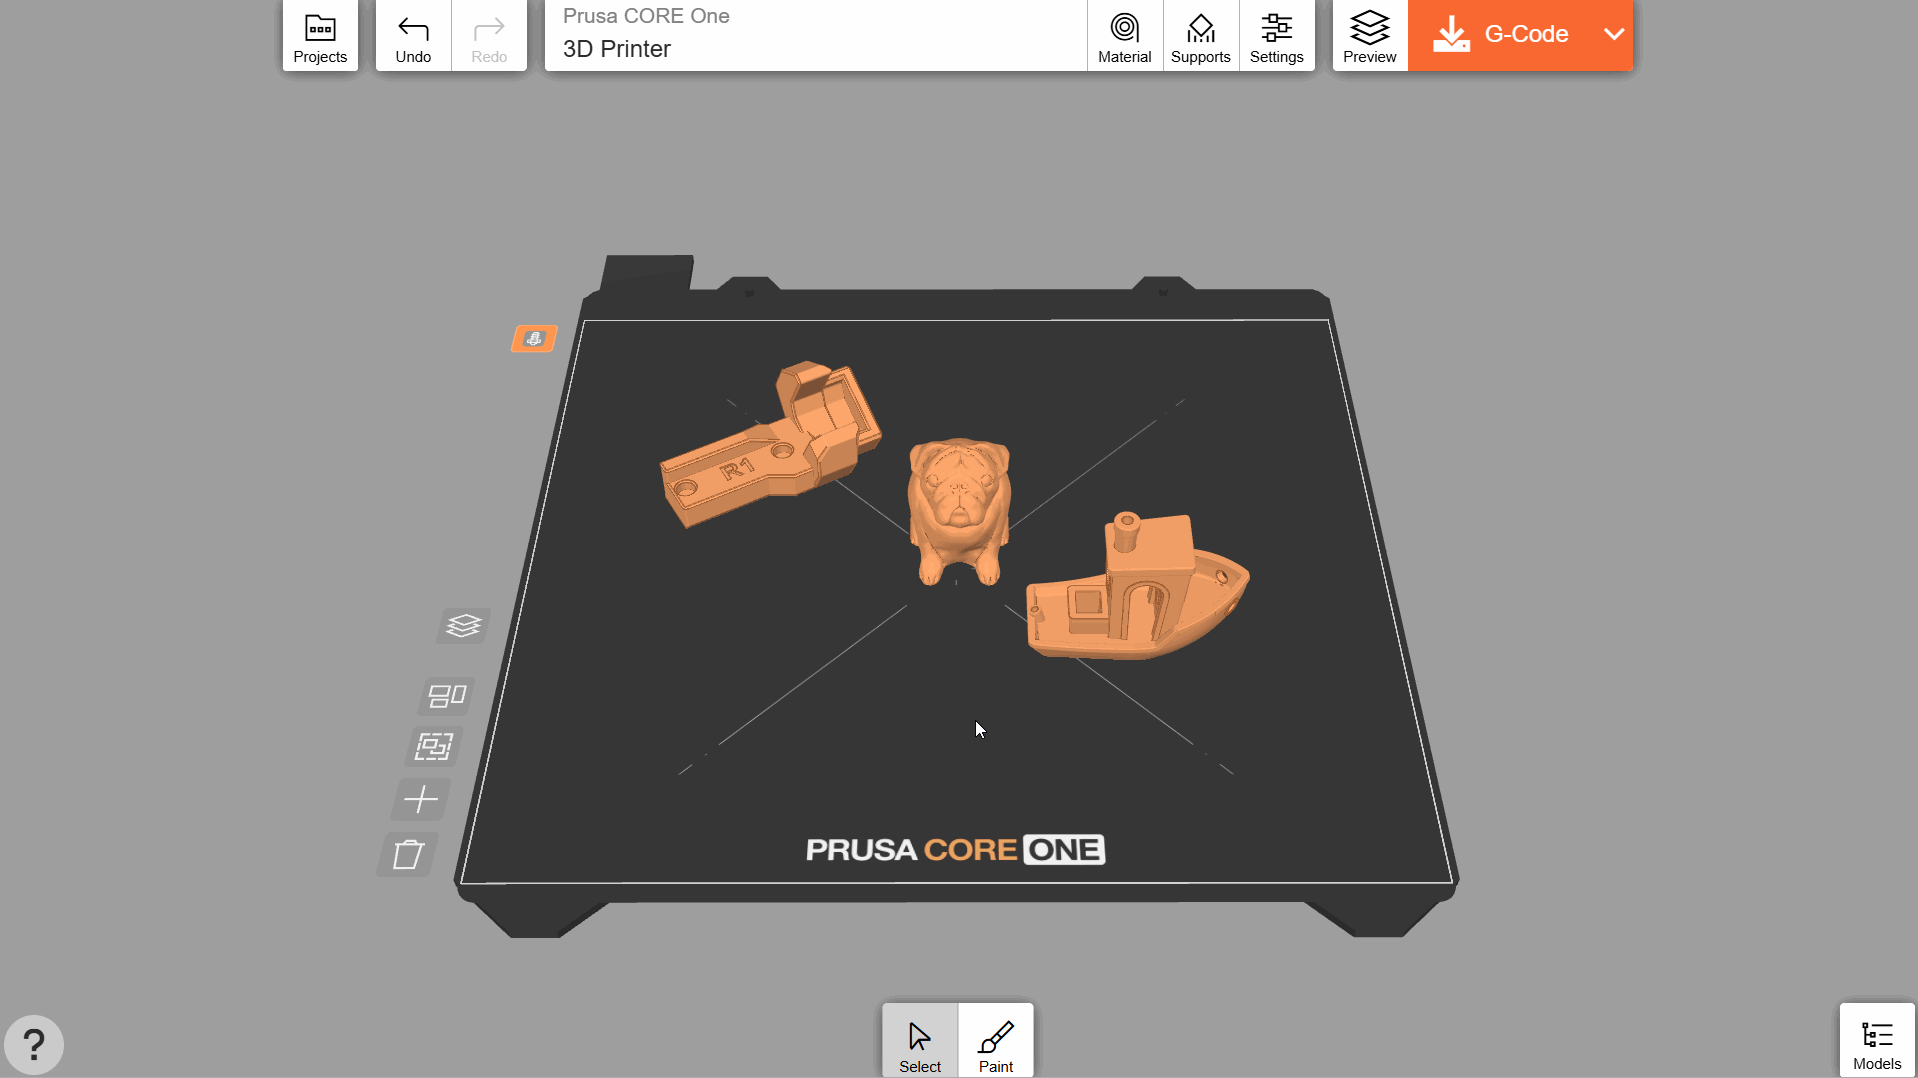
Sobald Sie alle Modelle in Ihrer Druckliste haben, klicken Sie auf „Weiter“, um zum Slicing-Bildschirm zu gelangen. Alle Objekte aus Ihrer Druckliste werden automatisch auf einem virtuellen Druckbett angeordnet.
Sie können auch Modelle von Ihrem eigenen Gerät hochladen, indem Sie auf die Schaltfläche „Modelle“ in der unteren rechten Ecke klicken, dann auf Hinzufügen... und Modell hochladen. Auf derselben Registerkarte können Sie auch nach anderen Modellen aus Printables suchen und diese hinzufügen. Die Schaltfläche „+“ auf der linken Seite des Druckblechs kann ebenfalls verwendet werden, um Modelle hinzuzufügen.
Modellausrichtung und Maßstab
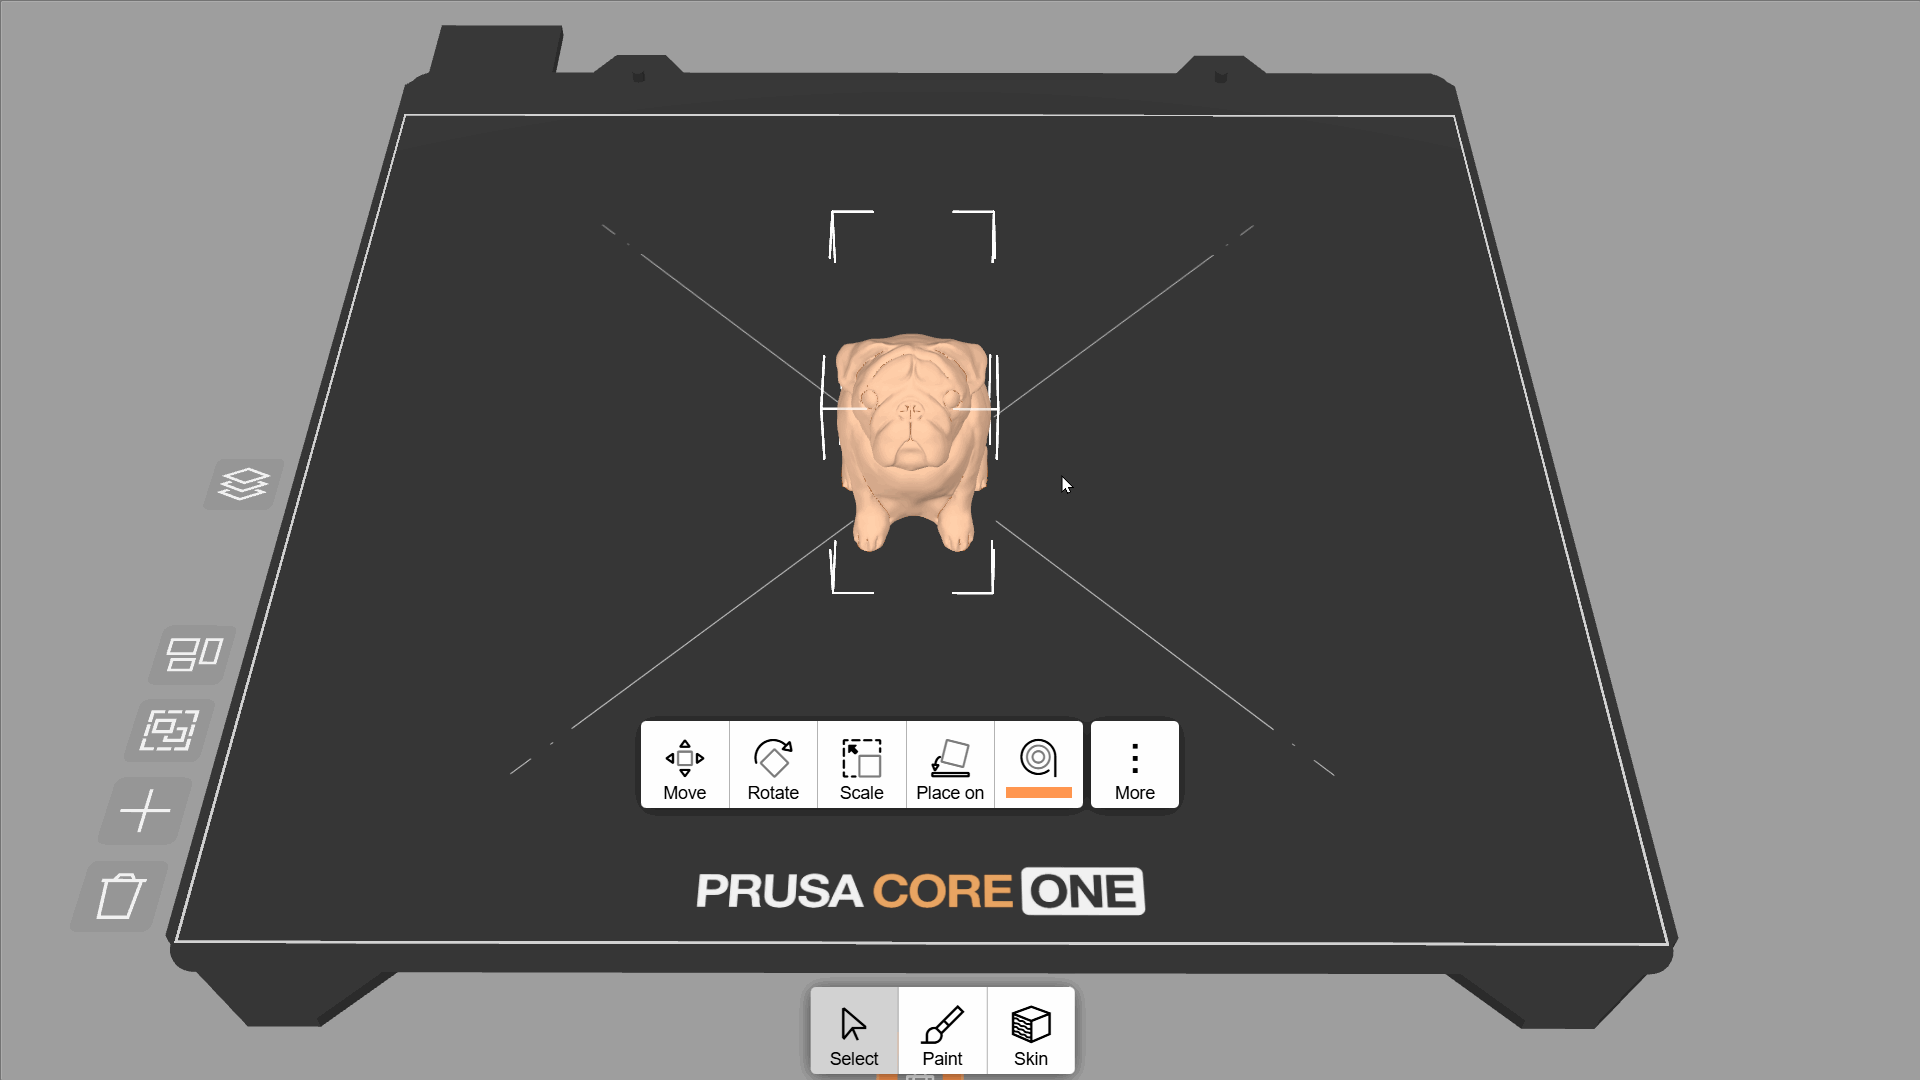
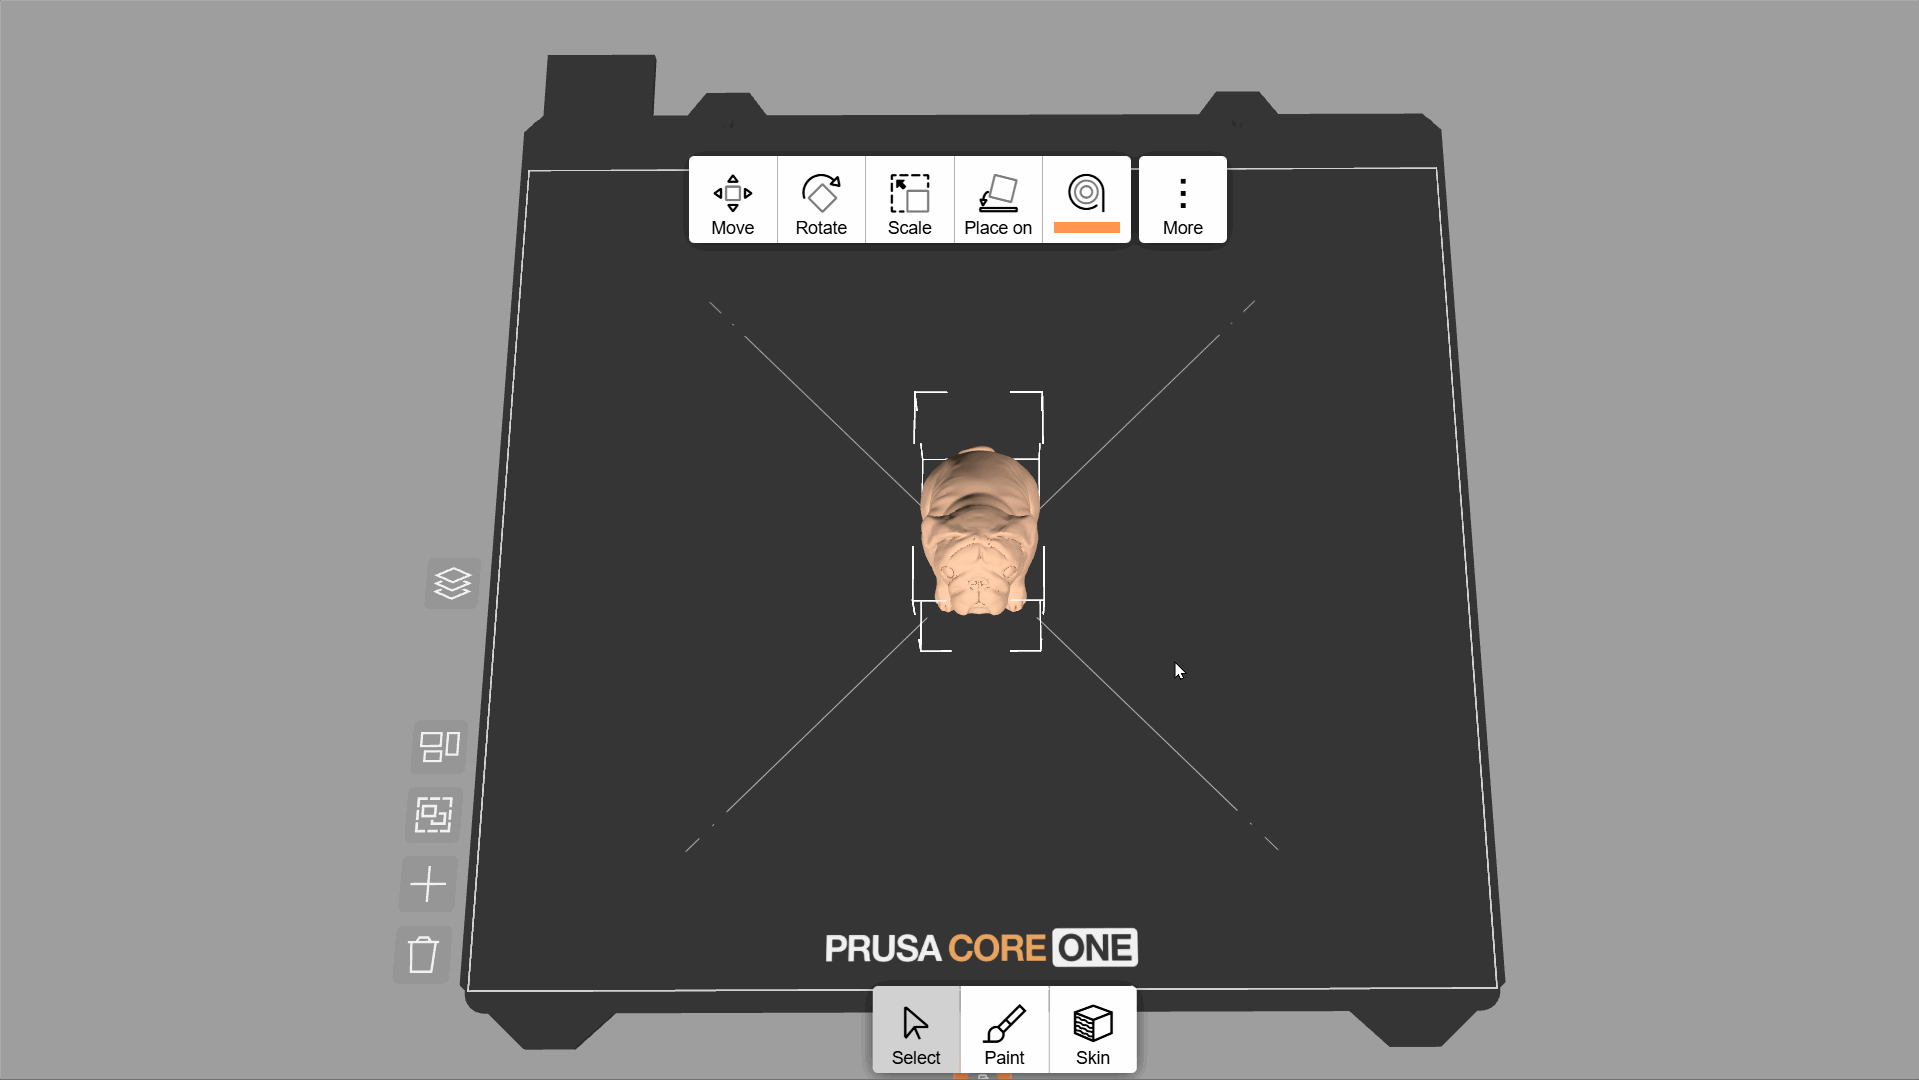
Es kann sein, dass Sie das Objekt drehen müssen, um seine Druckbarkeit zu verbessern (z.B. um die Anzahl der benötigten Stützen zu minimieren). Sie können dies ganz einfach tun, indem Sie das Objekt antippen und die Funktion Auf Fläche legen verwenden. Klicken Sie auf eine der markierten Flächen, um sie mit dem Druckbett auszurichten. Normalerweise werden Objekte so gedruckt, dass die größte Fläche die Platte berührt.
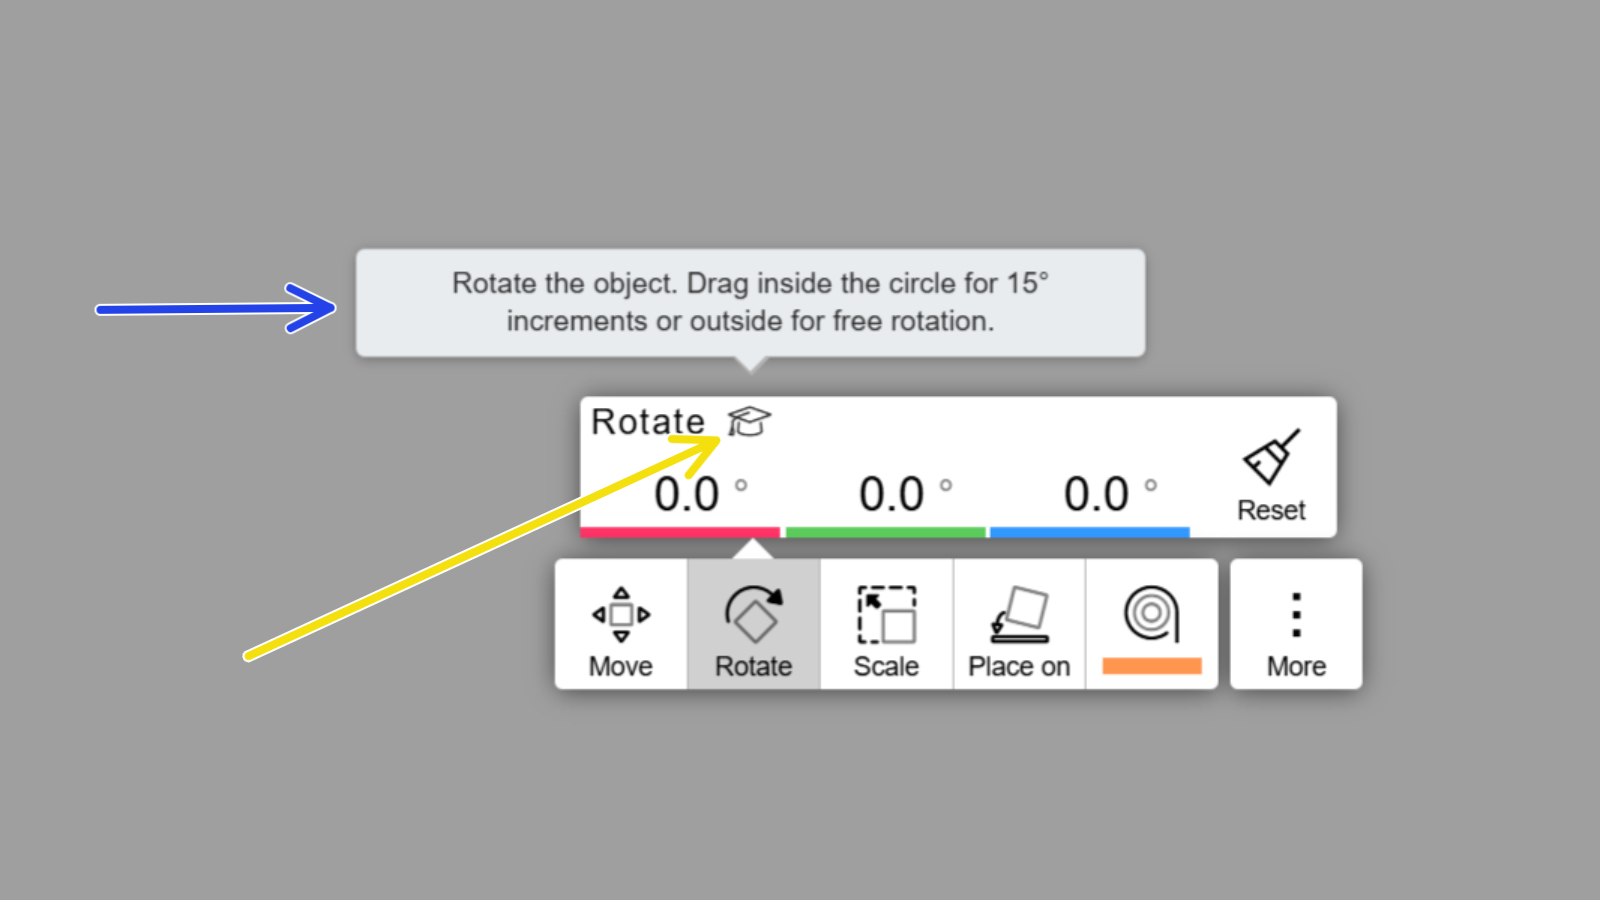
Bei einigen Objekten, die keine auffällige flache Seite haben, ist die Option Auf Fläche legen möglicherweise nicht verfügbar. In diesem Fall können Sie die Ausrichtung manuell mit dem Drehwerkzeug anpassen. Sie können die Pfeile verwenden, um das Objekt entlang seiner drei Achsen zu drehen. Wenn Sie den Mauszeiger/Finger entlang des Kreises halten, wird der Drehwinkel in 15-Grad-Schritten eingestellt. Alternativ können Sie die Drehwinkel auch manuell eingeben.

Mit dem Skalierungswerkzeug können Sie die Größe des Objekts ändern, indem Sie den roten Pfeil ziehen oder einen genauen Wert eingeben. Standardmäßig erfolgt die Skalierung gleichmäßig, d. h., die Proportionen des Objekts bleiben erhalten. Drücken Sie die Schaltfläche „Modus“, um die ungleichmäßige Skalierung zu aktivieren, mit der Sie Breite, Tiefe und Höhe separat skalieren können. Drücken Sie Zurücksetzen, um zur ursprünglichen Skalierung zurückzukehren.
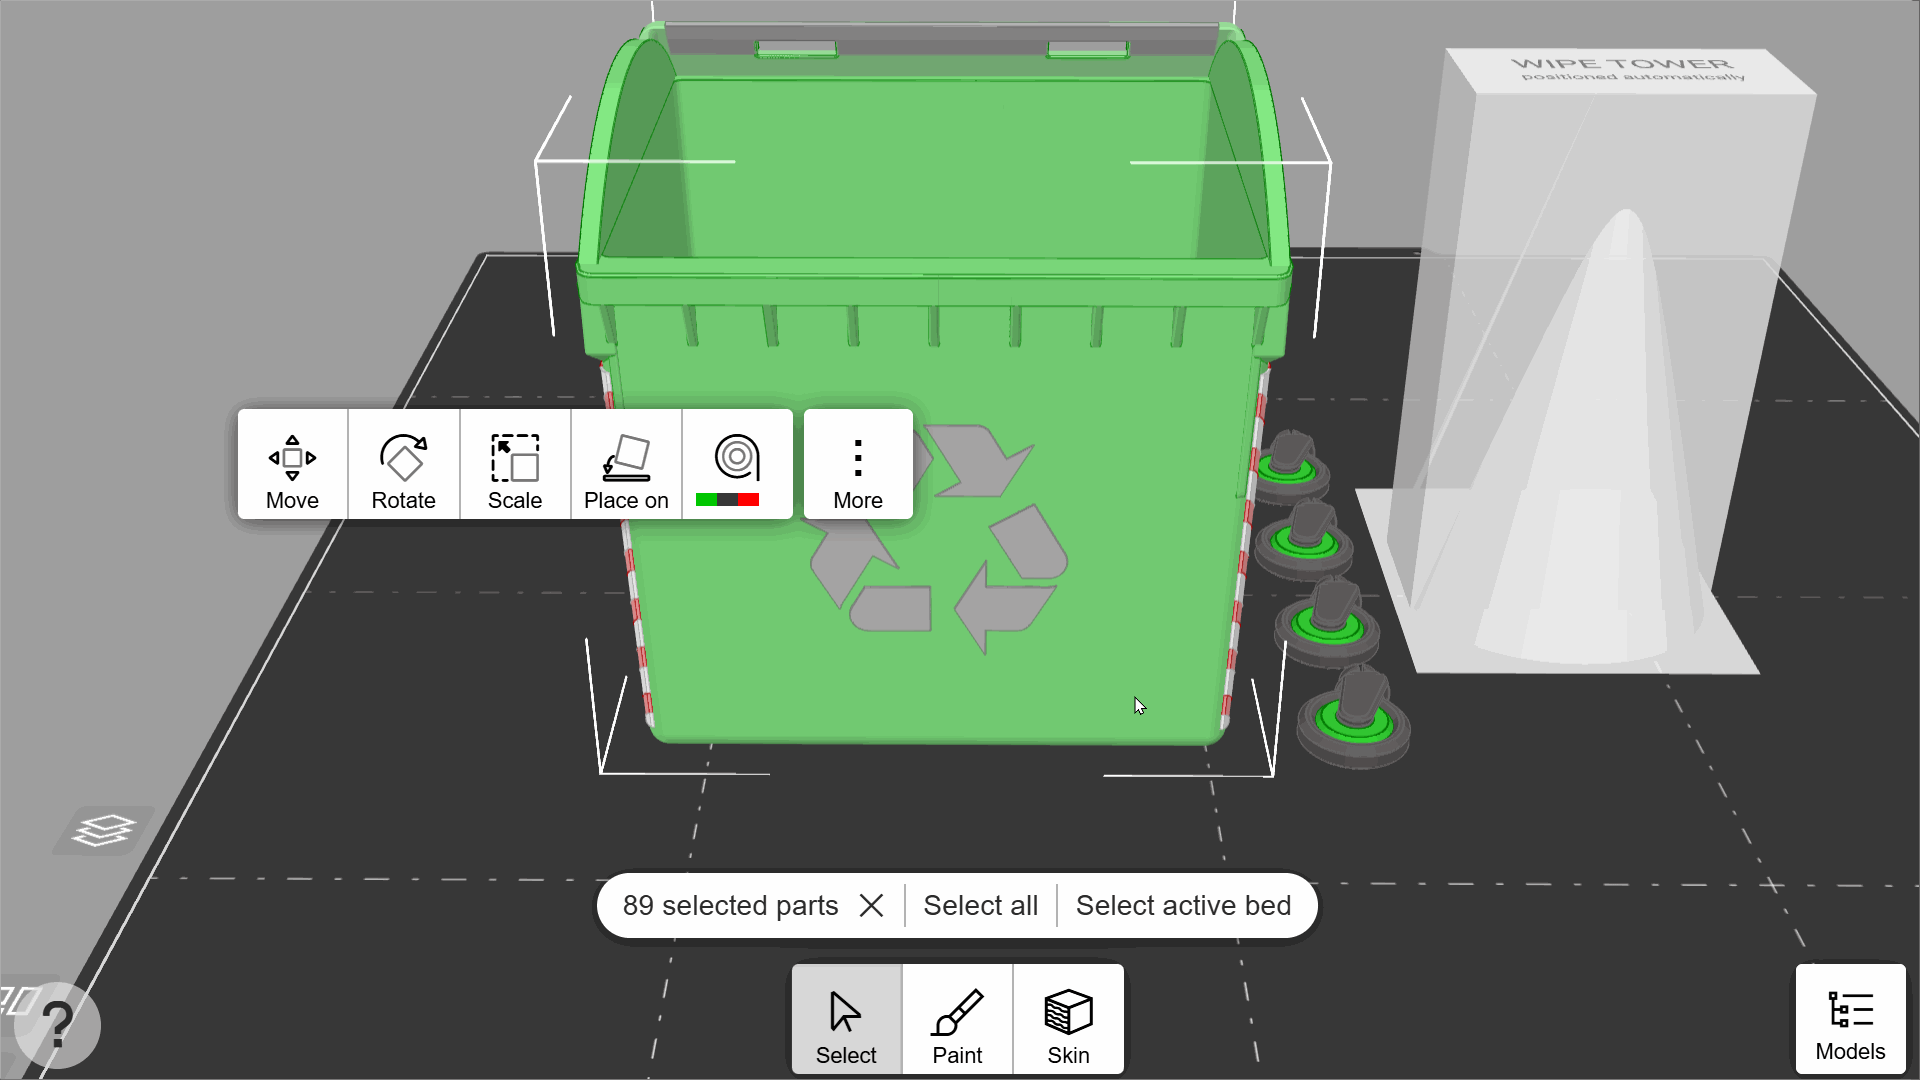
Sie können die Werkzeuge Drehen, Verschieben und Skalieren auf mehrere Objekte gleichzeitig anwenden. Um eine Mehrfachauswahl zu treffen, klicken Sie auf das erste Objekt und halten es gedrückt, bis es auf dem Druckbett wackelt. Das bedeutet, dass der Mehrfachauswahlmodus aktiv ist. Klicken Sie auf weitere Objekte, um sie der Auswahl hinzuzufügen, oder klicken Sie erneut, um sie wieder zu entfernen.
Objekte kopieren
Sie können mehrere Kopien desselben Objekts gleichzeitig drucken. Wählen Sie das Objekt aus und klicken Sie auf Mehr → Klonen, und wählen Sie dann die gewünschte Anzahl an Kopien (einschließlich des Originalmodells). Alle Kopien werden automatisch auf dem Druckbett angeordnet (oder auf mehreren Druckbetten, falls sie nicht alle darauf Platz finden).
Drucker auswählen
Klicken Sie auf die Schaltfläche Drucker im oberen Menü, um alle Drucker, die Sie zu Prusa Connect hinzugefügt haben, und ihren aktuellen Status anzuzeigen. Sie können EasyPrint verwenden, um Druckdateien aus der Ferne an diese Drucker zu senden.
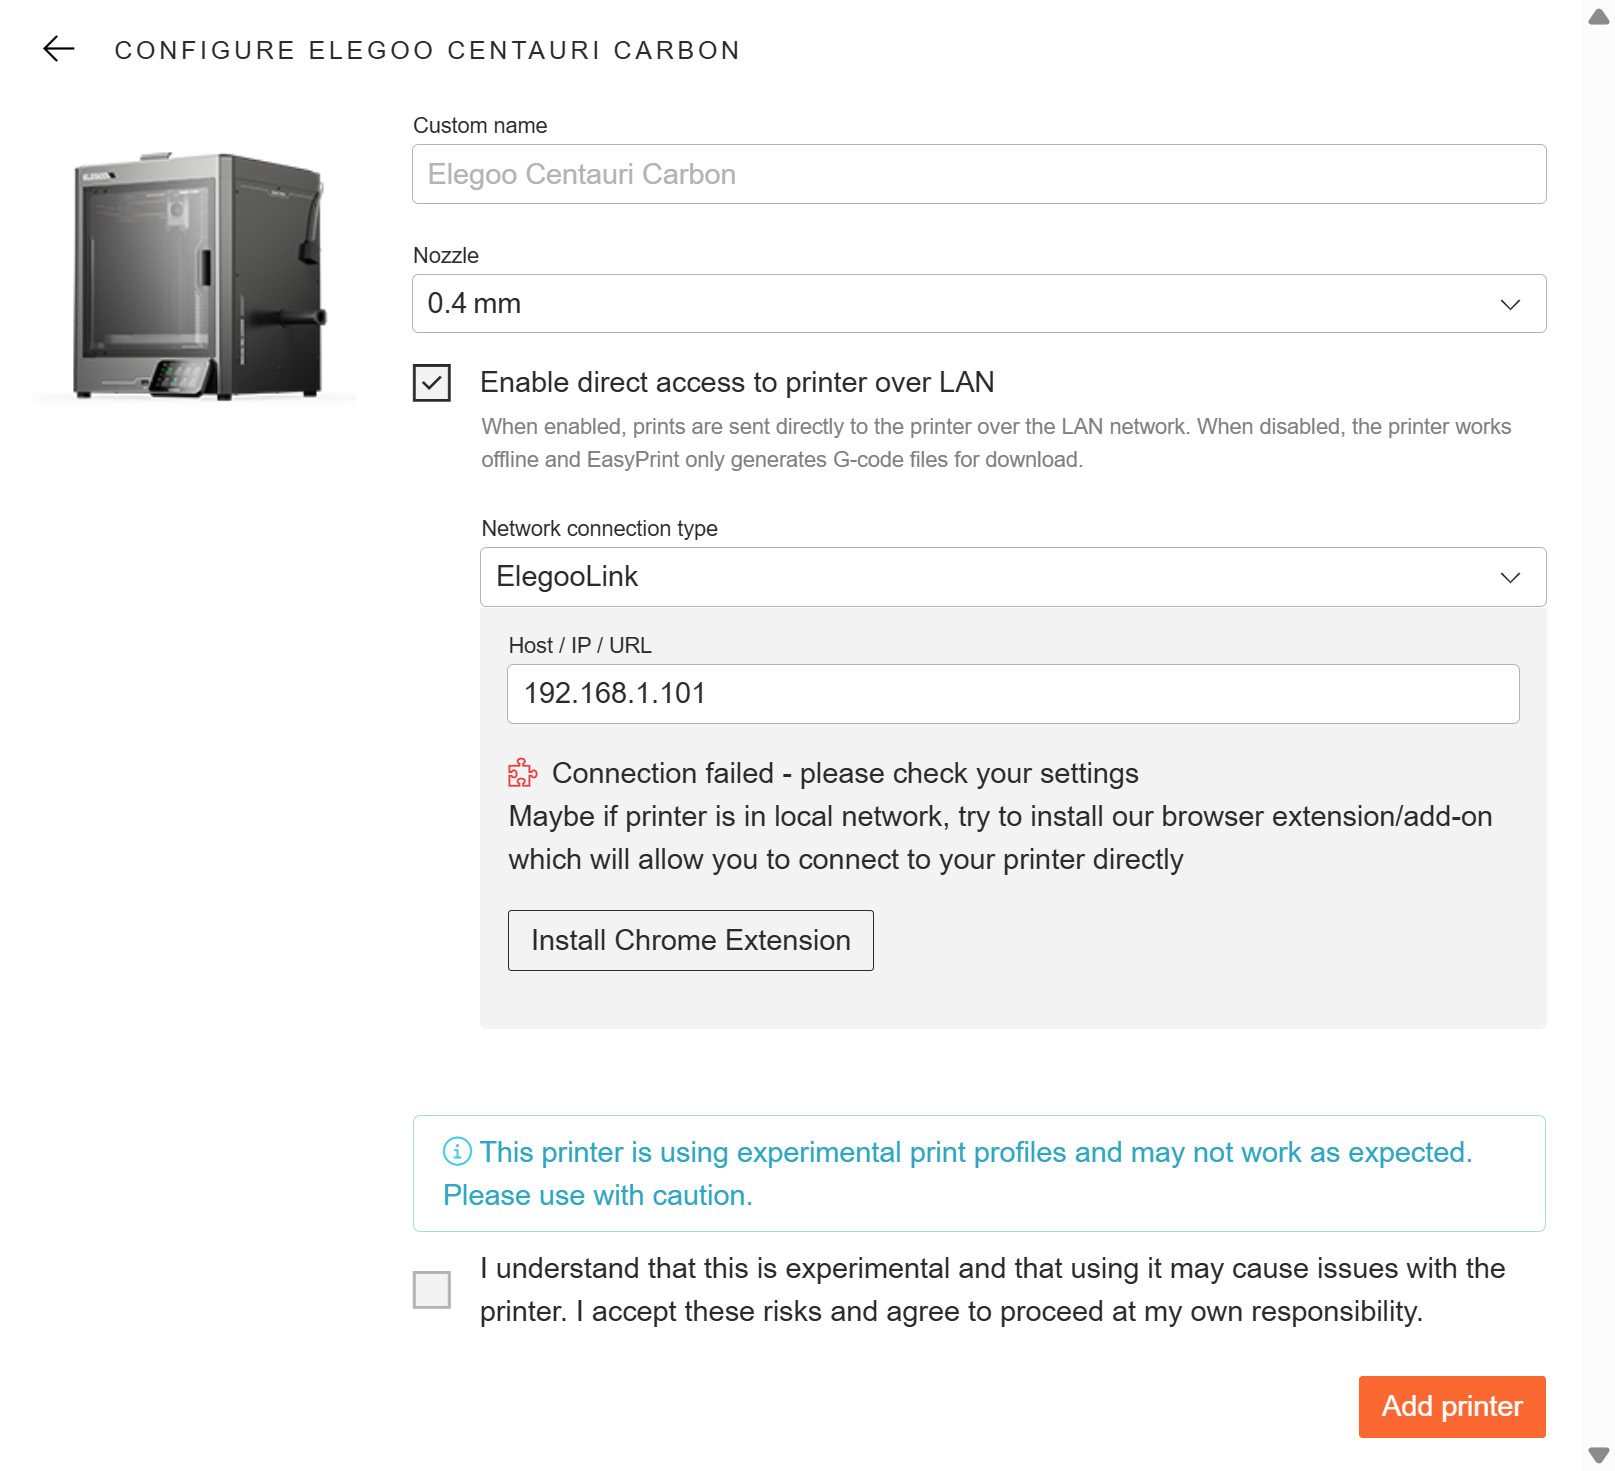
Bei Verwendung von EasyPrint über einen Desktop-Browser, der nicht mobil ist, ist das Senden von Dateien aus der Ferne auch mit Nicht-Prusa-Druckern über eine LAN-Verbindung möglich, indem Sie in der Konfiguration des Nicht-Prusa-Druckers die Option „Direktzugriff auf den Drucker über LAN aktivieren“ auswählen.
In diesem Fall ist es notwendig, einen Netzwerkverbindungstyp auszuwählen, mit der Option, unsere Browsererweiterung für die direkte Verbindung zum Drucker im Browser zu installieren - unser Konfigurationsmenü bietet diese Option an.
Sie können EasyPrint auch für Prusa-Drucker verwenden, die nicht bei Prusa Connect registriert sind, oder für Nicht-Prusa-Drucker im Offline-Modus. Verwenden Sie die Option Offline-Drucker hinzufügen, um das genaue Modell Ihres Druckers innerhalb jeder Produktfamilie zu finden. Wenn Sie nicht die Standarddüse verwenden, ändern Sie den Düsendurchmesser in den Druckeroptionen.

Material auswählen
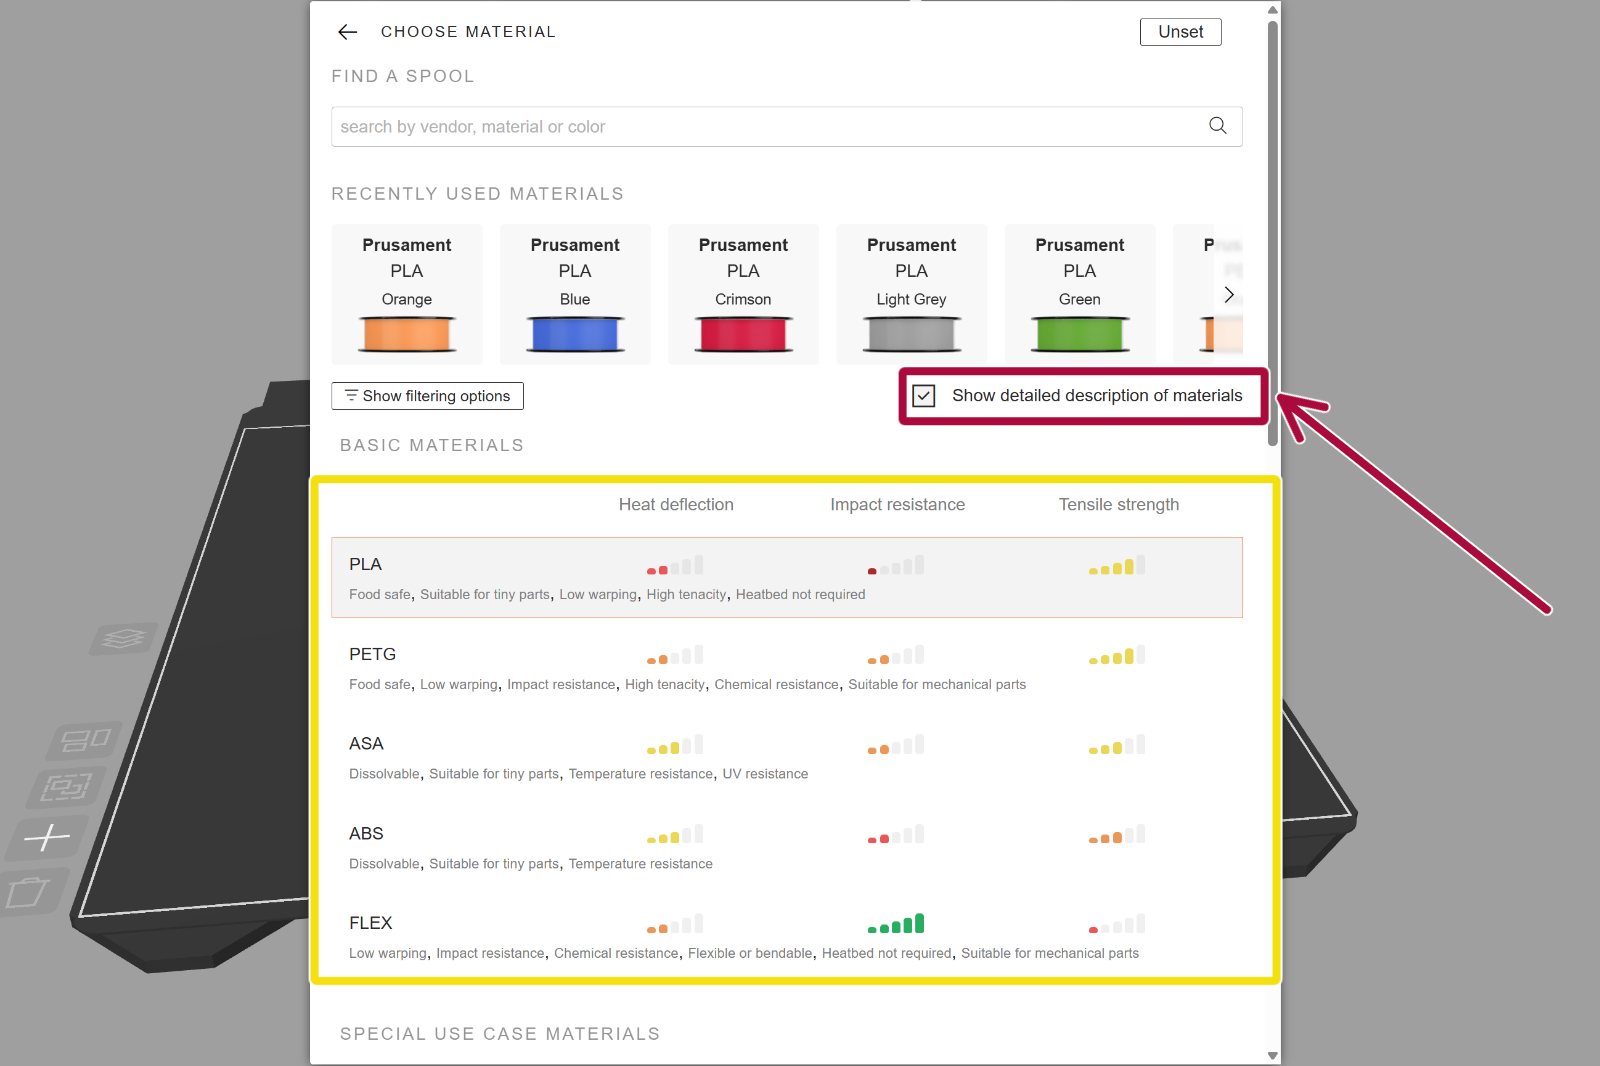
Öffnen Sie die Registerkarte „Material“, um Ihr Druckmaterial festzulegen. Am schnellsten wählen Sie ein Material über die Suchleiste aus – geben Sie einfach den Namen der Filamentrolle ein, die Ihnen zur Verfügung steht, z. B. „Prusament PLA Yellow“. Die Materialbibliothek enthält ein Foto der Materialfarbe, das sich anschließend in der 3D-Vorschau widerspiegelt. Dies ist besonders nützlich für die Farbgestaltung.
Auf dem Materialauswahlbildschirm werden zur Erleichterung des Zugriffs auch kürzlich verwendete Materialien angezeigt. Anstatt nach einer bestimmten Filamentfarbe zu suchen, können Sie die Liste am unteren Rand der Registerkarte „Material“ verwenden, um zunächst den allgemeinen Typ (z. B. PETG usw.) und anschließend den Hersteller und den Untertyp (z. B. Prusament – PETG Carbon Fiber) auszuwählen. Falls Ihre spezifische Filamentmarke nicht in der Liste aufgeführt ist, verwenden Sie eines der generischen Profile für das jeweilige Material.
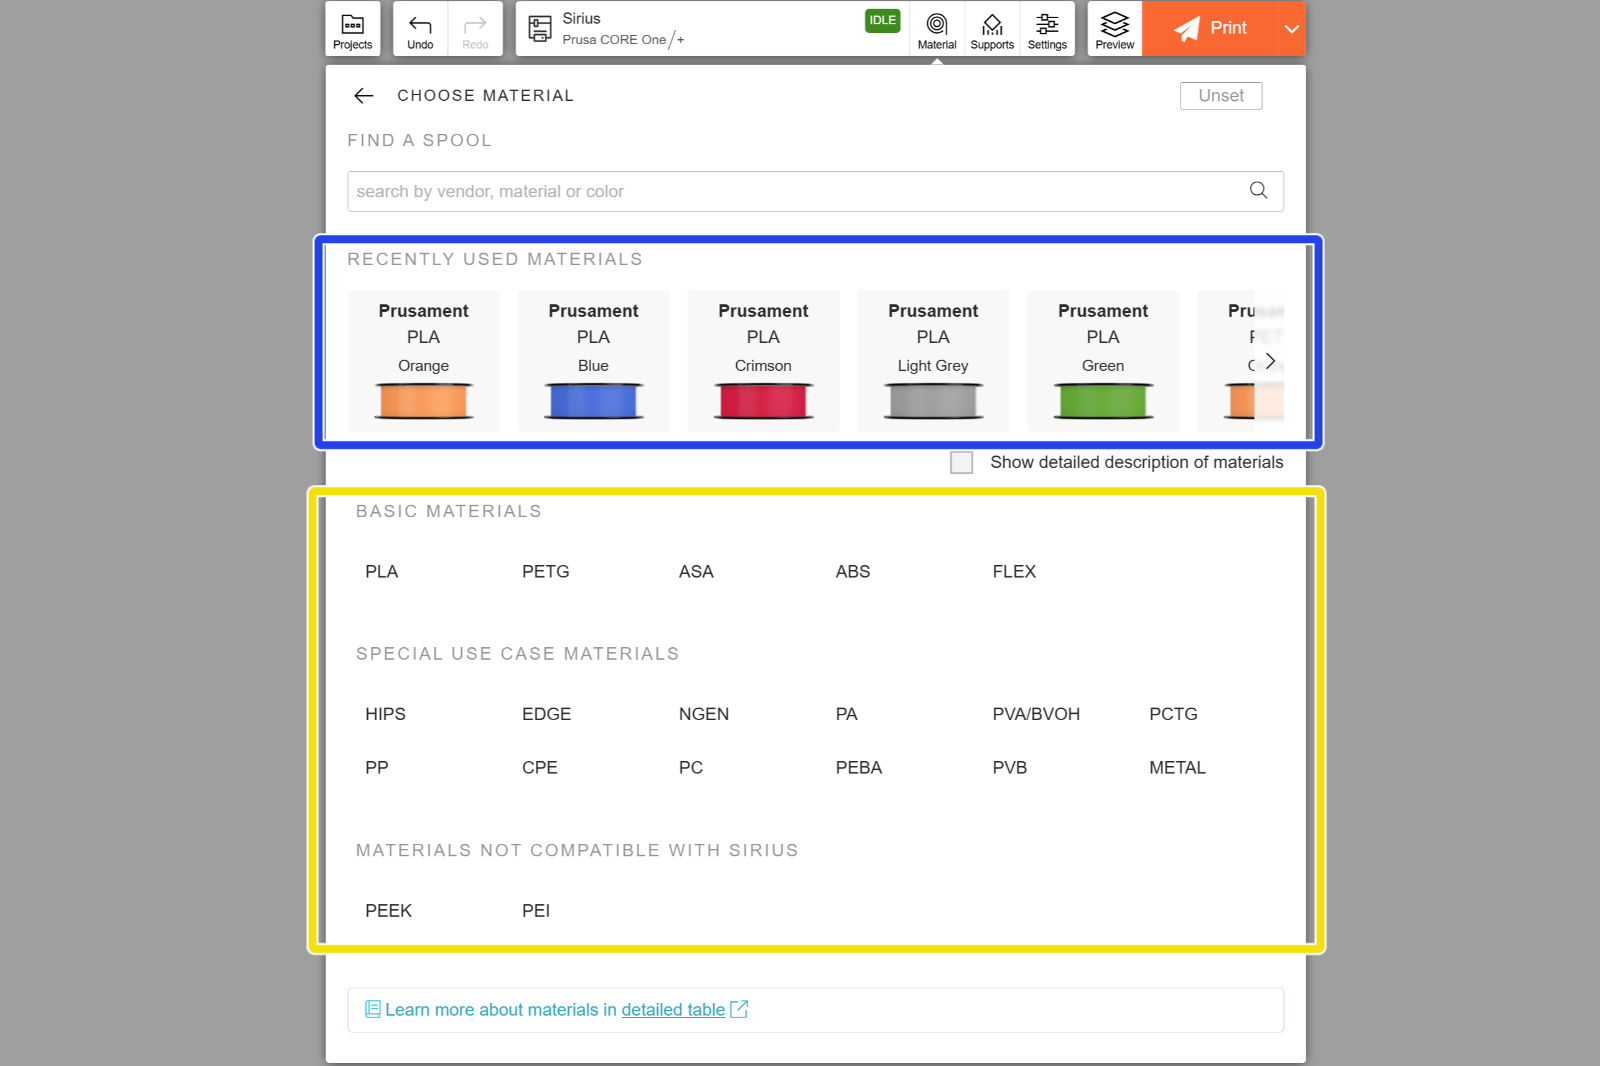
Aktivieren Sie das Kontrollkästchen „Detaillierte Materialbeschreibung anzeigen“, um eine kurze Beschreibung und einen Vergleich der einzelnen Materialien anzuzeigen. Dies kann Ihnen dabei helfen, ein geeignetes Filament für Ihren speziellen Anwendungsfall auszuwählen.
Stützen aktivieren und Haftung verbessern
Aufgrund der Beschaffenheit der 3D-Drucktechnologie kann unter Teilen, die sonst in der Luft gedruckt würden, eine Stützstruktur erforderlich sein. Für Anfänger kann es schwierig sein, zu entscheiden, wann diese Stützen notwendig sind. Wenn Sie sich nicht sicher sind, ist es im Allgemeinen am sichersten, sie mit der Option „Überall – Organisch“ zu aktivieren. Jede Option verfügt über ein Bild, das veranschaulicht, welche Art von Stützen sie erzeugt.
Viele Modelle, die speziell für den 3D-Druck hergestellt werden, sind so konzipiert, dass keine Stützen benötigt werden. Dies ist hilfreich, da Stützen zusätzliche Druckzeit und Material erfordern. Schauen Sie in der Beschreibung des jeweiligen Modells nach, wo die Autoren in der Regel Tipps zur Aktivierung von Stützen geben.
Objekte mit einer kleinen Basis können sich während des Drucks versehentlich vom Druckblech lösen. Wenn Sie Haftung erhöhen - automatisch aktivieren, fügt EasyPrint automatisch kleine Ränder (d.h. eine dünne Materialschicht, die nach dem Druck leicht entfernt werden kann) für Objekte hinzu, die dies benötigen.
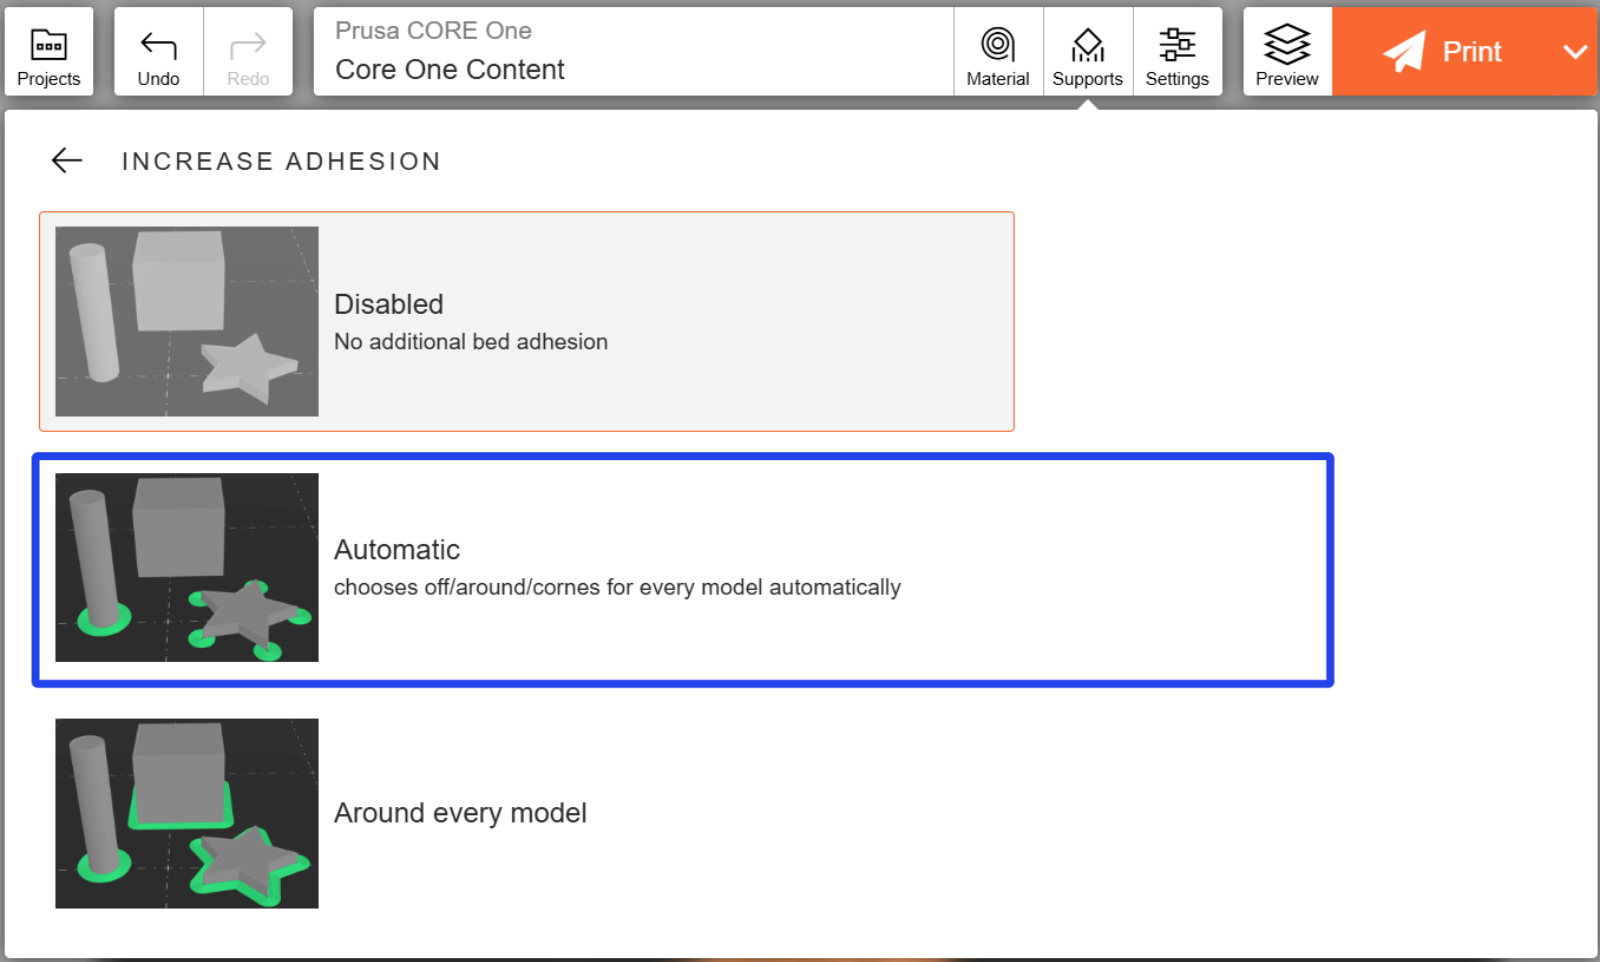
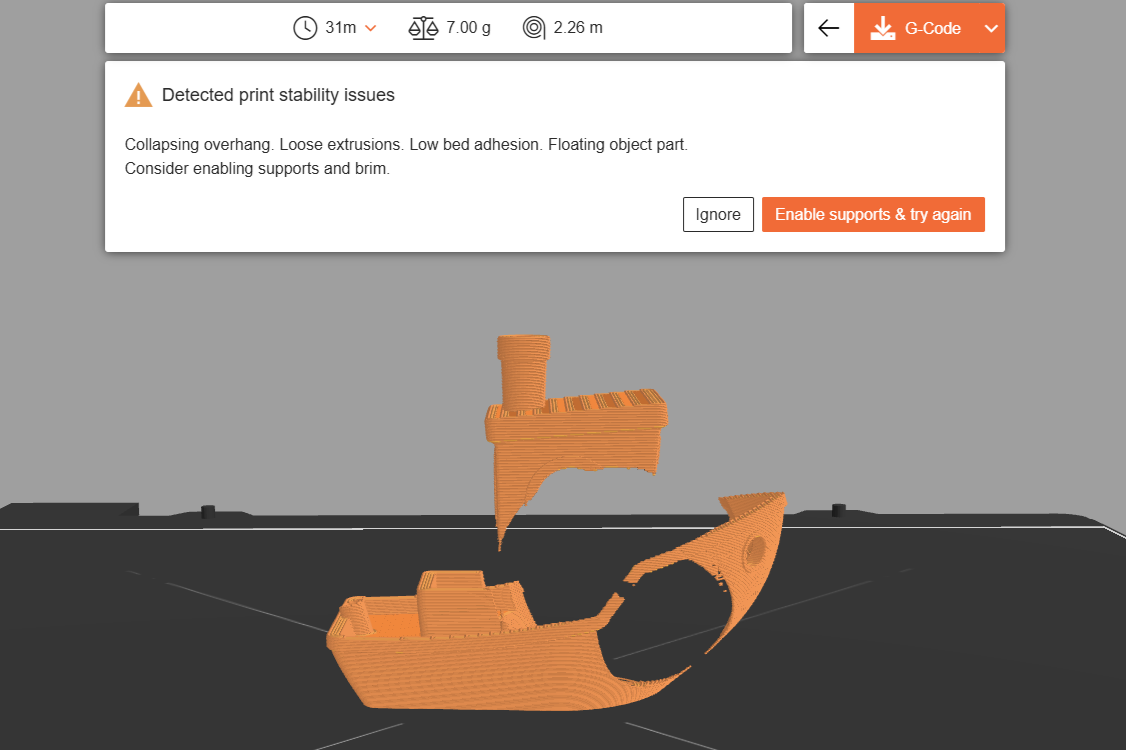
EasyPrint erkennt auch automatisch mögliche Probleme während des Slicing-Prozesses und schlägt die Verwendung von Stützen und/oder erhöhter Haftung vor, wenn diese nicht aktiviert sind.
Anpassen der Druckeinstellungen
Wählen Sie auf der Registerkarte „Einstellungen“ eines der Druckprofile aus. Das Profil Balanziert bietet für die meisten Anwendungsfälle einen guten Kompromiss zwischen Qualität und Druckgeschwindigkeit.
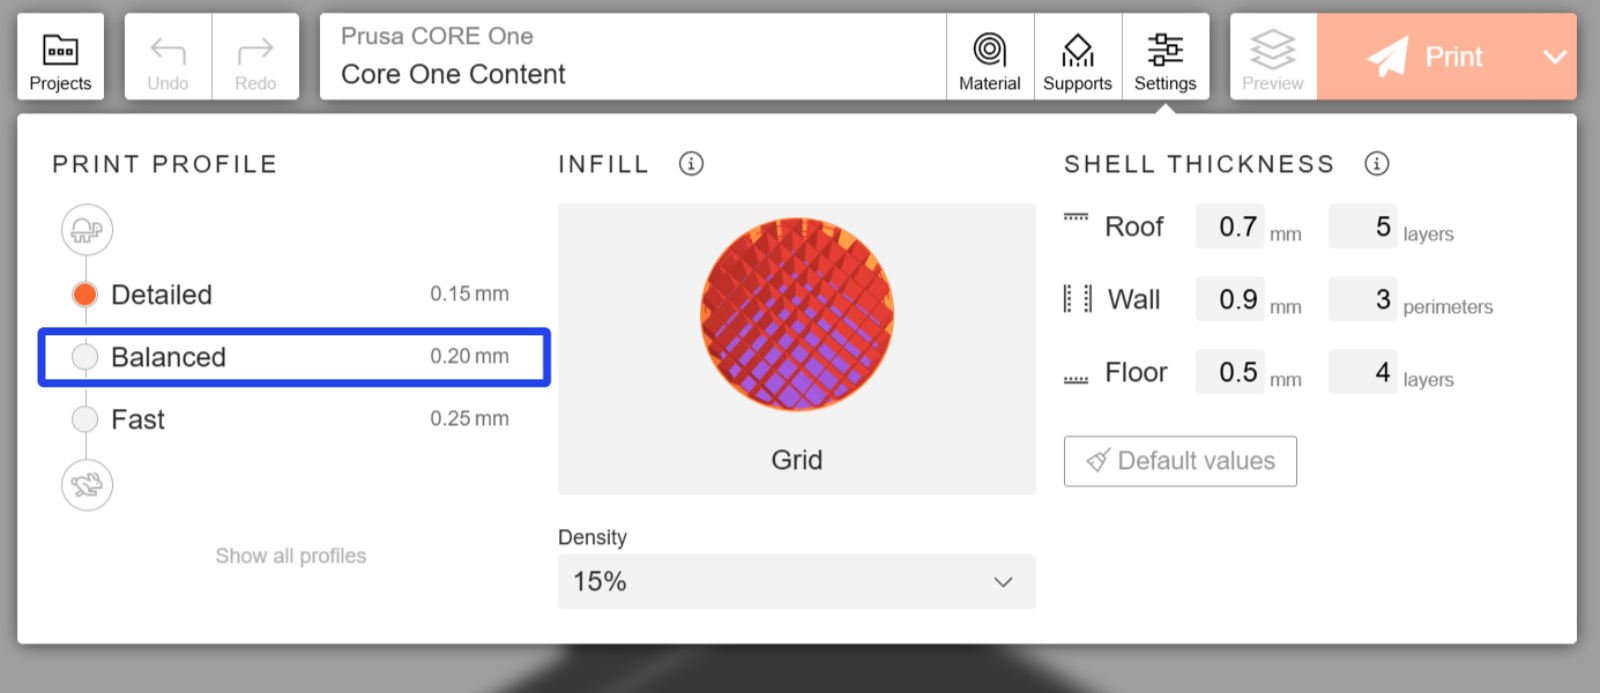
Sie können auch einige Einstellungen, wie z. B. das Infill-Muster (d. h. die innere Struktur des gedruckten Modells), feinabstimmen. Die Muster sind in verschiedene Kategorien eingeteilt, die auf ihrer Druckgeschwindigkeit oder Haltbarkeit basieren.
Wenn Sie alles eingestellt haben, klicken Sie auf Drucken. Damit wird Ihr Projekt zum Slicen an entfernte Server gesendet. Je nach der Komplexität Ihres Projekts und der Größe der Warteschlange kann dies eine Minute dauern.
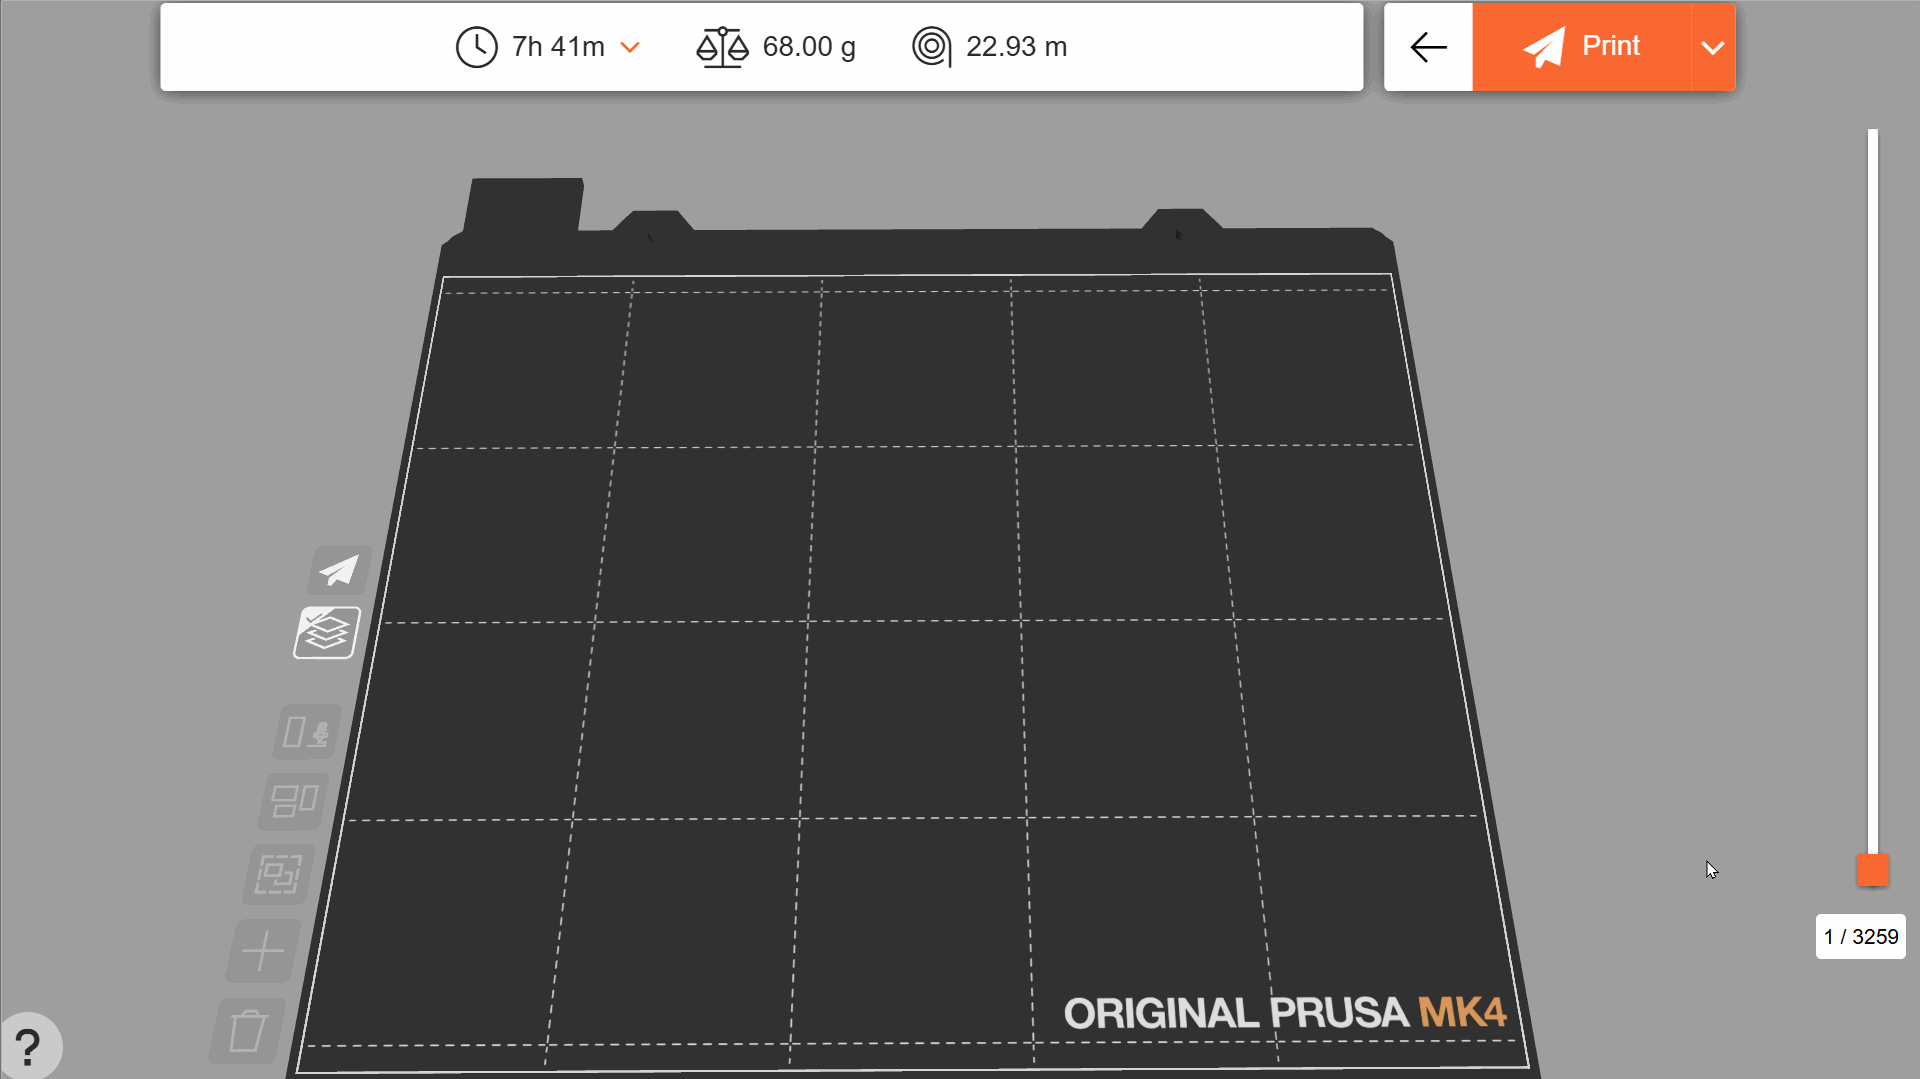
Sobald das Slicen abgeschlossen ist, erscheint der Bildschirm „Druckübersicht“, auf dem die Druckdauer sowie die Menge an Filament in Gramm und Metern angezeigt werden, die für das Drucken benötigt wird. Wenn Ihr Drucker derzeit im Leerlauf ist und über das richtige Material verfügt, können Sie sofort mit dem Drucken beginnen. Andernfalls wird der G-Code der Druckwarteschlange hinzugefügt.
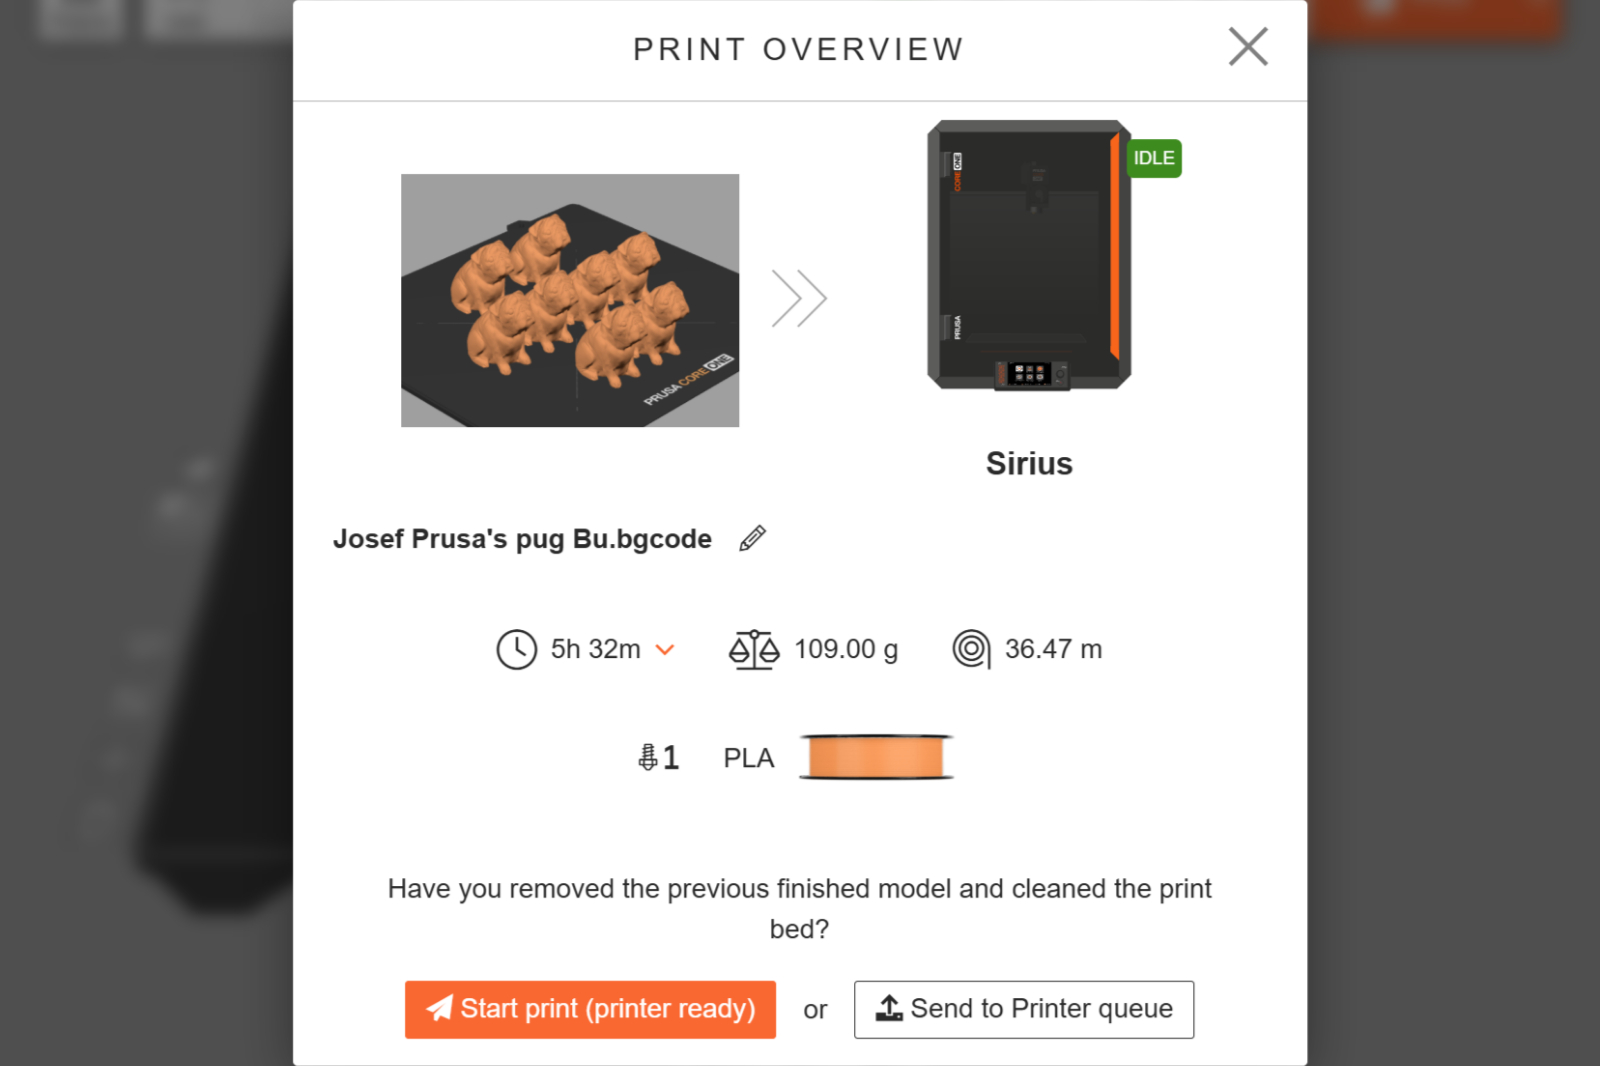
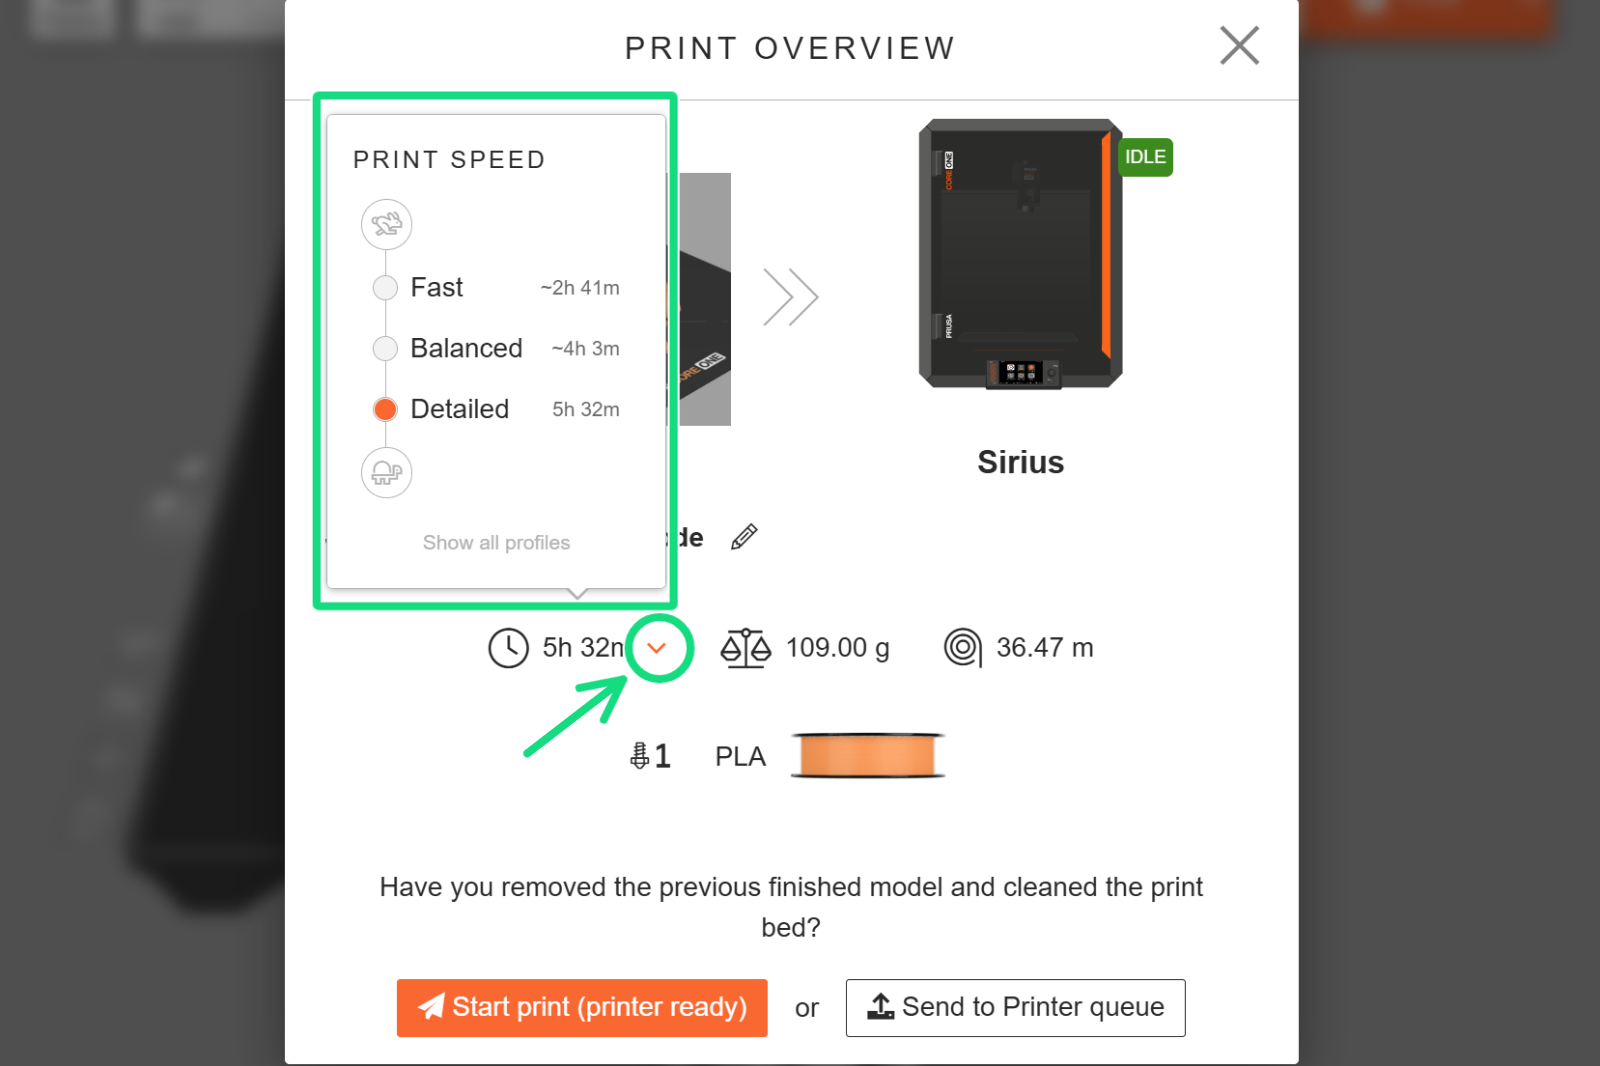
Sie können auf den Dropdown-Pfeil neben der geschätzten Druckzeit klicken, um einen schnellen Vergleich der Druckzeiten mit anderen Druckprofilen anzuzeigen. Wählen Sie eines der Profile aus, um das Projekt neu zu slicen.
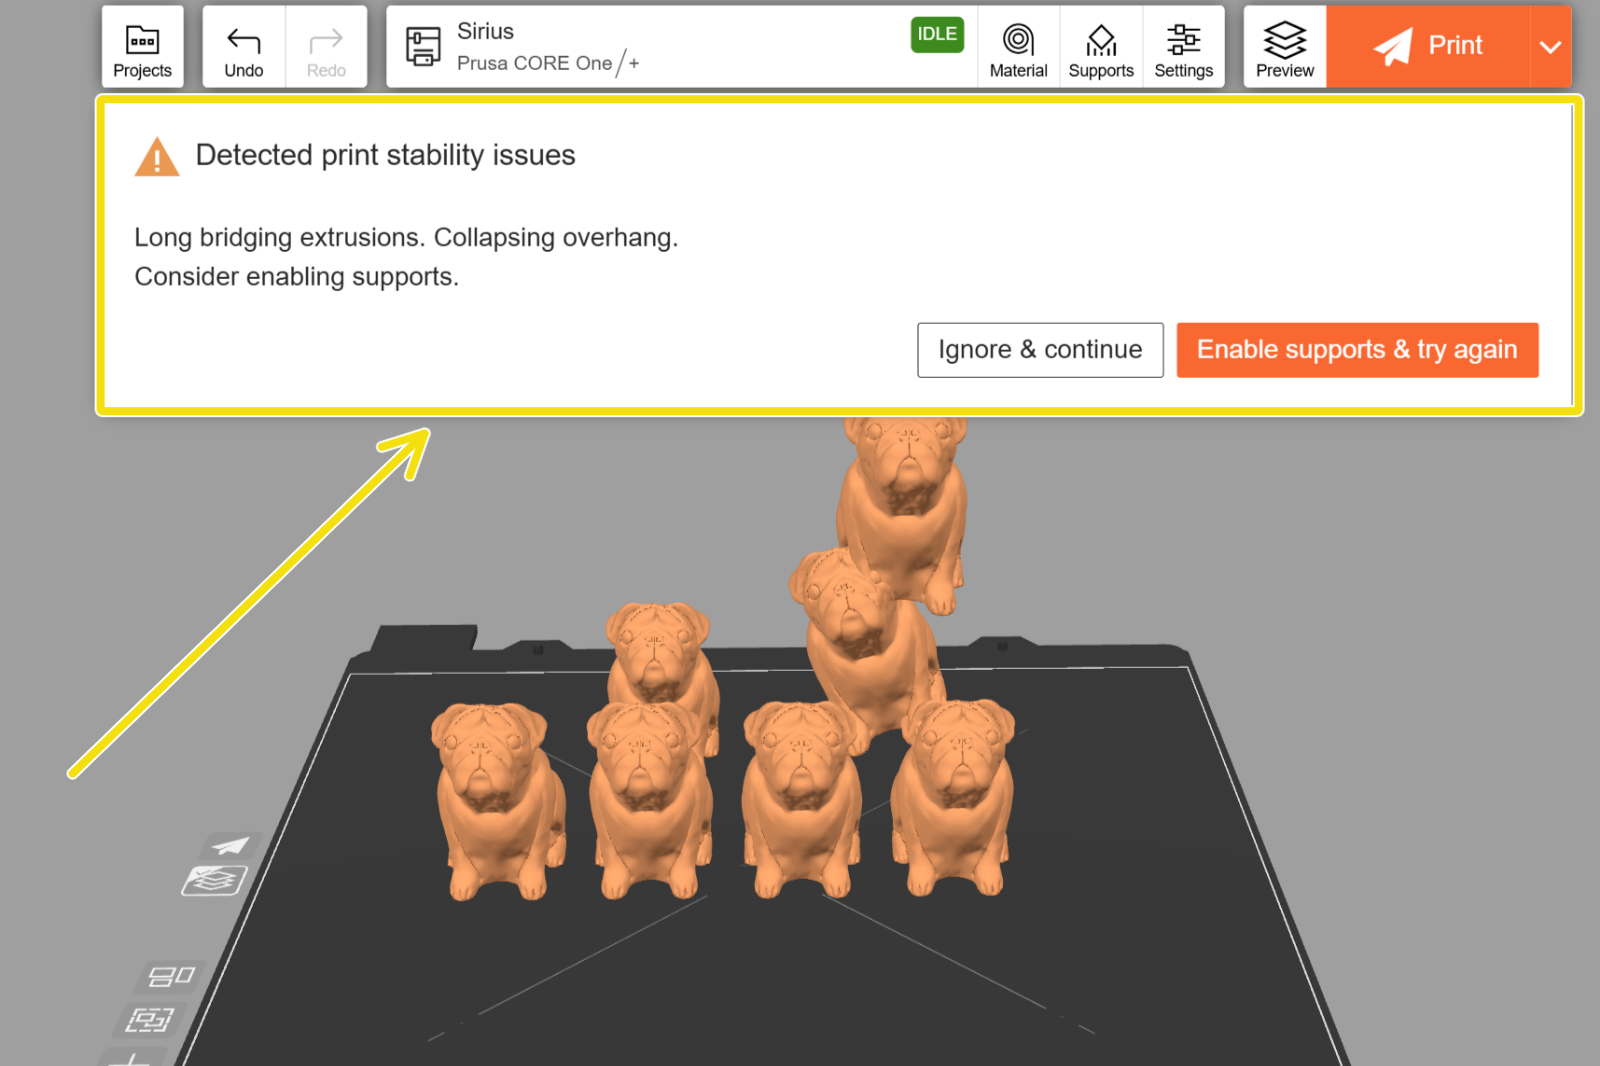
Wenn EasyPrint ein mögliches Problem beim Drucken erkennt, wird ein Warnbildschirm angezeigt, auf dem das Problem beschrieben wird. Sofern das Modell nicht ausdrücklich für das Drucken ohne Stützstrukturen konzipiert ist, ist es in der Regel sicherer, „Stützstrukturen aktivieren & erneut versuchen“ auszuwählen, zum erneuten Slicen. Alternativ können Sie auf Ignorieren & fortfahren klicken, um mit den aktuellen Einstellungen fortzufahren.
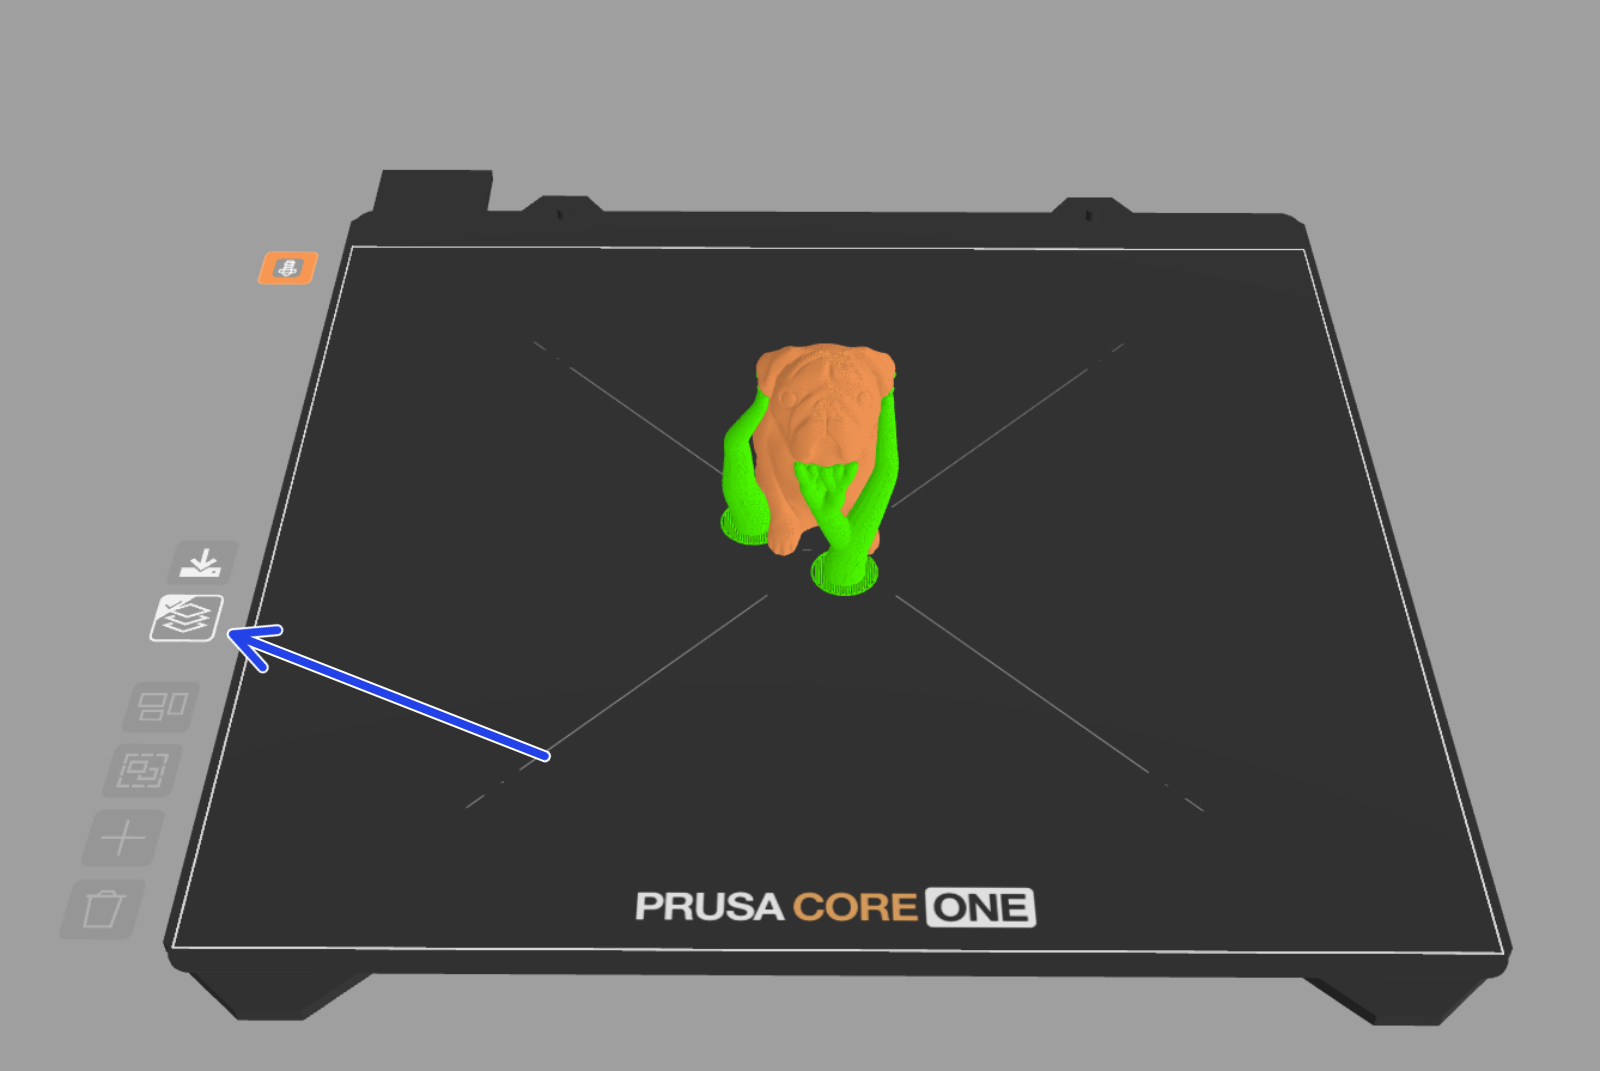
Optional können Sie die Vorschau des G-Codes anzeigen. Die Vorschau enthält die generierten Stützen (grün dargestellt) und ist eine gute Möglichkeit, eine letzte Kontrolle vor dem Drucken durchzuführen.
Um eine faire Nutzung für alle Anwender zu gewährleisten, gilt pro Druckbett eine Slicing-Zeitbegrenzung von 60 Sekunden, was für 95 % der Projekte ausreichen sollte. Bei besonders komplexen Druckaufträgen können Sie entweder die Projektdatei herunterladen und lokal auf Ihrem Computer in PrusaSlicer slicen oder die PRUSA Subscription nutzen, die erweiterte Slicing-Limits beinhaltet.
Sequentielles Drucken
When printing multiple objects, you can enable sequential printing, which changes the printer's default behavior: it prints one object from the first layer to the last, and only then starts printing the first layer of the next object. Sequential printing can reduce stringing or the chance of a single detached object ruining the whole print.
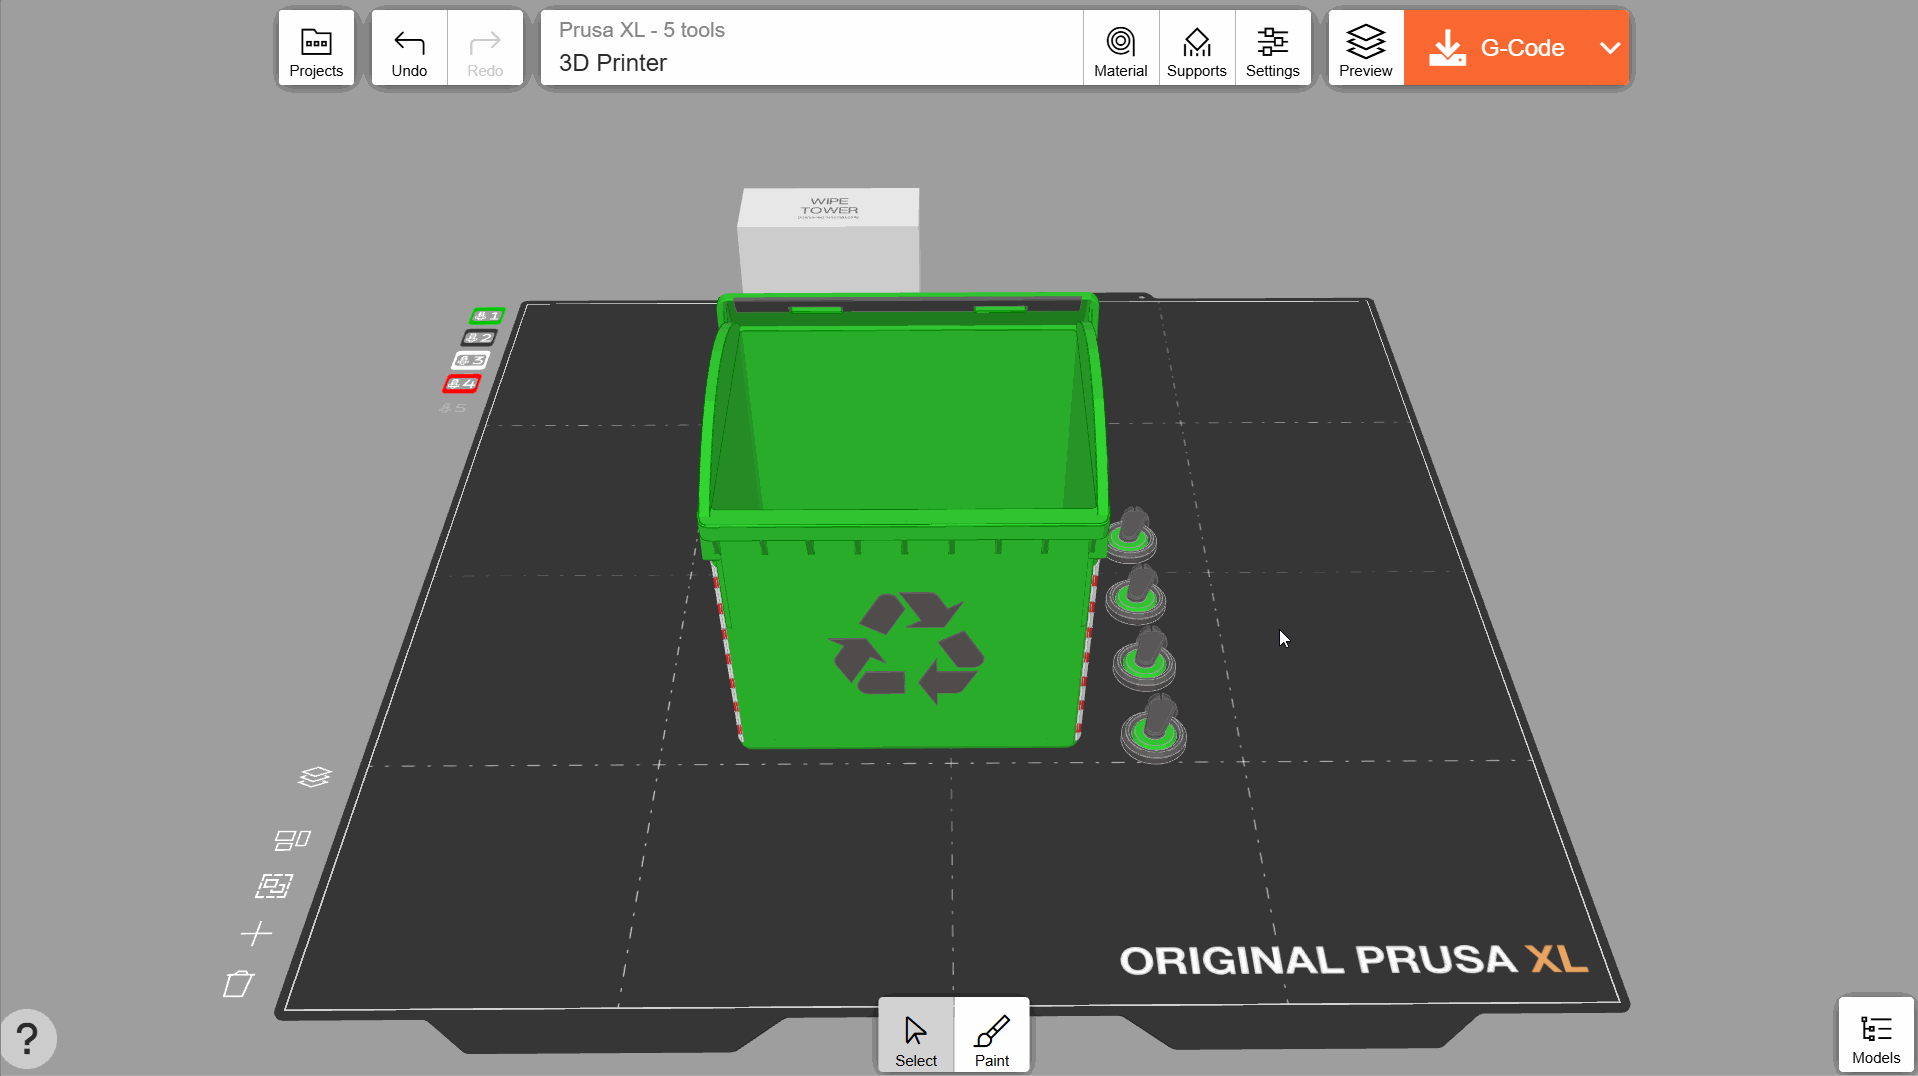
Aktivieren Sie diese Option, indem Sie auf die Schaltfläche „Sequentieller Druck“ auf der linken Seite des Druckbetts klicken. Alle Objekte werden automatisch so angeordnet, dass ein sequentieller Druck möglich ist. Die Abstände zwischen den Objekten sind deutlich größer als üblich, da der Druckkopf vermeiden muss, bereits gedruckte Objekte zu berühren. Die Objekte werden der Reihe nach von der Vorderseite zur Rückseite der Druckplatte gedruckt.
Sollten zu viele Objekte vorhanden sein oder diese für ein sequenzielles Drucken zu groß sein, werden sie stattdessen auf mehrere Druckbetten verteilt.
Wenn Sie Objekte verschieben, nachdem diese automatisch angeordnet wurden, wird die Schaltfläche „Sequenziell drucken“ möglicherweise rot angezeigt, um darauf hinzuweisen, dass die neue Position ungültig ist. Die Objekte, die das Problem verursachen, werden ebenfalls hervorgehoben. Klicken Sie auf die Schaltfläche „Anordnen“ (gekennzeichnet durch den grünen Pfeil), um die Objekte neu anzuordnen und das Problem zu beheben.
Bitte beachten Sie, dass der sequenzielle Druck für Prusa-Drucker optimiert ist. Bei anderen Druckern ist diese Funktion möglicherweise weniger effizient oder nicht verfügbar.
Schneidewerkzeug
Das Schneidewerkzeug teilt ein Objekt entlang einer ebenen Fläche in zwei separate Objekte auf. Dies kann genutzt werden, um ein zu großes Modell in mehrere Teile zu zerlegen, die auf ein kleineres Druckbett passen, um eine ebene Grundfläche für das Drucken zu schaffen oder um einfach unnötige Teile eines Modells zu entfernen.
Um das Werkzeug zu verwenden, wählen Sie ein Objekt aus und drücken Sie Mehr → Schneiden. Daraufhin wird eine transparente Vorschau der Schnittebene angezeigt. Sie können die Ebene mit dem Cursor nach oben und unten ziehen oder die abgerundeten Pfeile verwenden, um die Ebene zu drehen. Sie haben die Wahl zwischen Teilen des Modells (wodurch es in zwei Objekte aufgeteilt wird, die automatisch angeordnet werden) oder An Ort und Stelle schneiden (die Teile bleiben an ihrem Platz und gehören weiterhin zu einer Objektgruppe). Drücken Sie auf „Übernehmen“, um den Schnitt zu bestätigen.
Im Gegensatz zu PrusaSlicer behält das Schneidewerkzeug in EasyPrint Objekteigenschaften wie Bemalung oder Fuzzy Oberfläche bei. Das Schneidewerkzeug von PrusaSlicer bietet jedoch die Möglichkeit, dem Schnitt benutzerdefinierte Verbindungselemente hinzuzufügen, was für die Montage gedruckter Teile nützlich ist.
Arbeiten mit Gruppen
Modelle, die aus mehreren Teilen (Netzen) bestehen, werden als Gruppe in EasyPrint geladen. Alle Objekte in der Gruppe werden zusammen als ein Objekt verschoben, skaliert und gesliced. Im Bedienfeld Modelle können Sie die einzelnen Teile innerhalb der Gruppe überprüfen. Jedes Teil kann einzeln aus der Gruppe entfernt oder gelöscht werden. Alternativ können Sie auch auf ein Teil eines Modells auf dem Druckbett doppelklicken, um es manuell zu trennen.
Wenn Sie ein Objekt so verschieben, dass es ein anderes Objekt berührt, werden die Objekte automatisch zu einer Gruppe zusammengefasst. Sie können die Gruppe im Bedienfeld „Modelle“ wieder auflösen.
Ein Objekt in ein Loch verwandeln
Ein Objekt innerhalb einer Gruppe kann in ein Loch umgewandelt werden, wodurch sich überschneidende Geometrie entfernt wird. Dies kann nützlich sein, um kleine Löcher zu erstellen oder Teile von Objekten zu entfernen, wenn das reguläre Schnittwerkzeug nicht gut funktionieren würde.
Doppelklicken Sie auf ein Objekt innerhalb einer Gruppe, um es auszuwählen. Wählen Sie anschließend auf der Registerkarte „Farbzuweisung“ die Option „Loch“ aus. Die 3D-Vorschau wird aktualisiert und zeigt das Objekt mit transparenten Farben an; dabei werden alle sich überschneidenden Teile entfernt. Sie können das Loch später wieder in ein normales Objekt umwandeln, indem Sie auf der Registerkarte „Farbzuweisung“ die Option „Massiv“ auswählen.
Das Loch lässt sich wie jedes andere Objekt verschieben, und die Vorschau wird in Echtzeit aktualisiert.
Das „Loch“-Werkzeug kann unter Umständen nicht druckbare Geometrie erzeugen. Wir empfehlen Ihnen, die G-Code-Vorschau zu überprüfen, um sicherzustellen, dass das Objekt tatsächlich eine hohe Druckbarkeit hat. EasyPrint erkennt zudem automatisch größere Probleme und gibt Ihnen vor dem Drucken eine Warnung aus.
Arbeiten mit mehreren Betten
Sie können in EasyPrint nahtlos mit mehreren virtuellen Betten arbeiten. Alle Betten haben die gleichen Druckeinstellungen, aber jedes Bett wird separat gesliced und erzeugt seine eigene Druckdatei. Dies kann bei großen Projekten mit vielen Teilen nützlich sein. Wenn die Objekte in Ihrer Druckliste nicht auf ein einzelnes Bett passen, werden sie automatisch auf mehreren Betten angeordnet.
Alternativ können Sie ein beliebiges Objekt in den leeren Bereich ziehen, woraufhin dynamisch neue Betten erscheinen. Sobald Sie das Objekt ablegen, bleibt das Bett darunter bestehen.
Sie können ein Objekt auf ein bestimmtes anderes Bett verschieben, indem Sie es auswählen, auf Mehr → Verschieben nach klicken und das Zielbett auswählen. Standardmäßig werden Objekte auf dem Zielbett automatisch angeordnet; diese Funktion kann über das Kontrollkästchen auf diesem Menübildschirm deaktiviert werden. „Neues Bett“ erzeugt ein weiteres leeres Bett für das Objekt.
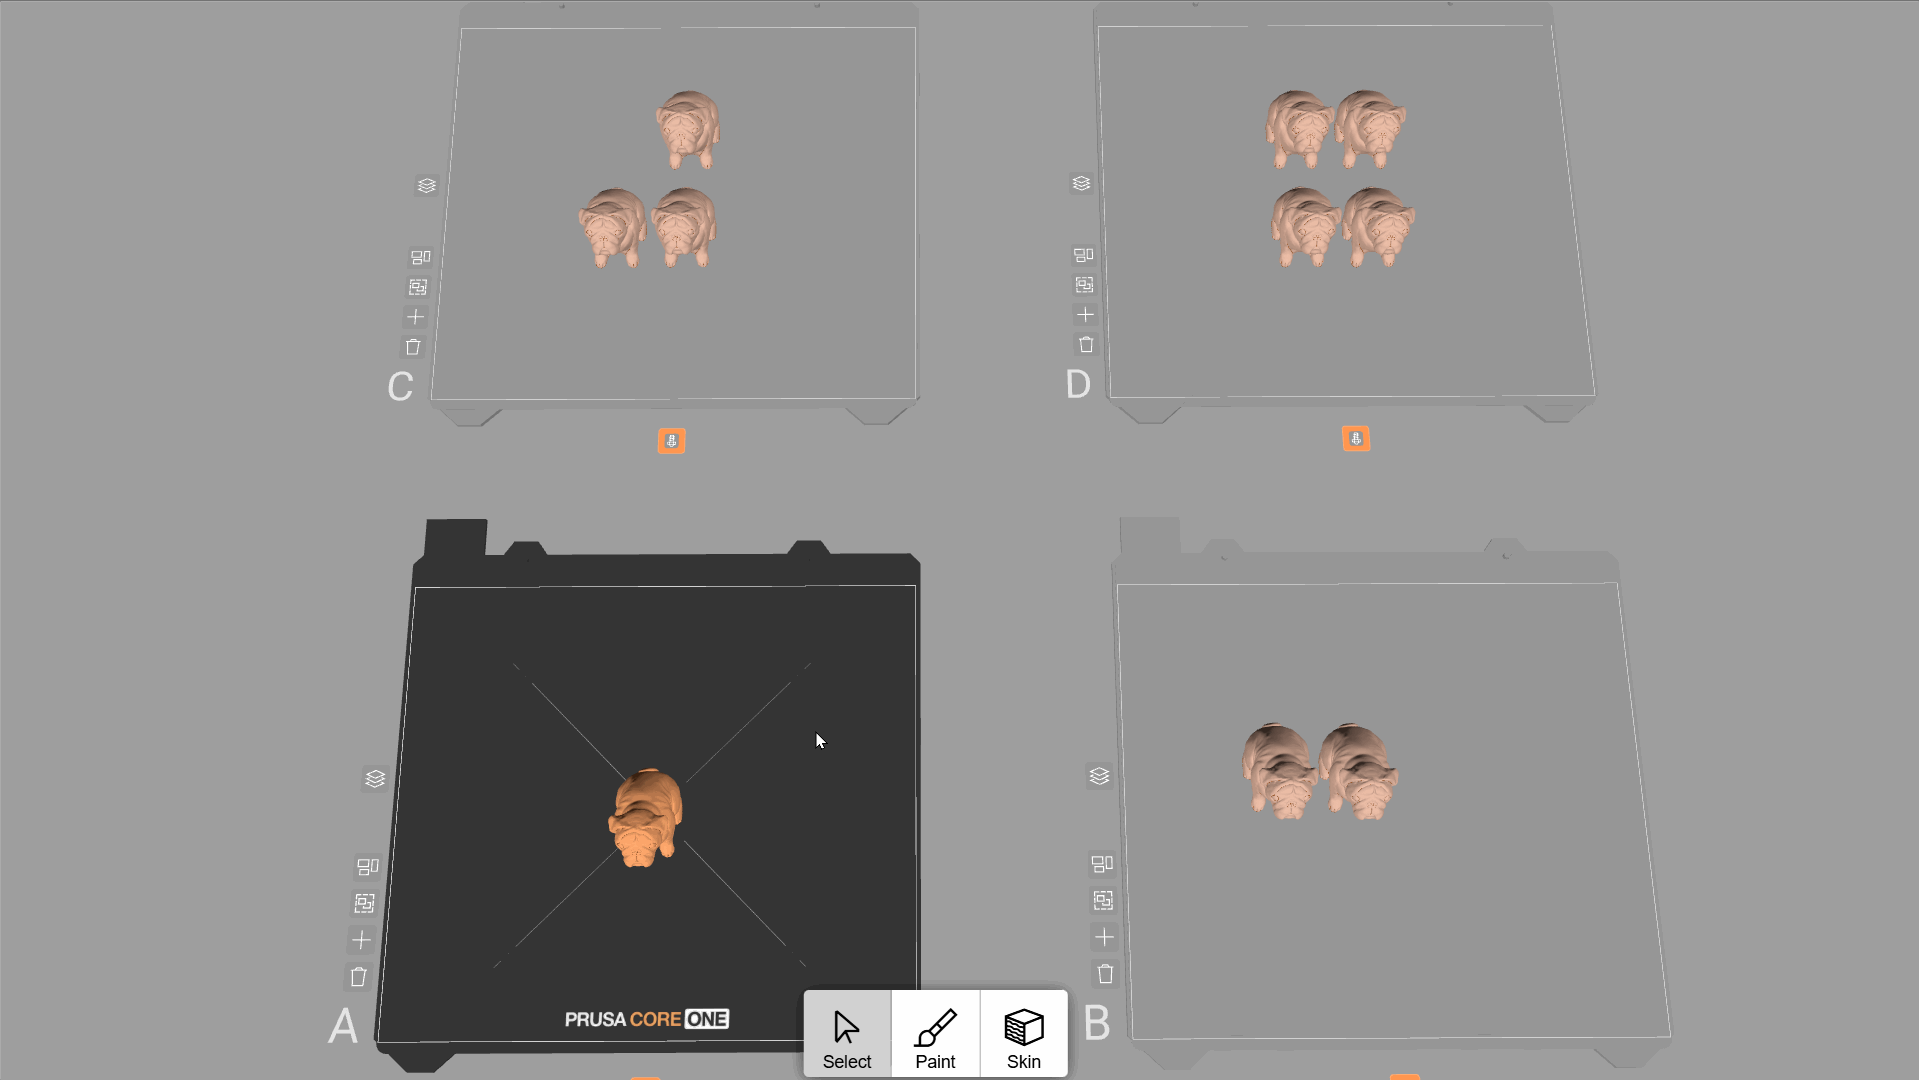
Es gibt immer ein aktives Bett, das Sie an seiner einfarbigen Farbe erkennen können (die inaktiven Betten sind halbtransparent). Klicken Sie auf ein inaktives Bett, um es zu aktivieren. Über das Dropdown-Menü können Sie wählen, ob Sie alle Betten oder nur das aktuell aktive Bett drucken möchten.
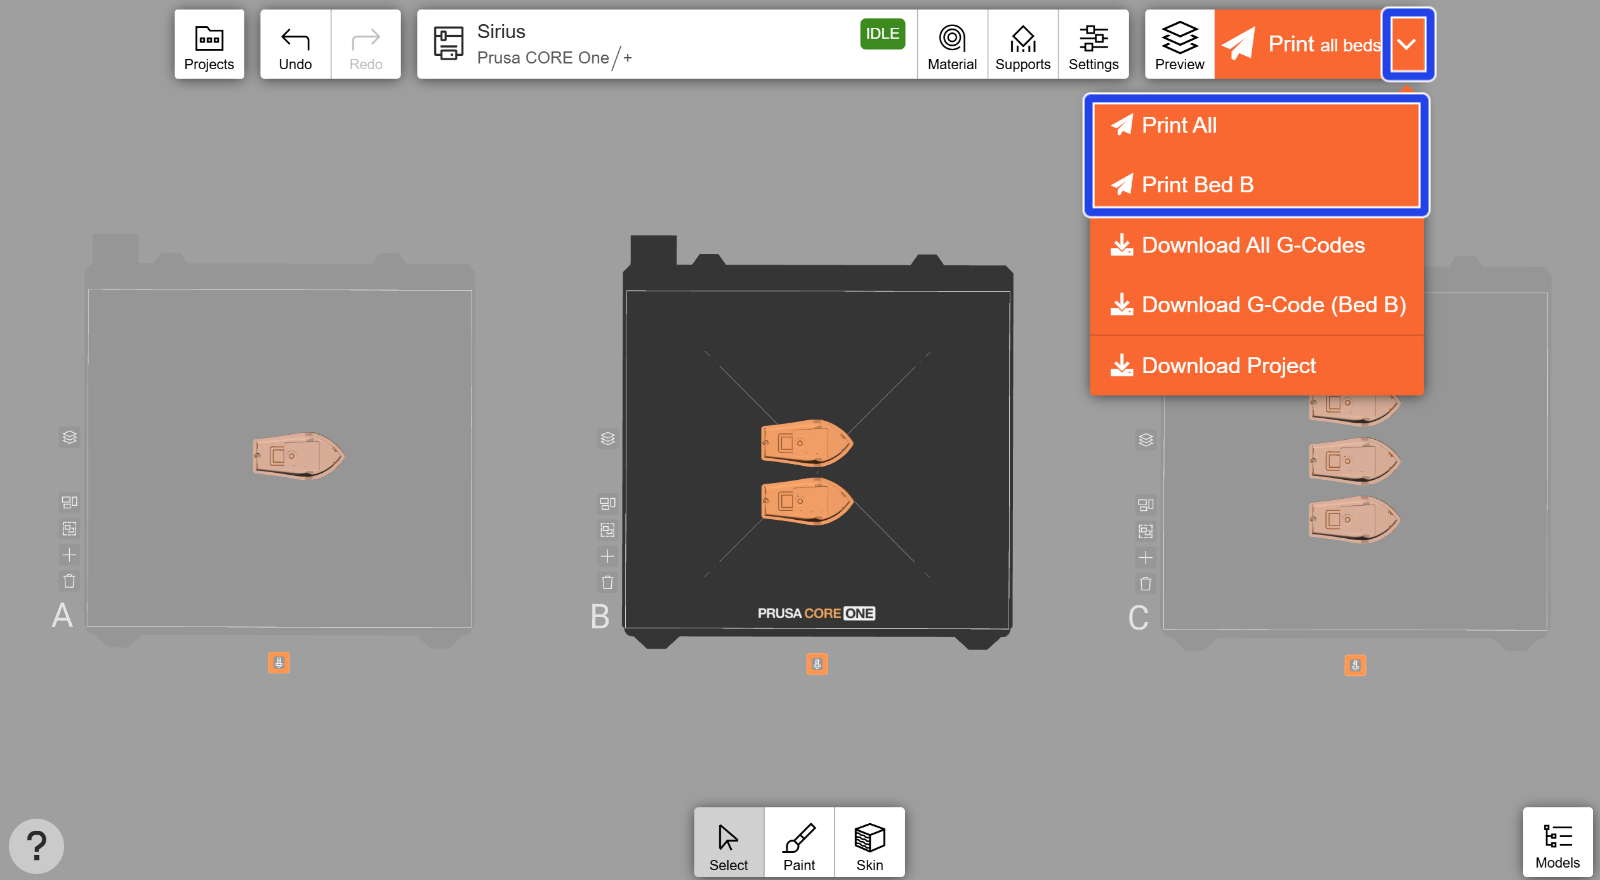
Wenn Sie sich dafür entscheiden, alle Betten auf einmal zu slicen, werden diese nacheinander geslicet. Accounts mit aktivem PRUSA Subscription haben Zugriff auf das parallele Prioritäts-Slicing.
Wenn das Vorschausymbol auf der linken Seite jedes Bettes ein Häkchen in seiner Ecke zeigt, bedeutet dies, dass das Bett bereits gesliced wurde. Mit der Schaltfläche darüber können Sie die Datei schnell an den Drucker senden (oder den G-Code herunterladen, je nach dem von Ihnen gewählten Drucker).
Projekte anzeigen und herunterladen
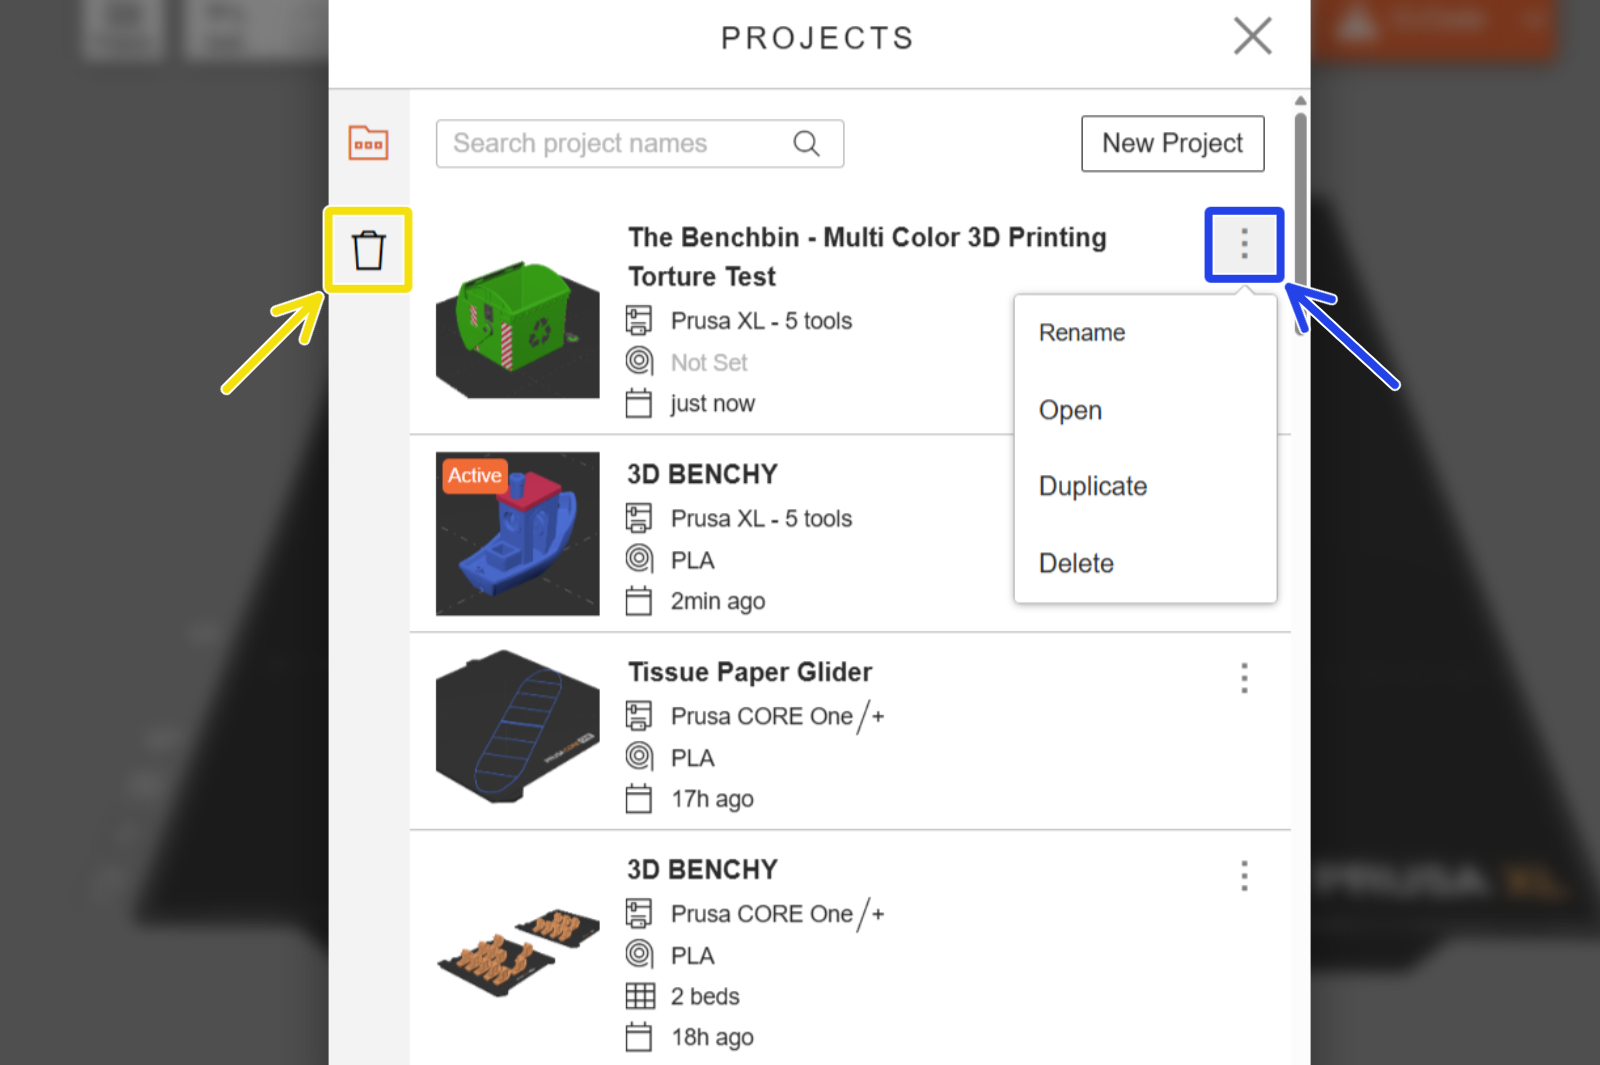
Über das orangefarbene Dropdown-Menü können Sie das aktuelle Projekt als 3MF-Datei herunterladen. Dies kann nützlich sein, wenn Sie Ihr Projekt in PrusaSlicer optimieren oder es mit anderen teilen möchten. Über die entsprechende Registerkarte „Projekte“ können Sie auch auf frühere Projekte zugreifen.
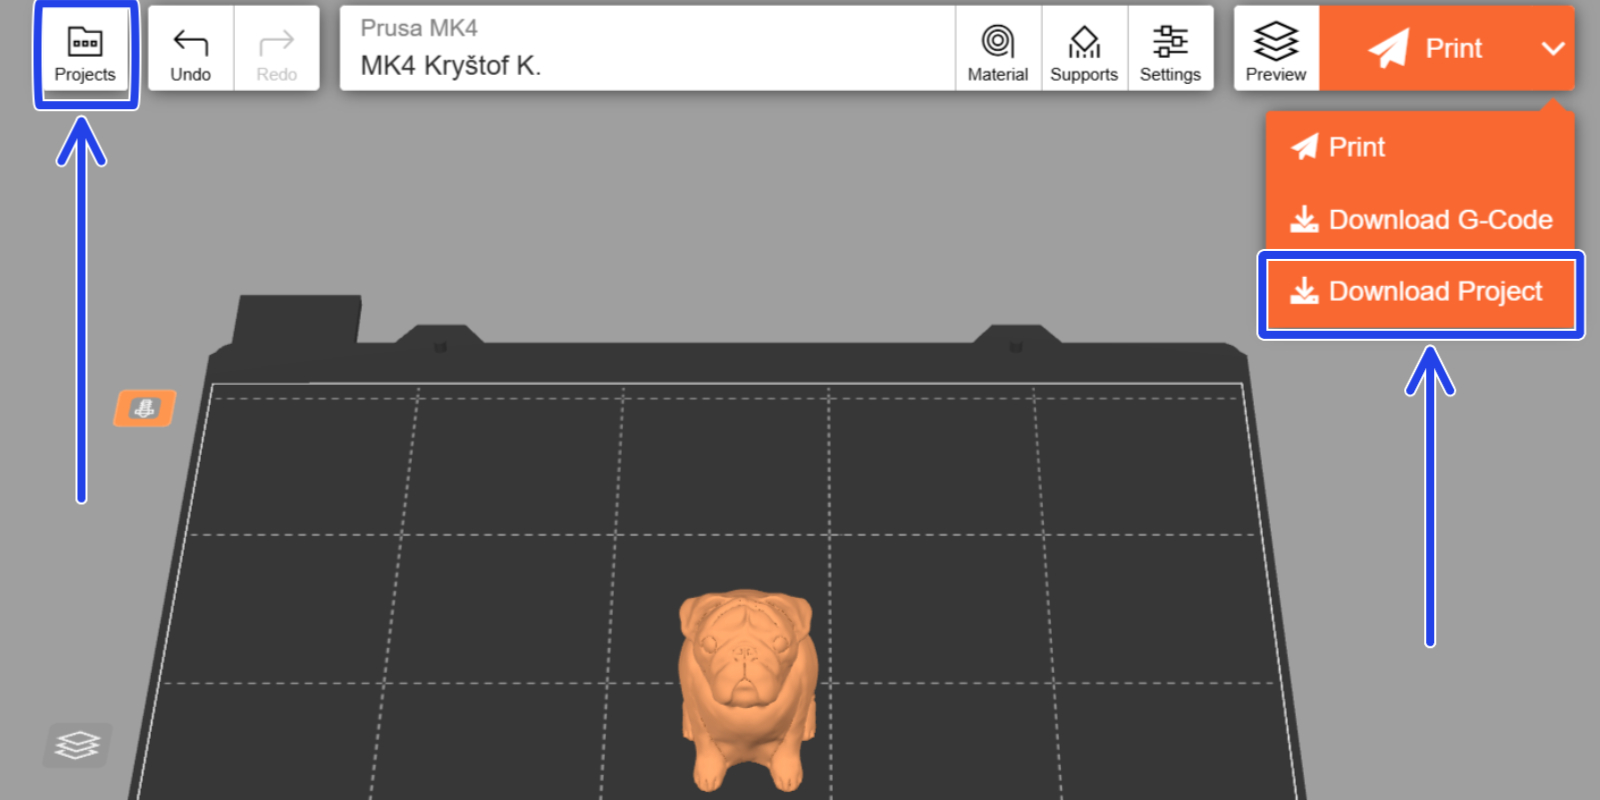
Klicken Sie auf der Registerkarte „Projekte“ auf die drei Punkte, um ein Projekt umzubenennen, zu öffnen, zu duplizieren oder zu löschen. Gelöschte Projekte werden 30 Tage lang im Ordner „Gelöschte Projekte“ aufbewahrt (auf den Sie durch Klicken auf das Papierkorb-Symbol zugreifen können), sofern sie nicht manuell entfernt werden.
EasyPrint-Projekte werden automatisch in einem Cloud-Speicher gespeichert, der mit Ihrem Prusa Account verknüpft ist. Sie können auf einem Gerät mit der Arbeit an einem Projekt beginnen, und es steht Ihnen auch auf Ihren anderen Geräten zur Verfügung. Selbst wenn Sie dasselbe Projekt gleichzeitig auf zwei verschiedenen Geräten geöffnet haben (z. B. auf Ihrem Smartphone und auf einem PC), werden alle Änderungen, die Sie vornehmen, fast sofort auf dem anderen Gerät übernommen.
Benutzerdateien und Cloud-Speicher
Ähnlich wie bei Projekten sind die Dateien, die Sie in EasyPrint hochladen, auf allen Geräten verfügbar. Sie können diese anzeigen, indem Sie im Menü „Modelle hinzufügen“ das Ordnersymbol (das Pluszeichen neben dem Druckbett) auswählen. Sie können diese Dateien für beliebig viele EasyPrint-Projekte wiederverwenden. Die auf diese Weise gespeicherten Dateien werden auf das Cloud-Speicherlimit angerechnet (siehe unten). Um Speicherplatz freizugeben, können Sie einige Ihrer Dateien über das Papierkorbsymbol löschen.
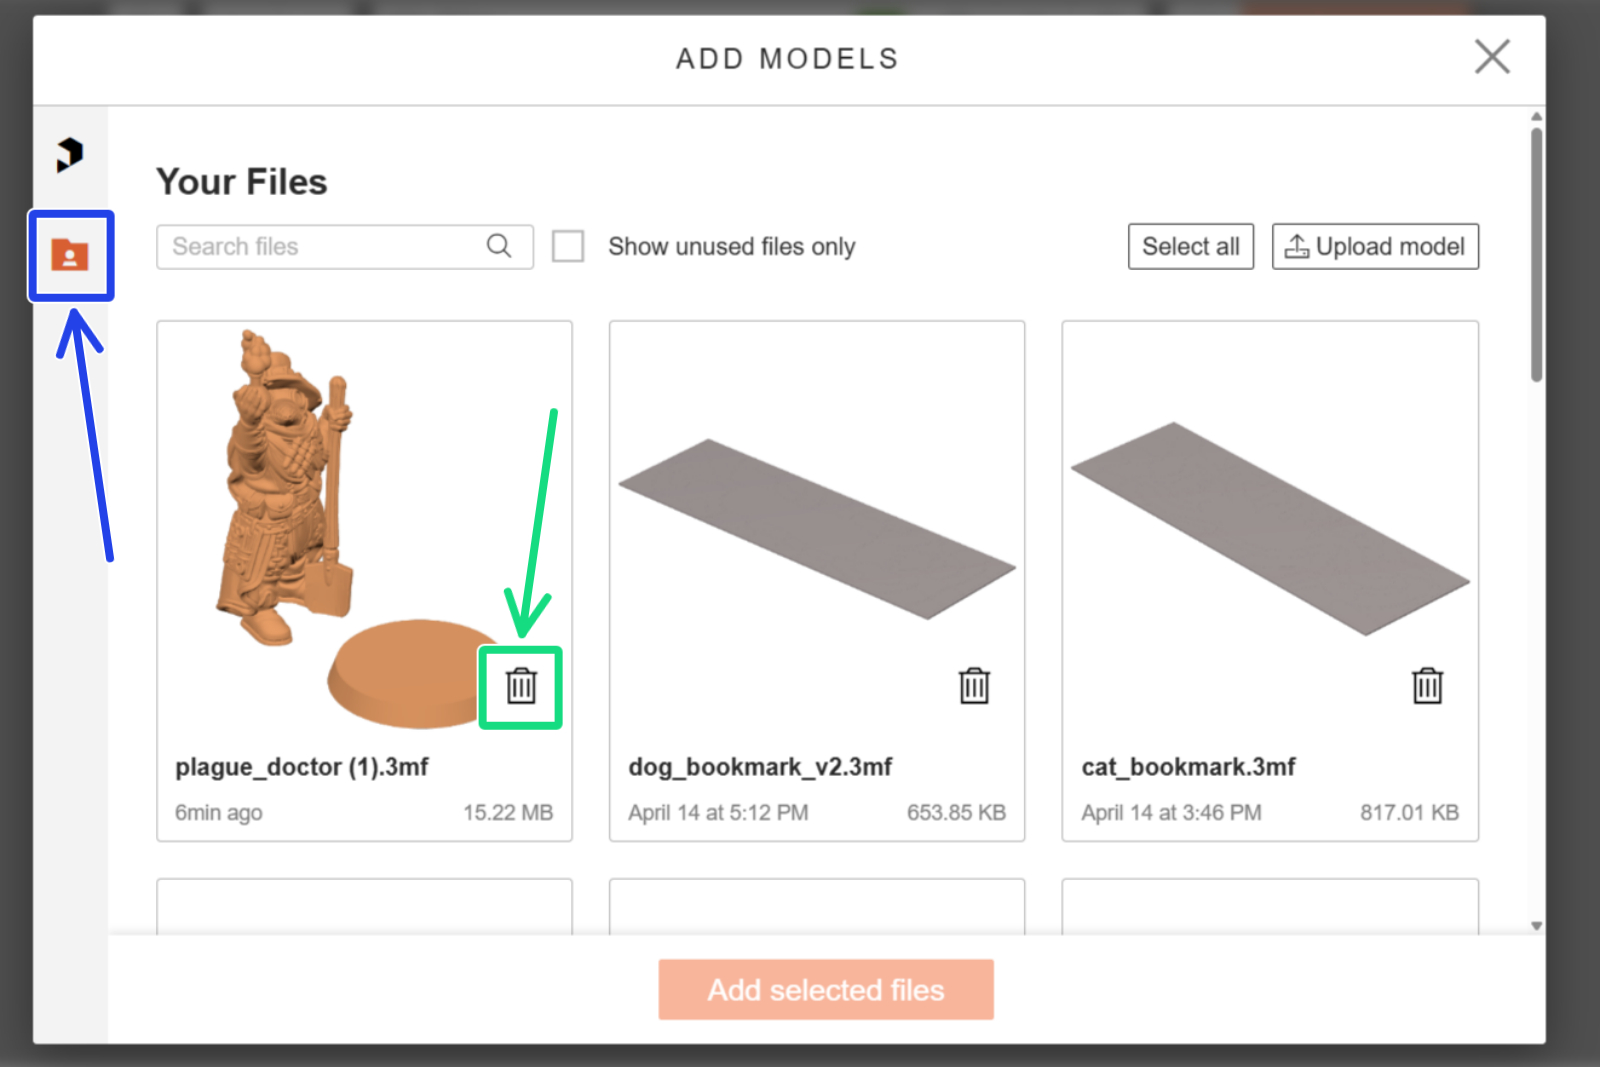
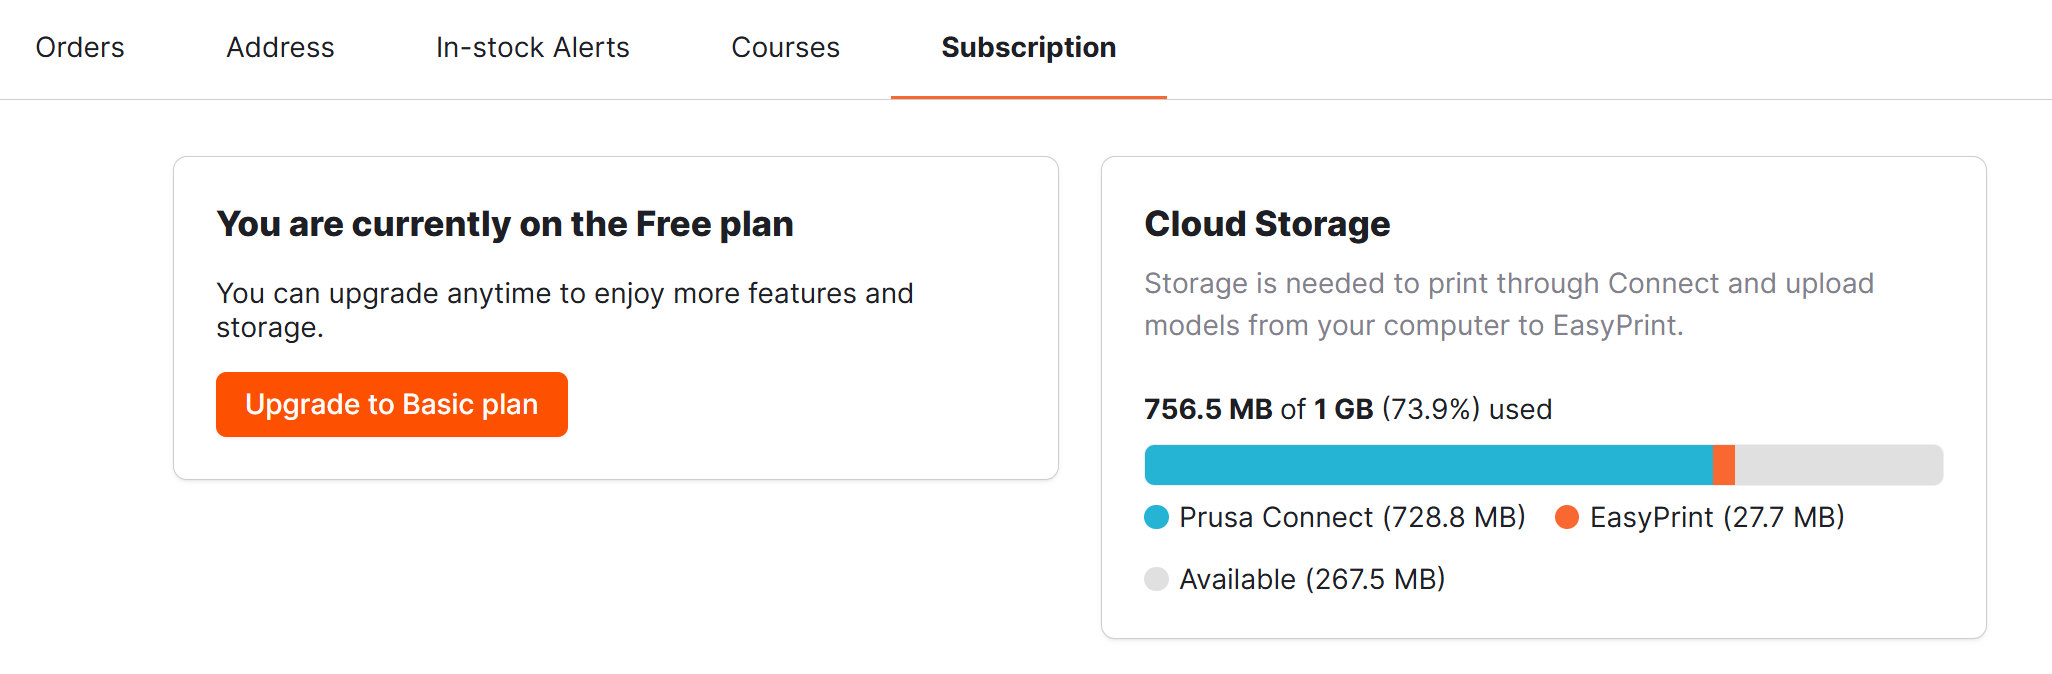
Jedes Prusa Account verfügt über 1 GB Cloud-Speicherplatz, der sowohl für Prusa Connect als auch für EasyPrint genutzt wird. Der Speicherplatz für EasyPrint wird durch das Hochladen von Modellen von Ihrem Gerät belegt. Projekte, die Modelle aus Printables verwenden, werden nicht auf das Speicherlimit angerechnet. Sie können die aktuelle Verwendung in Ihrem Prusa Account einsehen.
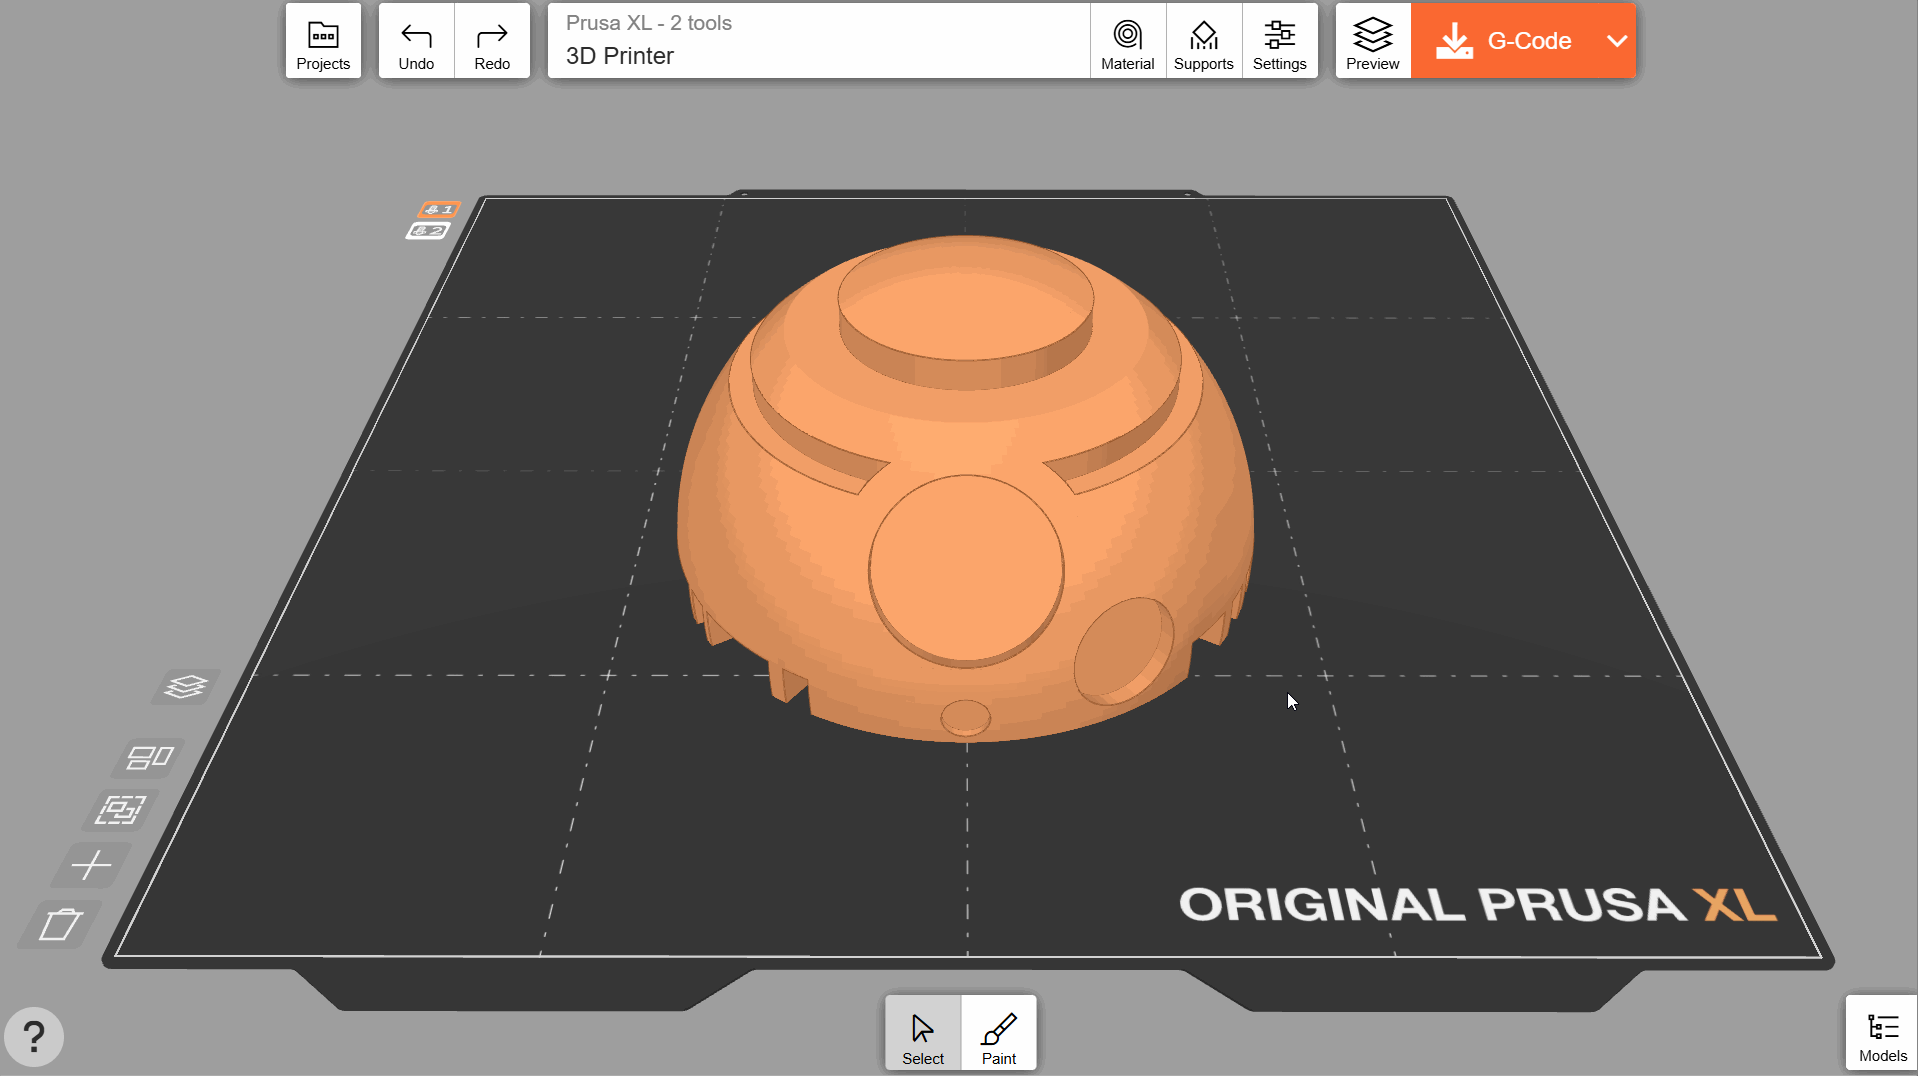
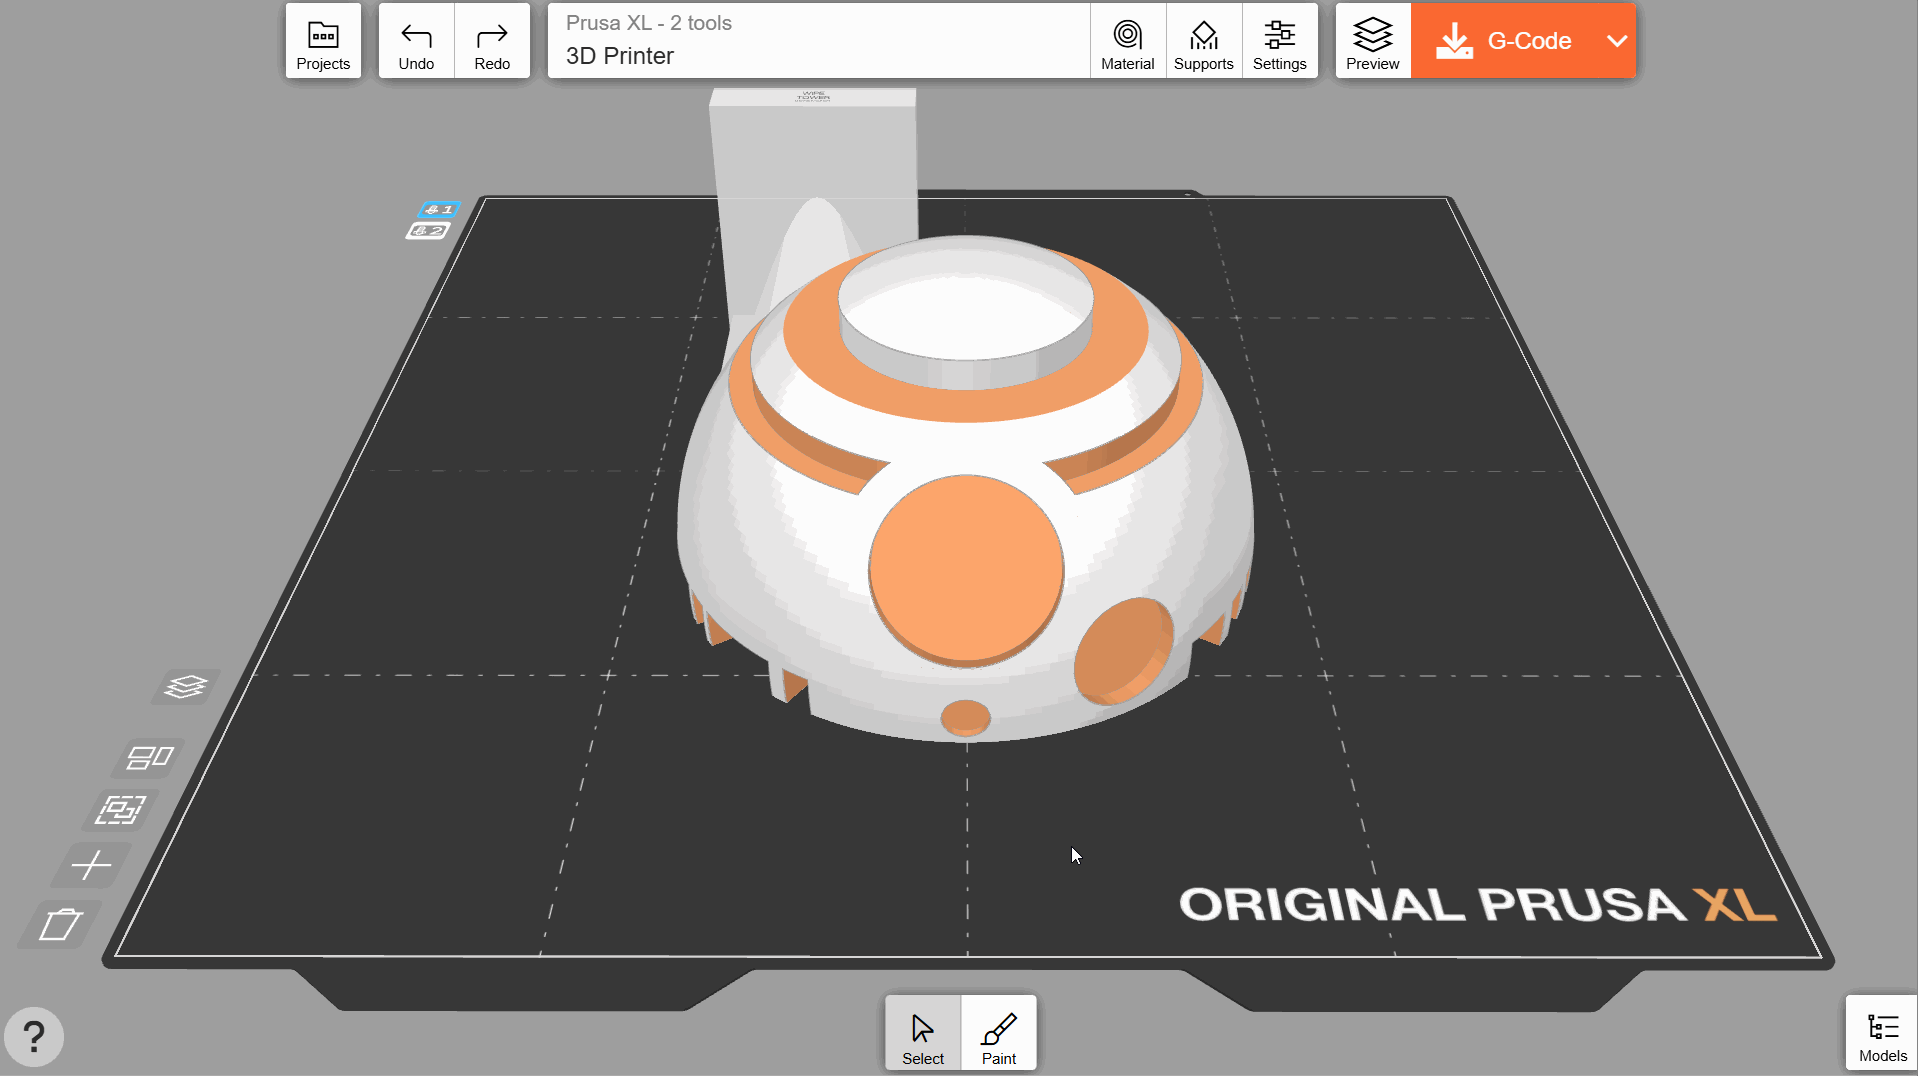
Farben bemalen und zuweisen
EasyPrint kann auch mehrfarbige Druckdateien für Drucker mit Multi-Material-Fähigkeiten (z.B. Original Prusa XL oder Original Prusa MK4S mit dem MMU3 Upgrade) erzeugen.
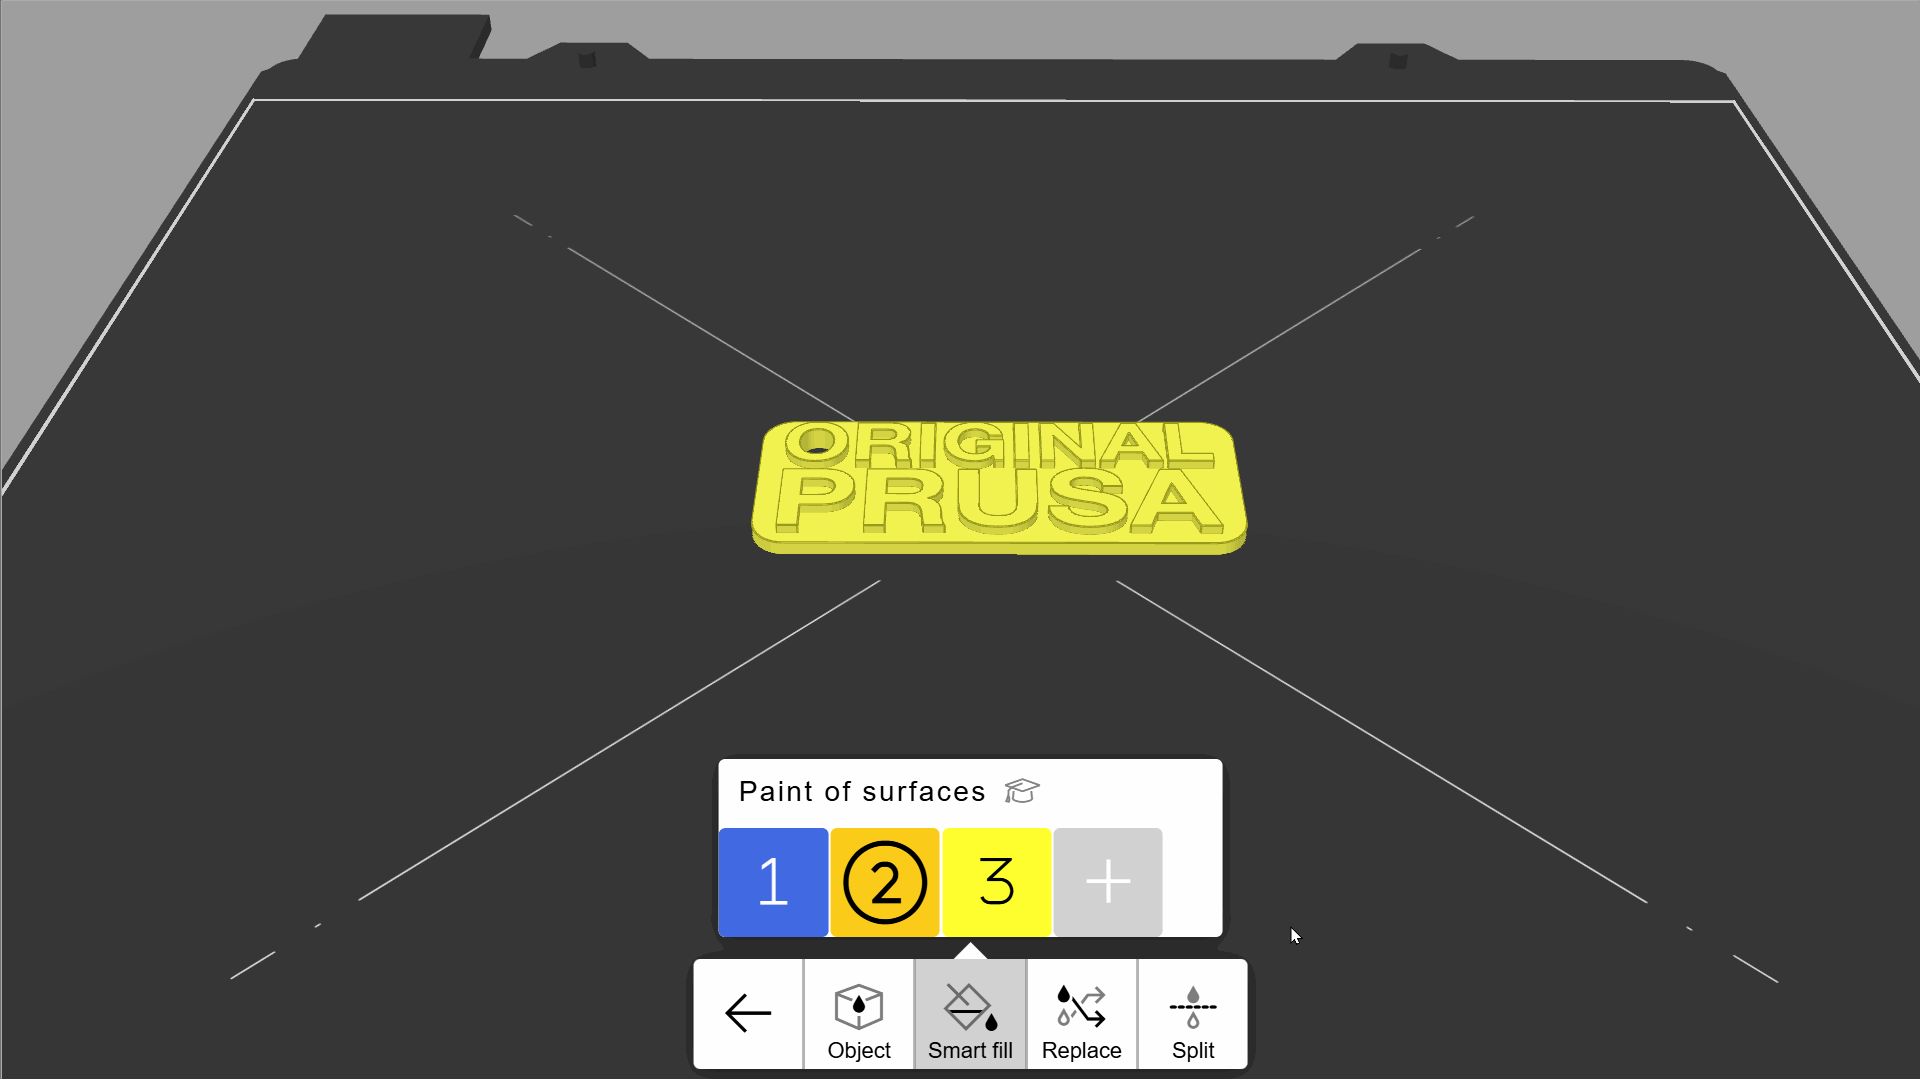
Wählen Sie das Farbwerkzeug und fügen Sie ein weiteres Material (Farbe) hinzu. Wenn Sie auf das Objekt klicken, bemalt das intelligente Füllen-Werkzeug alle umliegenden Bereiche, bis es einen scharfen Winkel erreicht. Wenn Sie ein zweites Mal auf den bemalten Bereich klicken, wird der Schwellenwinkel leicht abgesenkt und die aktuelle Farbe weiter ausgedehnt.
Wenn Sie mit dem Ersetzen-Werkzeug auf eine beliebige Farbe klicken, werden alle Vorkommen dieser Farbe im Objekt durch die derzeit aktive Farbe ersetzt.
Sie können auch mehrfarbige 3MF-Projektdateien mit mehreren Teilen (Meshes) importieren, wie z. B. die Benchbin. Die vom Autor zugewiesenen Farben bleiben dabei erhalten.
Sie können auf ein Teil eines mehrteiligen Objekts doppelklicken, um ihm über die Schaltfläche Material/Farbe ändern eine Farbe zuzuweisen.
Verwenden Sie „Farbe“ → „Objekt“, um mehreren Objekten schnell eine Farbe zuzuweisen.
Sie können eine Farbe, die bereits auf mehrere Objekte angewendet wurde, auf der Registerkarte Materialien ändern.
Mehrfarbendruck auf einem Einfarbdrucker
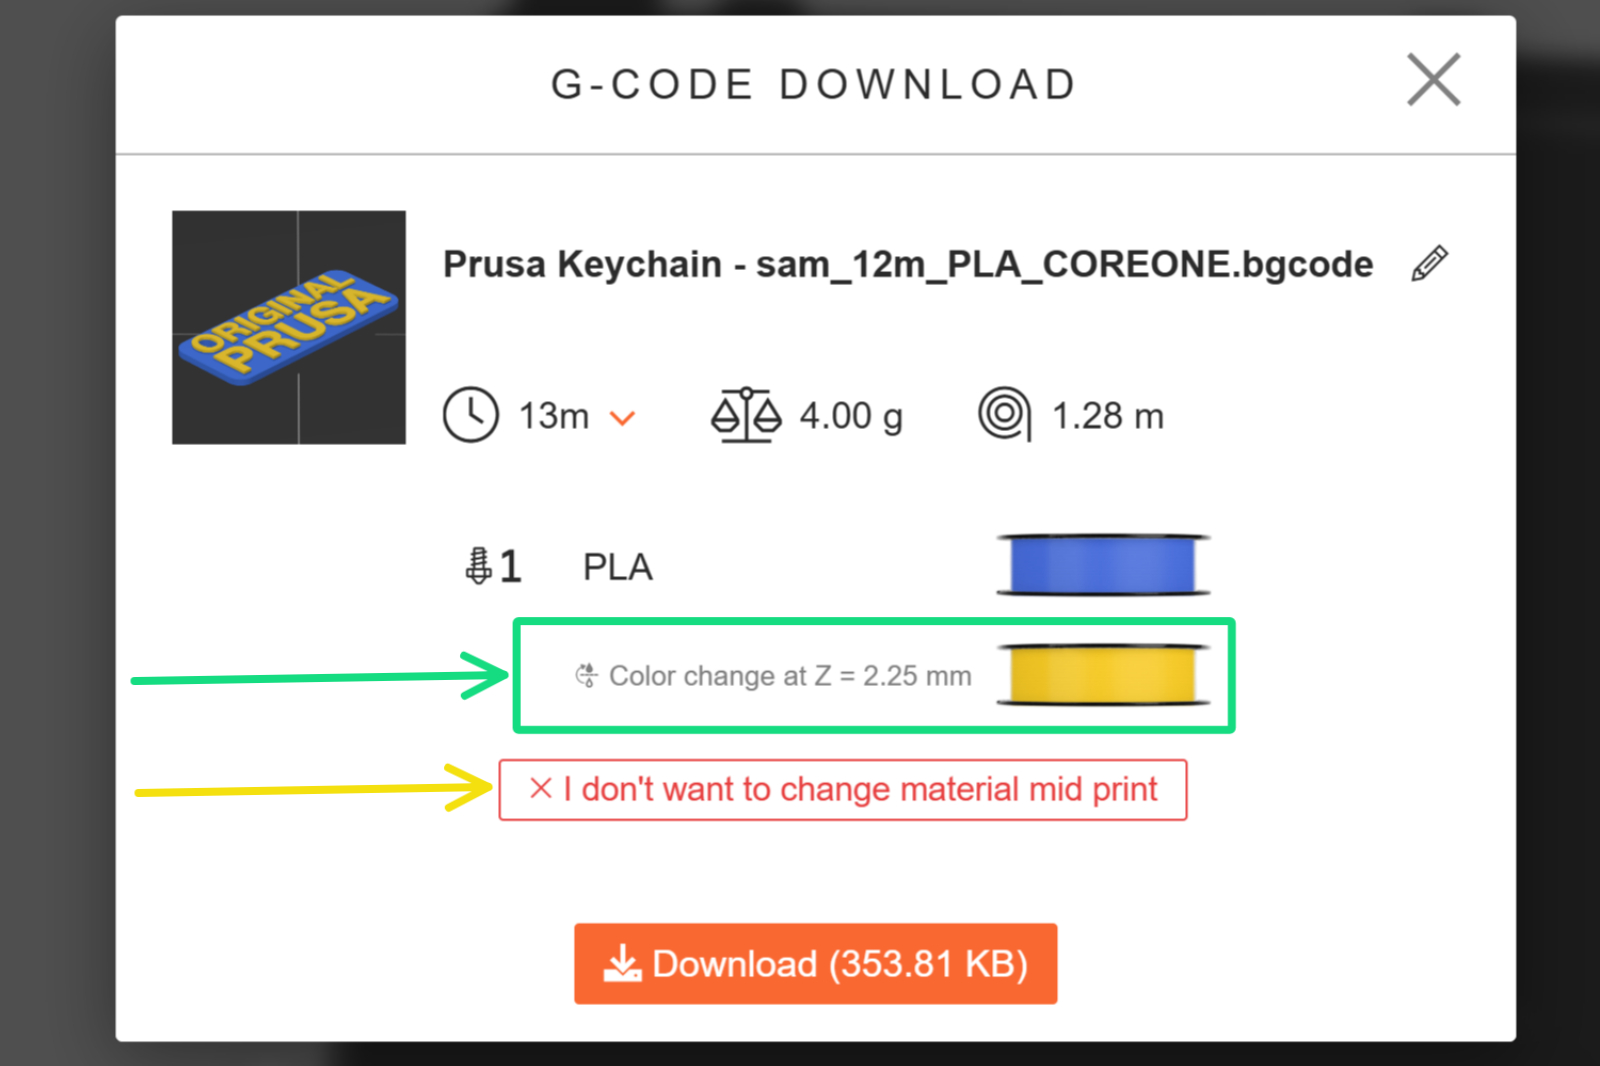
Mit EasyPrint können Sie auf einfarbigen Druckern mehrfarbig drucken. Der Drucker hält dann zwischen den Schichten an und fordert Sie auf, das Filament zu wechseln. Aus diesem Grund kann der Farbwechsel nur entlang einer perfekt horizontalen Ebene (parallel zur Druckplatte) geschehen. Diese Technik eignet sich besonders zum Drucken von Logos, Schildern usw.
Um den Farbwechsel anzuwenden, wählen Sie „Farbe“ → „Trennen“ und wählen Sie ein Objekt aus. Ziehen Sie die horizontale Ebene, um die Stelle für den Farbwechsel festzulegen. Wählen Sie anschließend eine Farbe aus und klicken Sie auf „Anwenden“. Die Farbe wird oberhalb der horizontalen Ebene angewendet.
Beim Exportieren der G-Code-Datei wird auf dem Bestätigungsbildschirm die Schichthöhe angezeigt, bei der der Farbwechsel geschehen soll. Bitte halten Sie sich während des Druckvorgangs in der Nähe Ihres Druckers auf, um diesen Farbwechsel durchzuführen. Wenn Sie keinen Farbwechsel wünschen, können Sie diesen auf diesem Bestätigungsbildschirm abbrechen.
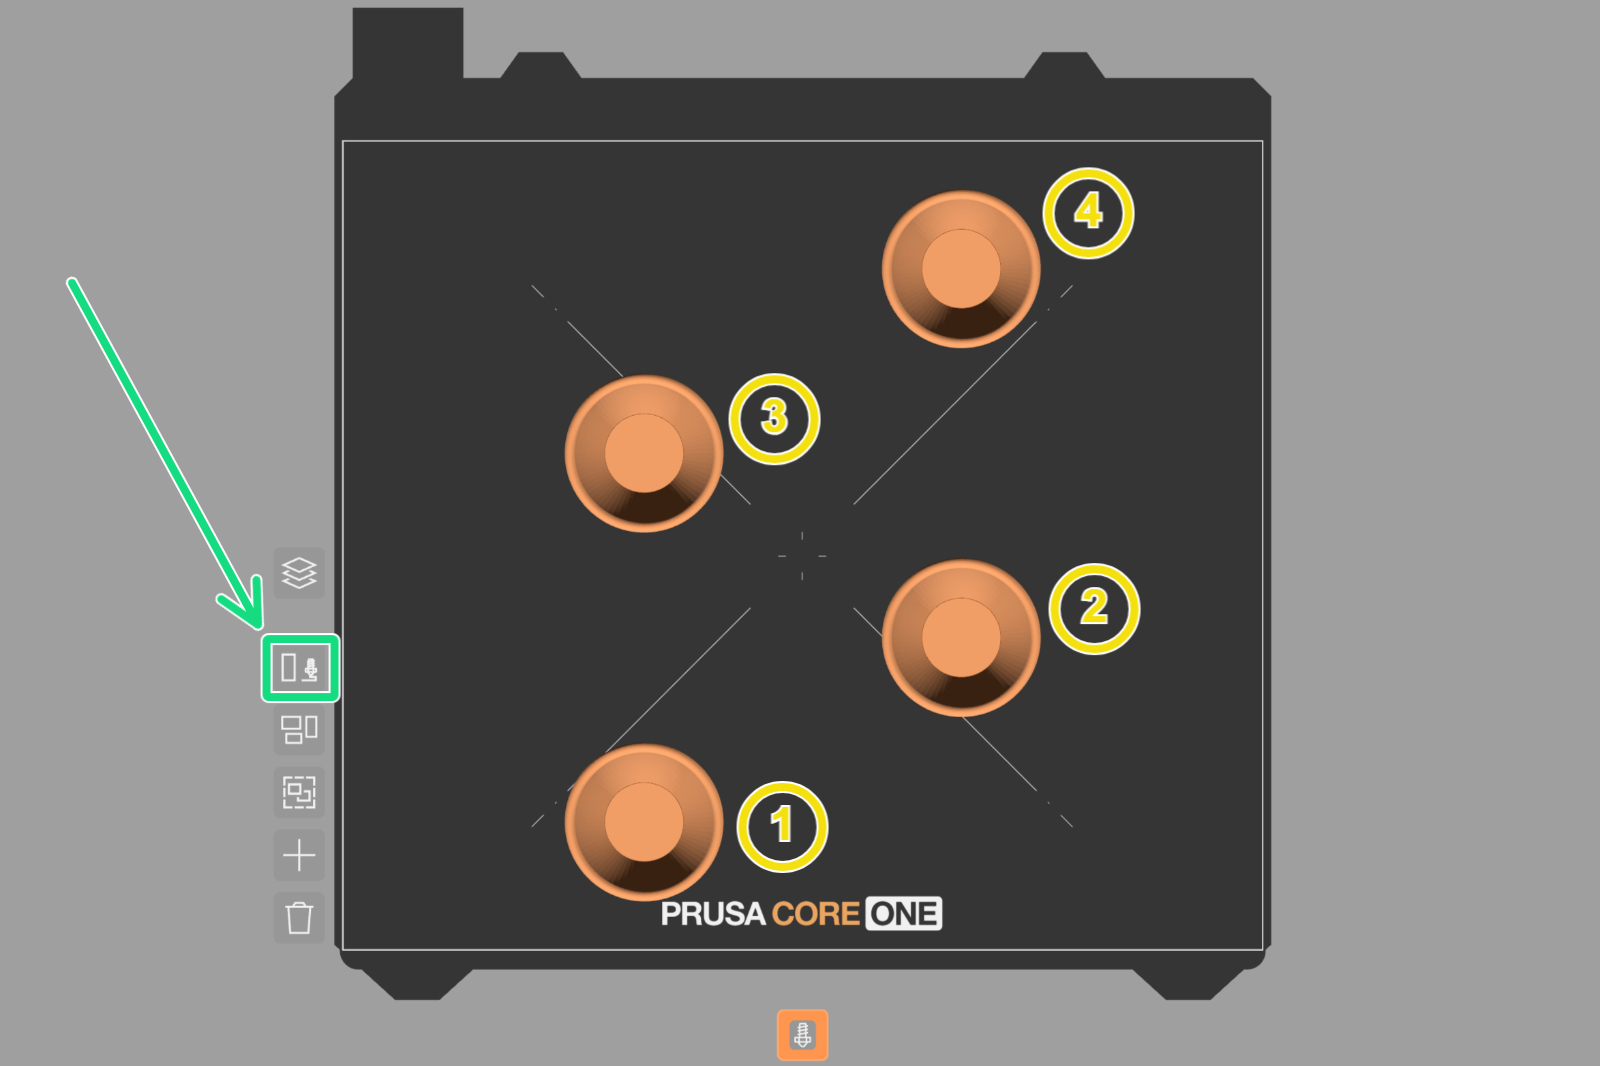
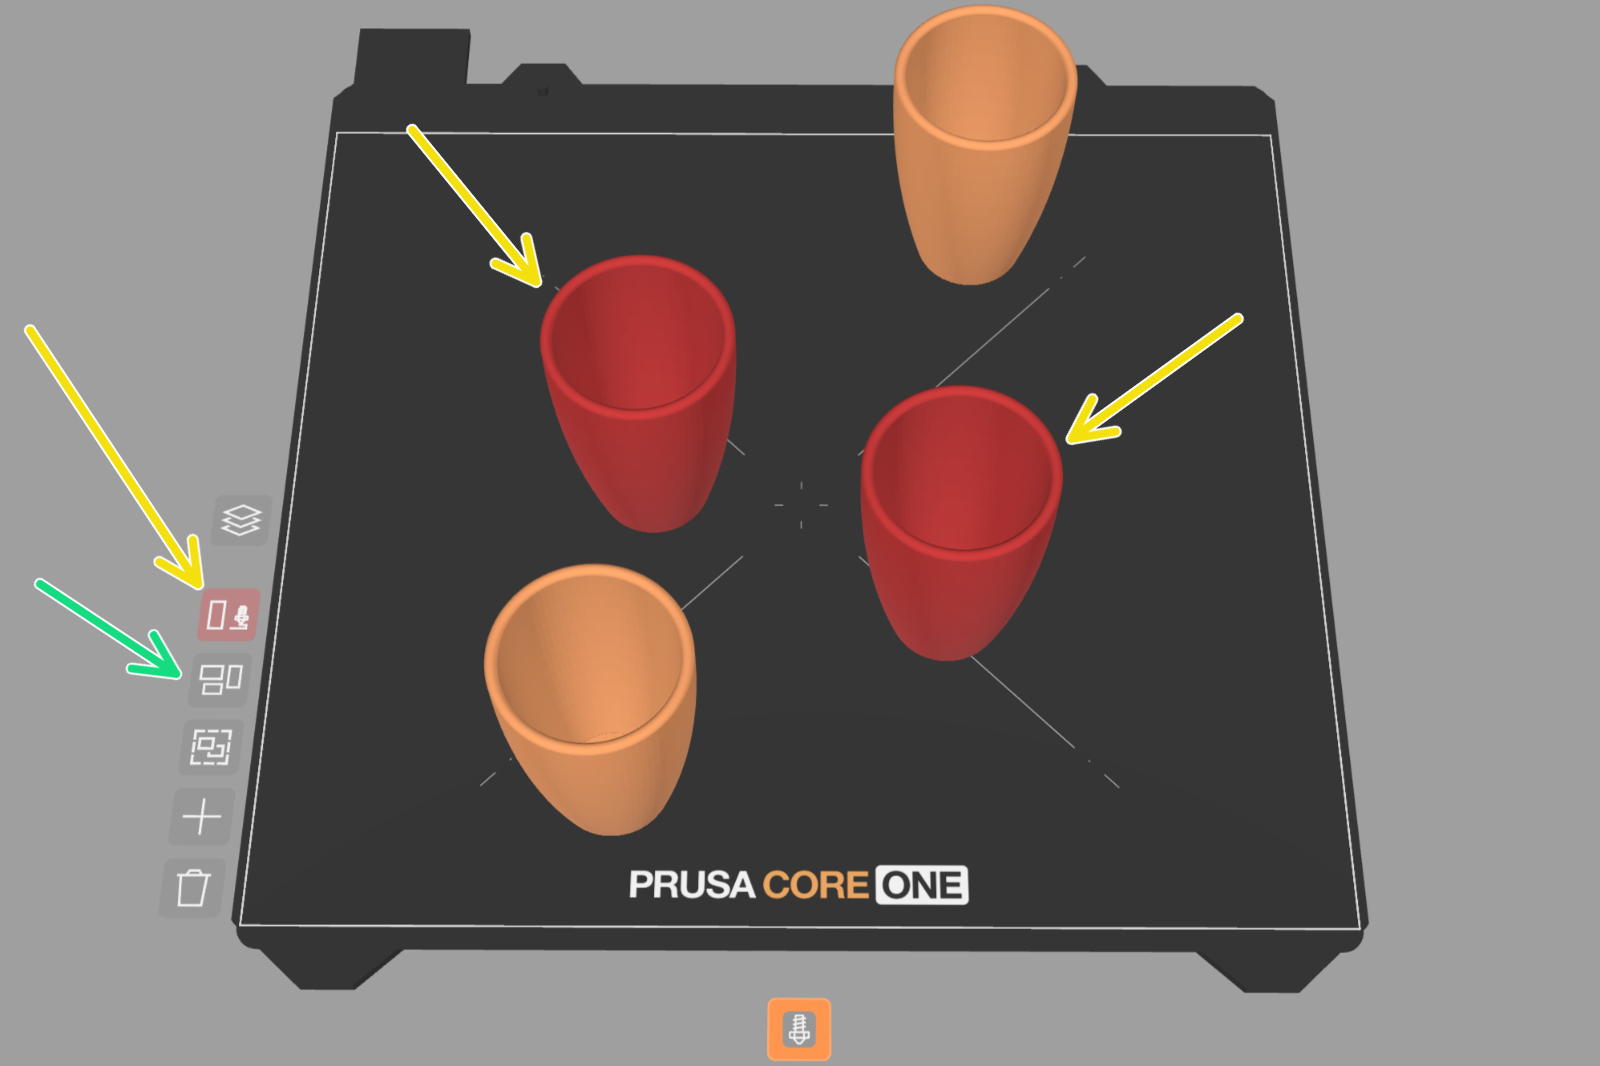
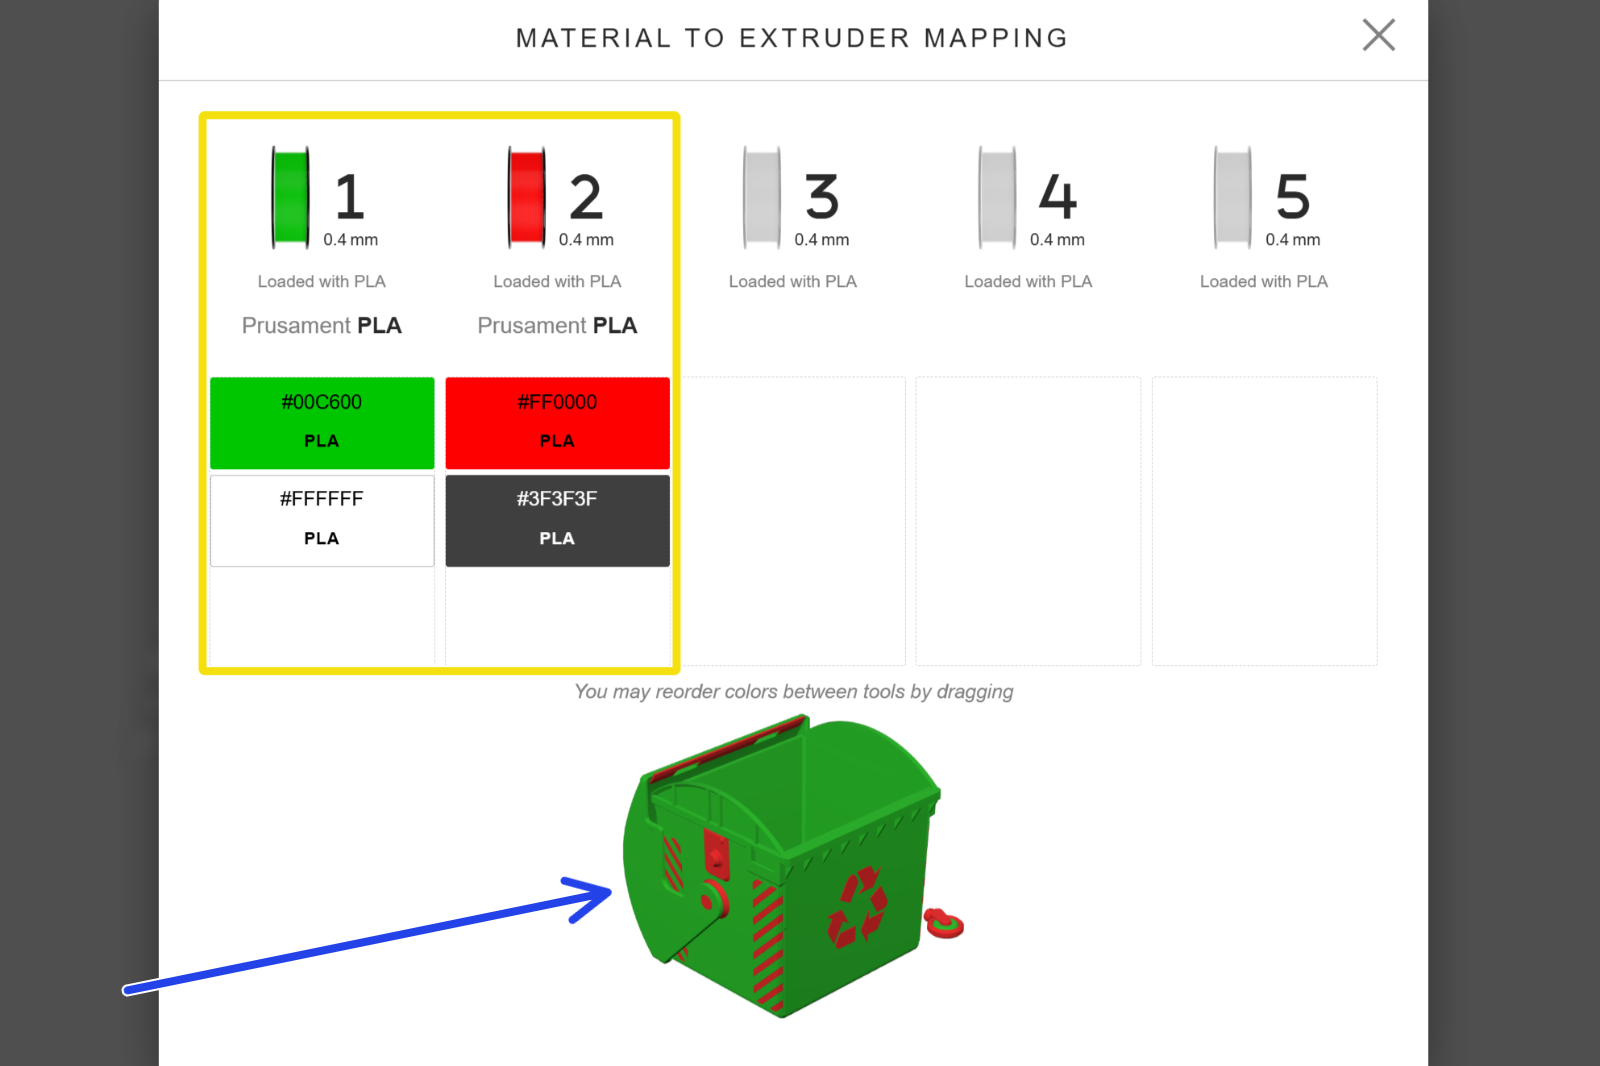
Materialzuordnung
Sie können das jedem Werkzeug eines Multiwerkzeugdruckers zugewiesene Material ändern, indem Sie auf eines der Extrudersymbole auf der linken Seite des Druckbetts klicken. Ziehen Sie im Pop-up-Menü die Farben per Drag & Drop, um sie dem gewünschten Werkzeug zuzuordnen.
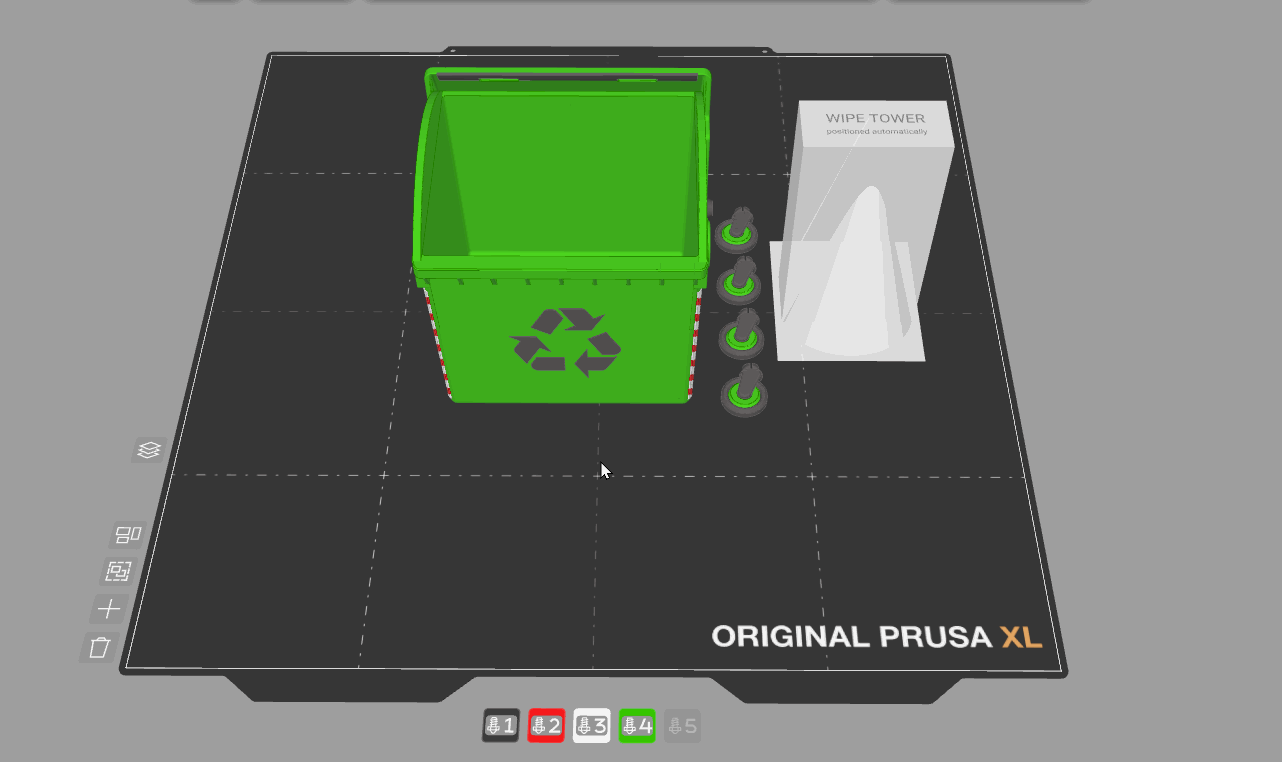
Sie können einem einzelnen Extruder mehrere Farben zuweisen, die dann zu einer einzigen Farbe verschmelzen (nämlich der obersten Farbe im Slot). Der Drucker verwendet dann dasselbe Werkzeug, um alle diese Farben zu drucken. Dies kann nützlich sein, um die Anzahl der Farben in einem Projekt schnell zu reduzieren. Das Modell am unteren Rand des Zuordnungsbildschirms zeigt eine Vorschau der Farben nach dem Slicen.
Fuzzy Skin Bemalung
Mit EasyPrint können Sie Fuzzy Oberfläche gezielt auf Objekte anwenden, wodurch eine strukturierte Oberfläche des gedruckten Modells entsteht. Dies kann genutzt werden, um einem dekorativen Modell eine interessante optische Struktur zu verleihen oder die Griffigkeit von Griffen an funktionalen Werkzeugen zu verbessern.
Aktivieren Sie die Malwerkzeuge für „Fuzzy Oberfläche“, indem Sie in der unteren Leiste „Skin“ auswählen. Wählen Sie „Anwenden“ und tippen Sie auf die Modelloberfläche, um „Fuzzy Oberfläche“ anzuwenden. Dies funktioniert ähnlich wie das intelligente Füllen beim Material-Painting: Ein einzelner Klick wendet „Fuzzy Oberfläche“ auf alle umliegenden Bereiche an, bis ein scharfer Winkel erreicht wird. Wenn Sie ein zweites Mal auf „Fuzzy Oberfläche“ klicken, wird der Schwellenwinkel leicht verringert, wodurch sich der Bereich weiter ausdehnt. Entfernen funktioniert auf die gleiche Weise, entfernt jedoch stattdessen die vorhandene Fuzzy-Skin.
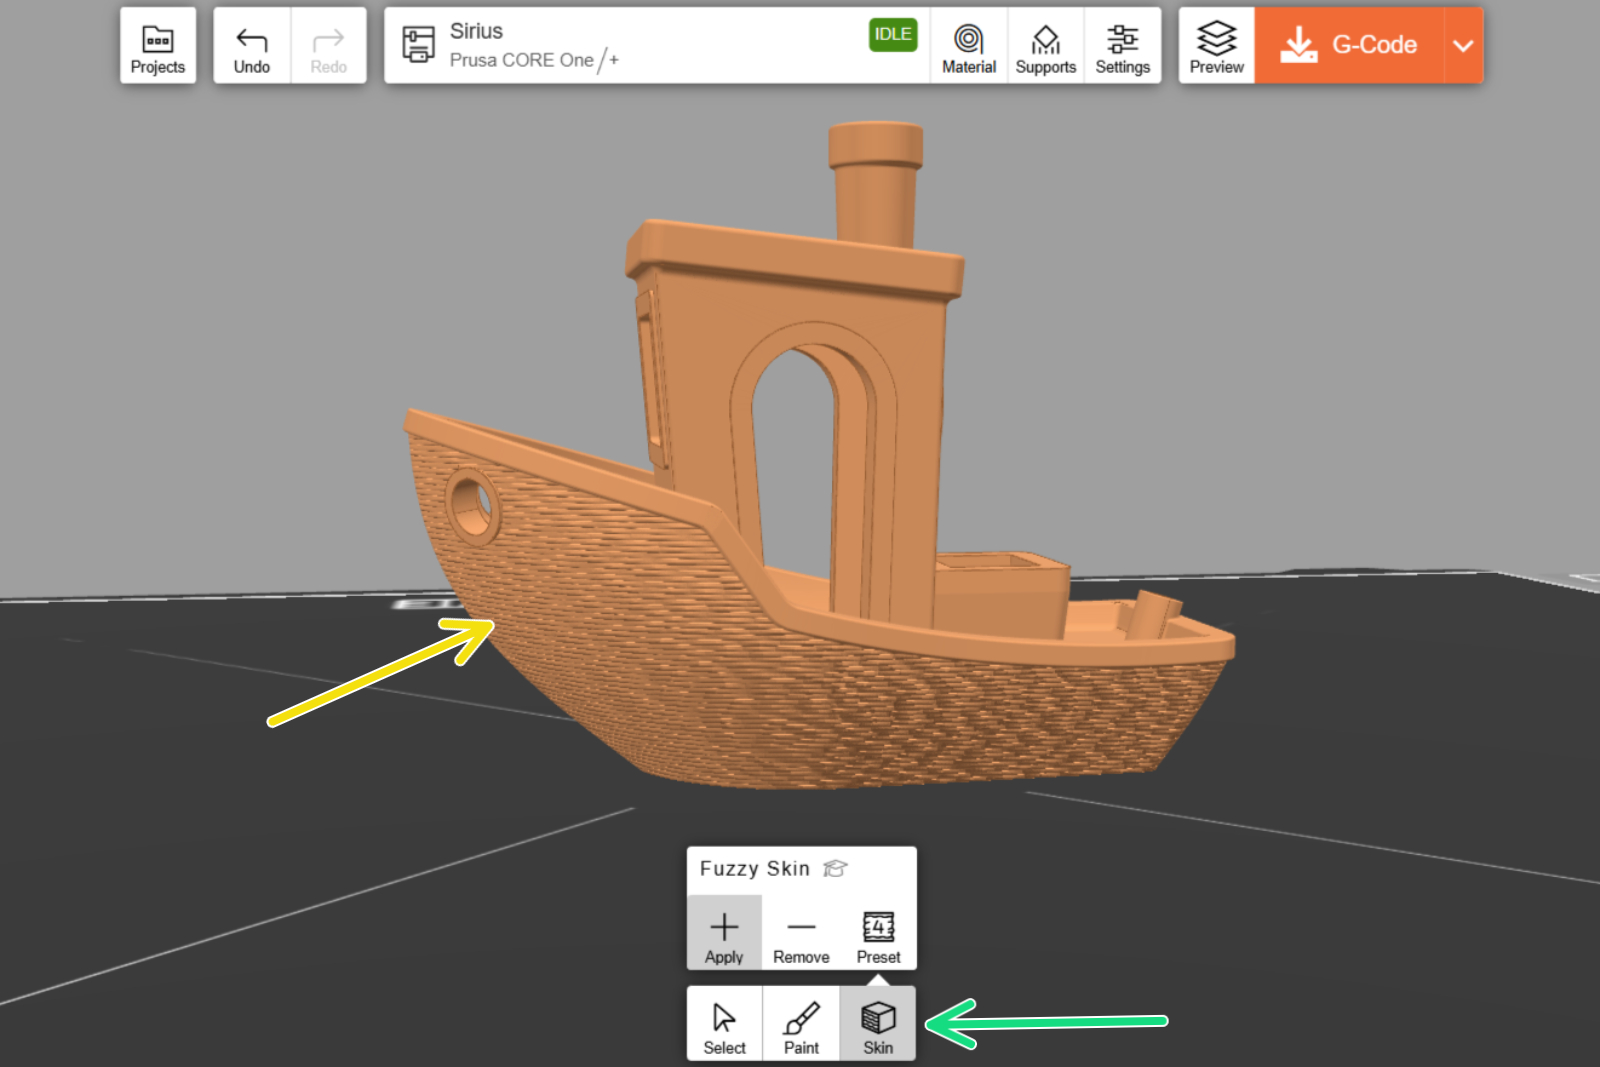
EasyPrint zeigt eine Texturvorschau auf den bearbeiteten Oberflächen an (siehe gelber Pfeil im Screenshot), doch die tatsächliche Textur des gedruckten Objekts wird durch die Auswahl einer der Voreinstellungen festgelegt.
Im Werkzeug „Fuzzy Oberfläche“ können Sie eine von 8 vordefinierten Voreinstellungen auswählen. Jede Voreinstellung enthält ein Vorschaubild eines tatsächlichen Ausdrucks, der gedruckt wurde.

Die G-Code-Vorschau zeigt eine genauere Darstellung der resultierenden Fuzzy-Skin-Oberfläche an.
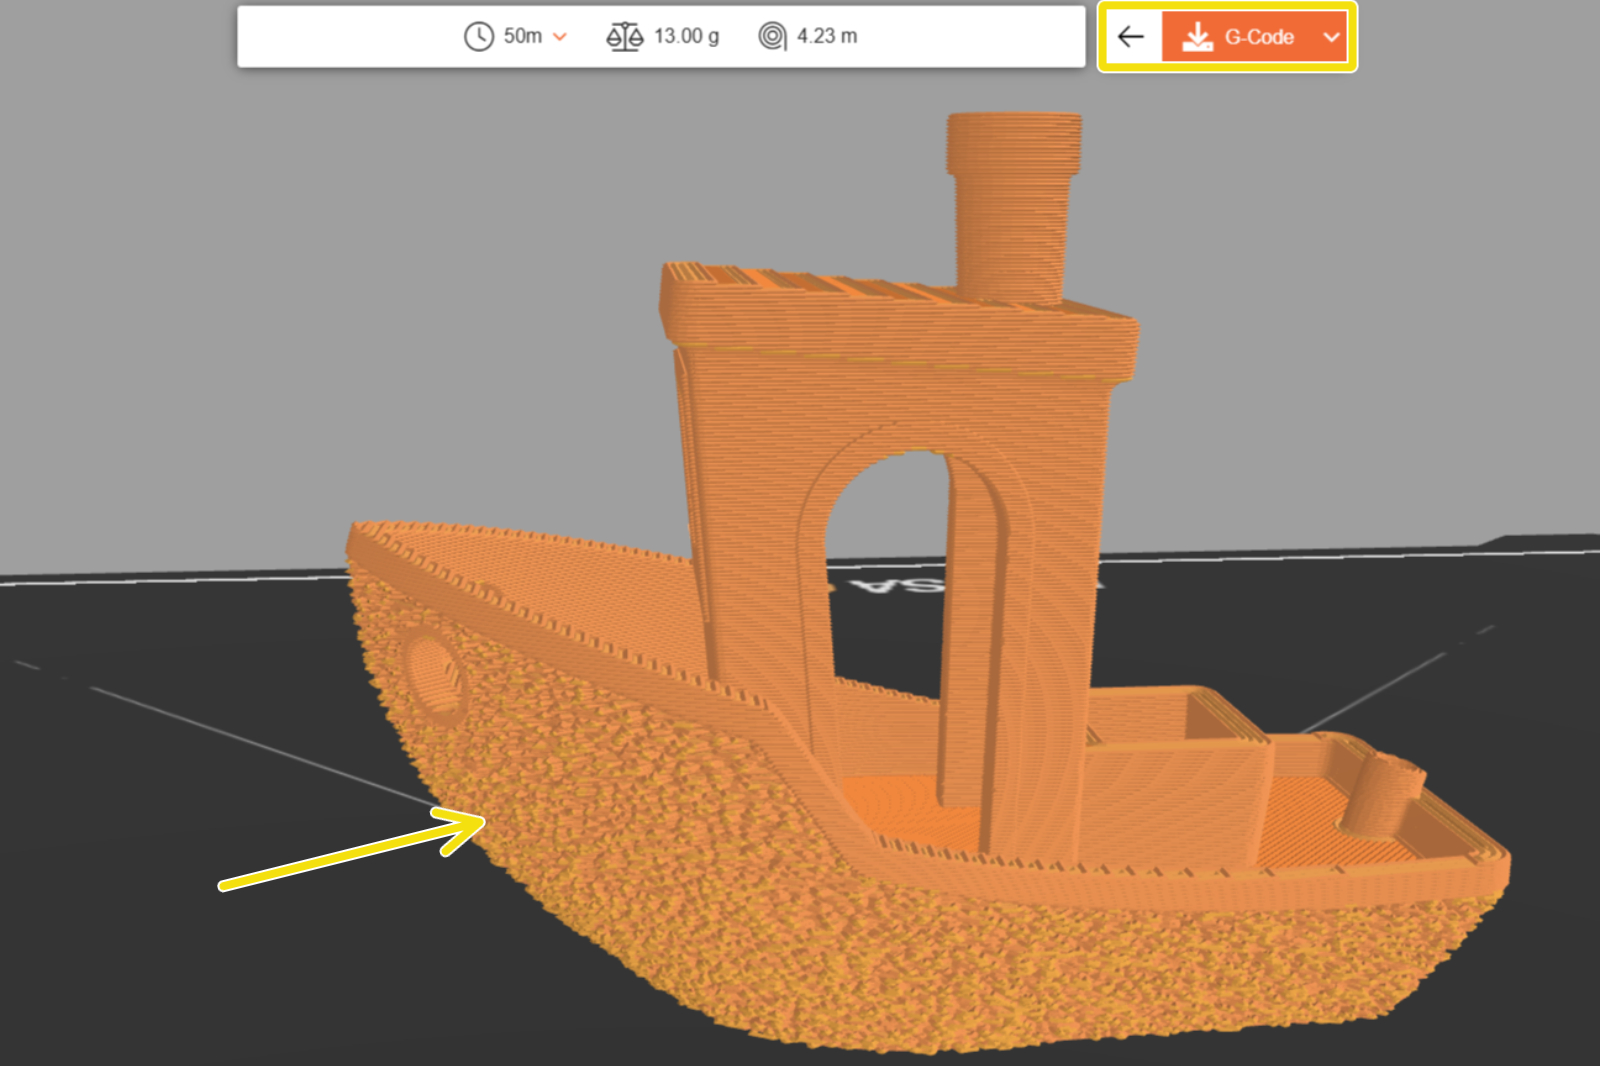
Bitte beachten Sie, dass „Fuzzy Oberfläche“ nur bei senkrechten Flächen funktioniert; auf ebenen Flächen hat sie keinerlei Wirkung. „Fuzzy Oberfläche“ ist zudem für Bereiche ungeeignet, in denen Maßgenauigkeit erforderlich ist, da die Textur die Modelloberfläche verzerrt.
1 Kommentar