Čeština
Login
3D tiskárny
Materiály
Díly & příslušenství
Pro firmy
Software
3D modely
Komunita
Podpora
Kurzy
Blog
O nás
Podpora
Original Prusa XL
Original Prusa XL Enclosure (1.0)
5. Nextruder upgrade (Single-Tool) | Nářadí potřebné k této kapitole
1. Nářadí potřebné k této kapitole
Krok 1 z 27 (Kapitola 5 z 7)
Obsah
Komentáře
⬢
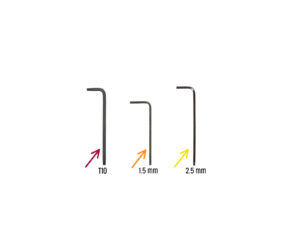
Pro tuto kapitolu si prosím připravte:
⬢
T10 Torx klíč (šroubovák)
⬢
1,5mm inbusový klíč
⬢
2,5mm inbusový klíč
Loading...
Další
Obsah
Original Prusa XL Enclosure
1. Úvod
2. Sestavení Enclosure
3. Upgrade tiskárny
4. Upgrade Nextruderu (Multi-Tool)
5. Upgrade Nextruderu (Single-tool)
Nářadí potřebné k této kapitole
Odpojení Nextruderu
Uvolnění Nextruderu
Uvolnění svazku kabelů Nextruderu
Uvolnění dílu Idler-swivel
Odšroubování dílu PG-case: čtyři šrouby
Odšroubování dílu PG-case: tři šrouby
Uvolnění idleru
Rozebrání přítlačné kladky (idler)
Idler Nextruderu: příprava dílů
Sestavení Extruder-idleru
Rozebrání dílu Idler-swivel
Rozebrání dílu Idler-swivel
Idler-swivel: příprava dílů
Sestavení přítlačné záklopky Idleru (Idler-swivel)
Montáž dílu Idler-nut
Uchycení Idleru: čtyři šrouby
Uchycení Idleru: tři šrouby
Uchycení dílu Idler-swivel
Uzavření krytu Nextruderu
Odstranění dílu fan shroud
Fan shroud: příprava dílů
Zajištění dílu fan shroud
Připojení Nextruderu
Připojení Nextruderu
Zajištění Nextruderu
Dobrá práce
6. Zajištění Enclosure
Seznam změn manuálu XL Enclosure kit
Komentáře
Pro přidání kometáře se prosím
přihlaste
Zatím žádné komentáře