Prusa
  • SHOP
    • Latest products
    BY CATEGORY
    • 3D printersnew
    • 3D printer upgradesnew
    • Materials
    • Accessories
    • Spare parts
    • Courses
    • Merch
    • Get a price quote
    QUICK LINKS
    • Shipping & delivery
    • Returns & refunds
    • Payment & financing
    • Warranty
    • VAT & Customs fees
    • FAQ

    0 item in your cartitems in your cart

    Your cart is empty

    Go to cartShop 3D printers

    My profile

    Log in to see orders, saved items

    My profile

    Signed in as

    • Orders
    • Logout
  • 3D PRINTING
    • Explore 3D printing
    FOR BEGINNERS
    • 3D printing 101
    • How FDM printing works
    • Buying your first printer
    • 3D model catalog
    BY APPLICATION
    • Rapid prototyping
    • Manufacturing
    • Engineering
    • Research
    • Arts & design
    GO DEEPER
    • Materials guide
    • Courses
    • Webinars
    • Case studies
    • Custom 3D printing
  • 3D PRINTERS
    • All 3D printers
    FOR
    • Home or garageHobbyists, tinkerers and home printing
    • BusinessIn-house production for small teams
    • EnterpriseFleets, security and scale
    • Which Prusa is right for me
    SHOP & BROWSE
    • CORE One+new
    • CORE One+ INDXnew
    • CORE One L+new
    • CORE One L+ INDXnew
    • XL+new
    • MK4S
    • Prusa Pro HT90
    • Prusa Pro AFS
    • Prusa Pro SLX
    MORE FROM PRINTERS
    • Parts & upgradesnew
    • Critical infrastructure
    • Case studies
    • Signature Oak
    • Kits
  • MATERIALS
    • All materials
    BY USE
    • Every-day & design
    • Functional engineering
    • Composites
    • Pro speciality
    • SLA resins
    PRUSAMENT
    • PLA
    • PETG
    • ASA
    • PC
    • PA11
    • Flex
    • TPU
    MORE FROM MATERIALS
    • Materials guide
    • We make material in house
    • Sustainability
    • Order on the store
  • SOFTWARE
    • All software
    PREPARE THE PRINT
    • PrusaSlicer 3.0New
    PRINT & MONITOR
    • Prusa Connect
    • EasyPrint
    • iOS & Android app
    • Prusa Farm
    GET STARTED
    • Download & install
    • Knowledge base
    MORE FROM SOFTWARE
    • 3D model catalog
  • SUPPORT
    • Explore support
    FIND ANSWERS
    • Knowledge base
    • Troubleshooting
    • Courses
    • Webinars
    GET HELP
    • Contact us
    • Livechat
    • Shipping & delivery
    • Warranty
    • Returns & refunds
    • Service & spare parts
    • Service & Repair
    COMMUNITY
    • Forum
    • Reddit
    • Printables
  • TRUST CENTER
    • Trust Center overview
    BY TOPIC
    • GDPR
    • Certificates
    • Security
    • Compliance
    COMMITMENTS
    • Sustainability report
    TALK TO US
    • Contact the security team
  • COMPANY
    • About Prusa
    GET TO KNOW US
    • Our story
    • How we make printers
    • Open source
    • Brand & media kit
    NEWS
    • Blog
    • Newsroom
    • Events
    TRUST & PARTNERS
    • Sustainability
    • Resellers & distributors
    • Affiliate program
    • Contact
    • English
    • Čeština
    • Deutsch
    • Español
    • Français
    • Italiano
    • Polski
    • 日本語
  • Signed in as

    • Orders
    • Address
    • In-stock Alerts
    • My Courses
    • Subscription
    • Edit Account
    • Logout

Log in to see orders, saved items

Signed in as
  • Orders
  • Address
  • In-stock Alerts
  • My Courses
  • Subscription
  • Edit Account
  • English
  • Čeština
  • Deutsch
  • Español
  • Français
  • Italiano
  • Polski
  • 日本語
Shop

0 item in your cartitems in your cart

Your cart is empty

Go to cartShop 3D printers

My profile

Log in to see orders, saved items

My profile

Signed in as

  • Orders
  • Logout
SHOP
  • Latest products
BY CATEGORY
  • 3D printersnew
  • 3D printer upgradesnew
  • Materials
  • Accessories
  • Spare parts
  • Courses
  • Merch
  • Get a price quote
QUICK LINKS
  • Shipping & delivery
  • Returns & refunds
  • Payment & financing
  • Warranty
  • VAT & Customs fees
  • FAQ

Featured products

    Popular categories

      Trending searches

        Articles

          Blog

            Products

              Categories

                Suggested searches

                  Searching…
                  No results
                  Something went wrong.
                  ↑↓ Select↵ OpenEsc Close search
                  1. Support
                  2. Troubleshooting
                  3. IR Filament Sensor Troubleshooting (MK2.5S, MK3S)
                   

                  Contents

                  • Wrong firmware
                  • Wiring
                  • Assembly of the extruder
                  • Clean up of printed part

                  Blog

                  • Prusament Pellets: Raw material batches for large-format 3D printing or small-scale polymer research & development
                  • Print colorful and glowing Halloween decorations with our spooky offer
                  • Factorio Has Arrived on Printables

                  Newsletter

                  Signup and get our monthly squeeze on updates, blog, printables and much more.

                  By clicking, you agree to receive our newsletter.

                  This site is protected by reCAPTCHA Enterprise and the Google Privacy Policy and Terms of Service apply.

                  Heavy Duty Keyboard Holder (No Supports)
                  E-shop
                  • 3D Printers
                  • Printer Upgrades
                  • Filaments
                  • Accessories
                  • Prusa Merchandise
                  Prusa

                  © Prusa Research a.s.

                  Printables
                  • 3D Models
                  • Store
                  • Clubs
                  • 3D Design Contests
                  • Brands
                  Community
                  • World Map
                  • Forum
                  • User Groups
                  • Events
                  Help
                  • Prusa Help
                  • Prusa Academy
                  • 3D Printing Calculators
                  Software
                  • PrusaSlicer
                  • Prusa.app
                  • Prusa Connect
                  • Drivers and Software
                  Company
                  • About Us
                  • Blog
                  • Official Prusa Resellers
                  • Contact Us
                  • Certified for ISO 9001, ISO 14001, ISO 45001
                  • General Terms and Conditions
                  • General Terms and Conditions of Use of the PRUSA Websites
                  • Privacy Policy
                  • Information about cookies
                  • Customer Complaints Policy
                  • Status Page
                  • Do Not Sell or Share My Personal Information
                  • Supplemental Statements
                  Prusa
                  • General Terms and Conditions
                  • General Terms and Conditions of Use of the PRUSA Websites
                  • Privacy Policy
                  • Information about cookies
                  • Customer Complaints Policy
                  • Status Page
                  • Do Not Sell or Share My Personal Information
                  • Supplemental Statements

                  © Prusa Research a.s.

                  JOSEF PRUSA®, PRUSA RESEARCH®, PRUSA POLYMERS®, PRUSA ORANGE®, PRUSA 3D ® AND PRUSAMENT® are registered trademarks of Prusa Development a.s. used by Prusa Research a.s. under licence from Prusa Development a.s.

                  IR Filament Sensor Troubleshooting

                  (MK2.5S, MK3S)

                  Relevant for

                  MK2.5S
                  MK3S
                  MK3S+
                  125 comments
                  Article is also available in following languages
                  English
                  Čeština
                  Polski
                  Deutsch
                  Français
                  Español
                  Italiano
                  日本語

                  The IR sensor is a hybrid solution that combines an IR laser sensor triggered by a tiny mechanical lever. This means that in case one of the functions of the IR sensor is not working, the source of the issue might not be the sensor itself.

                  Issues can appear as:

                  • Autoload not working.
                  • Filament sensor runout not working.
                  • The printer asking you at the beginning of a print to unload the filament and then to load it back in.
                  If you have to do some emergency prints before resolving the issue, you can always disable the filament sensor from LCD menu -> Settings -> Fil. Sensor [OFF].

                  Wrong firmware

                  There are two different versions of the firmware available, one for the S and S+ upgrade and one for the initial filament-sensor. Make sure you have the correct one. The new IR Filament sensor requires the S/S+ version of the firmware.

                  Having the incorrect firmware will often, but not always, cause it to fail calibration due to the different designs of the extruder parts.

                  Wiring

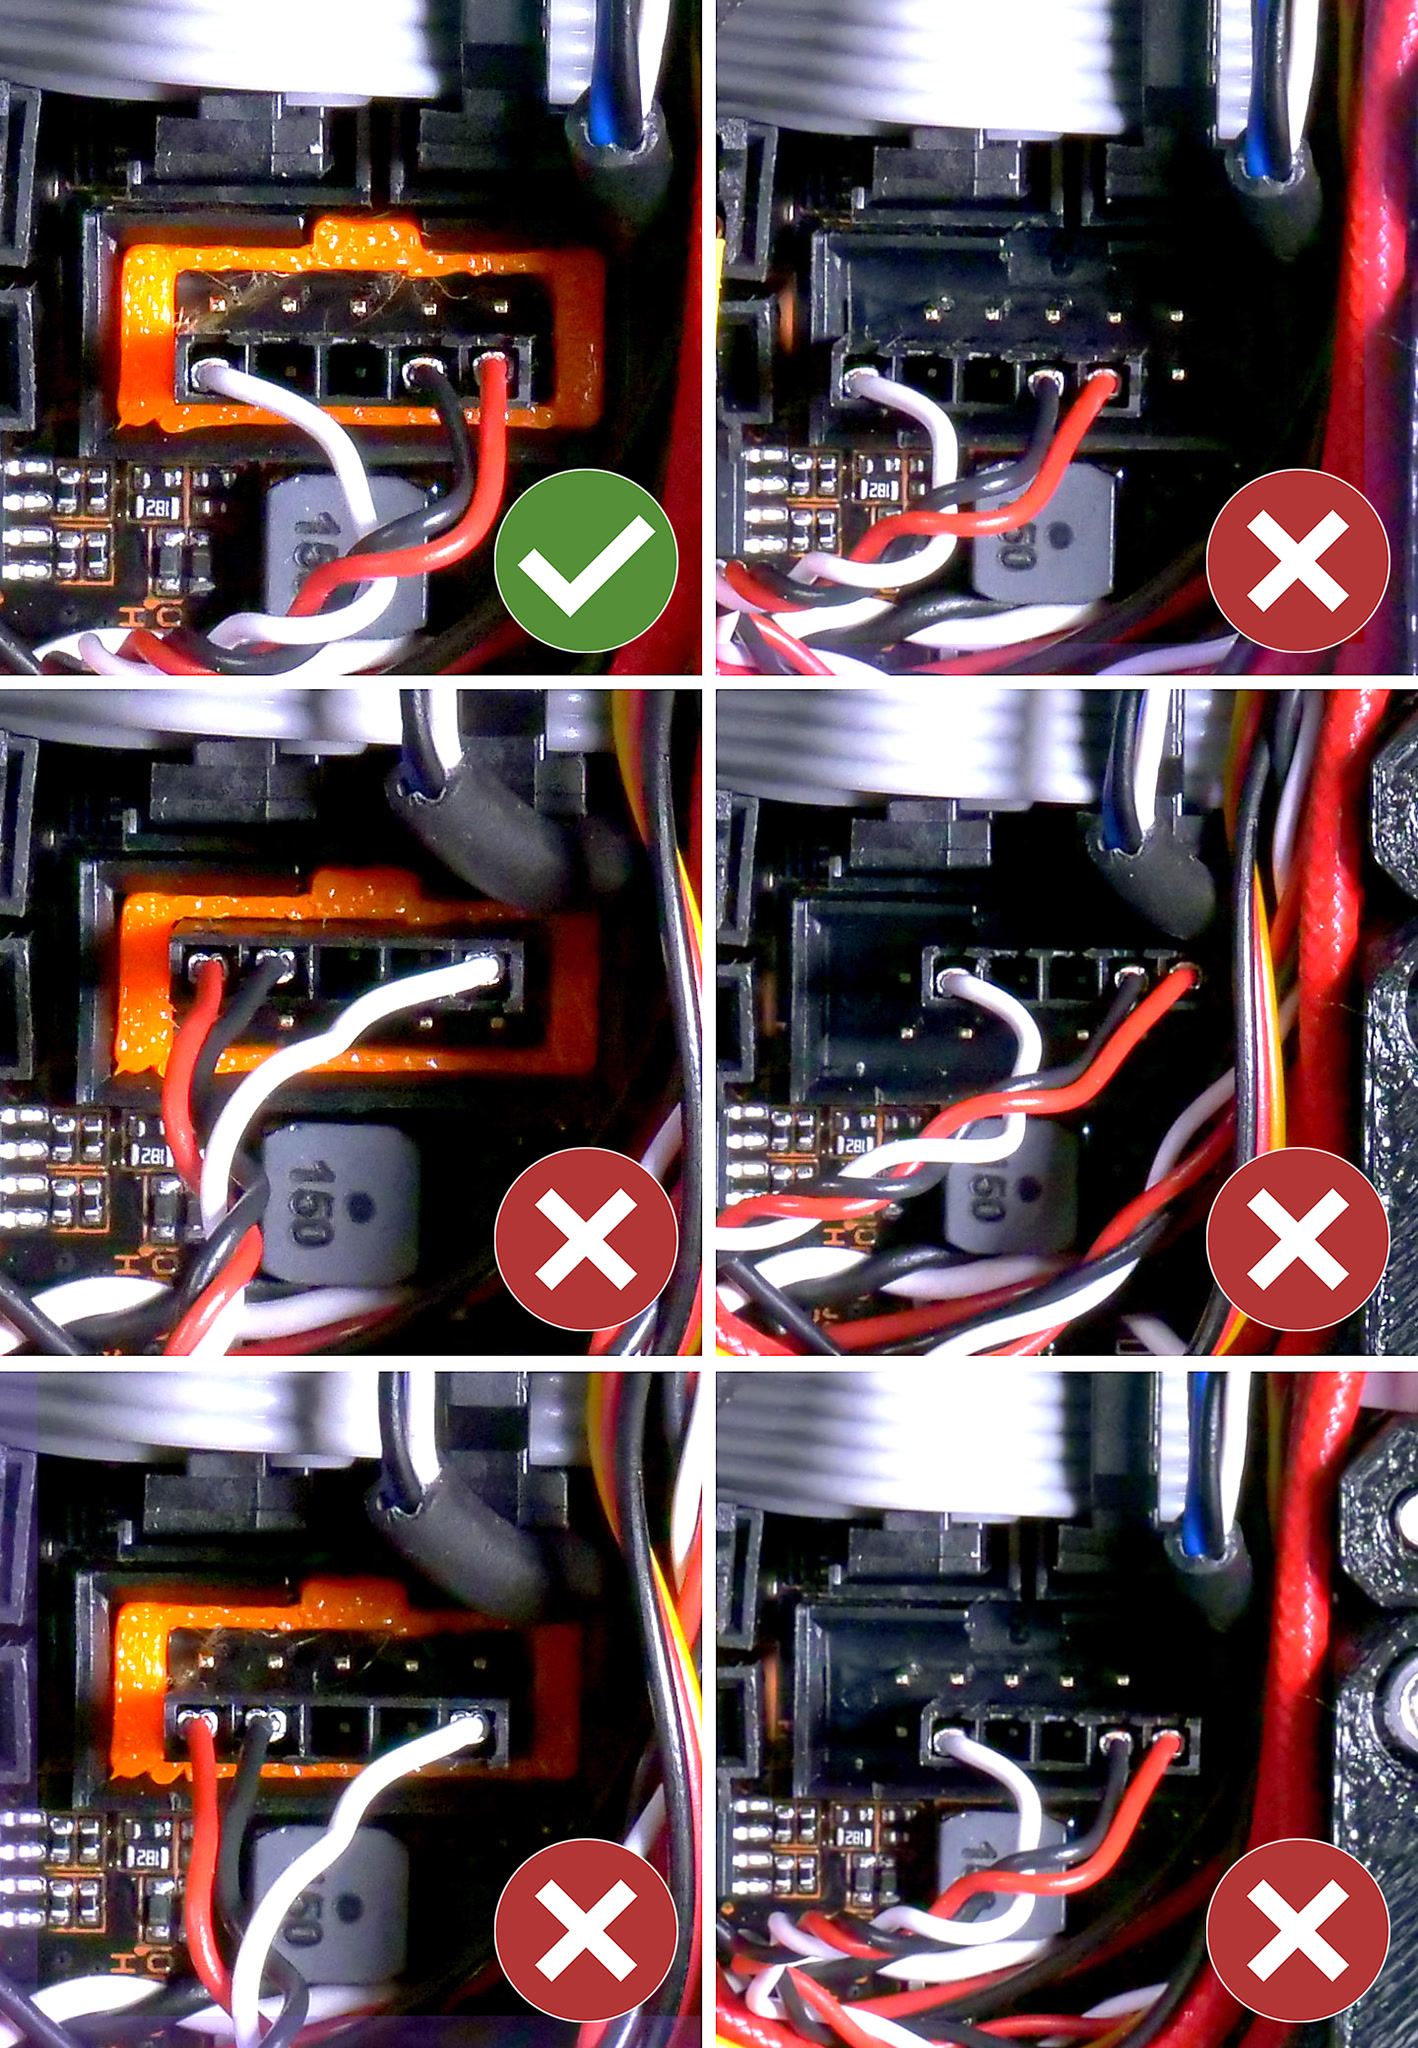
                  The connector should be on the bottom row of pins, covering all pins, with the red wire on the right. See the picture below. The only correct orientation is depicted on the top-left.

                  The cables for MK3/S/+ and MK2.5/S IR filament sensors are different as they have different mainboards. On MK2.5/S the white wire is shifted one pin to the right. The picture below depicts the MK3/S/+ cable, but the position and orientation of the connector remain the same on the two models.

                  Assembly of the extruder

                  Before going into disassembly you should check some key parts of your extruder assembly. You may have overtightened some screws which can affect the tight tolerances used in the trigger mechanism.

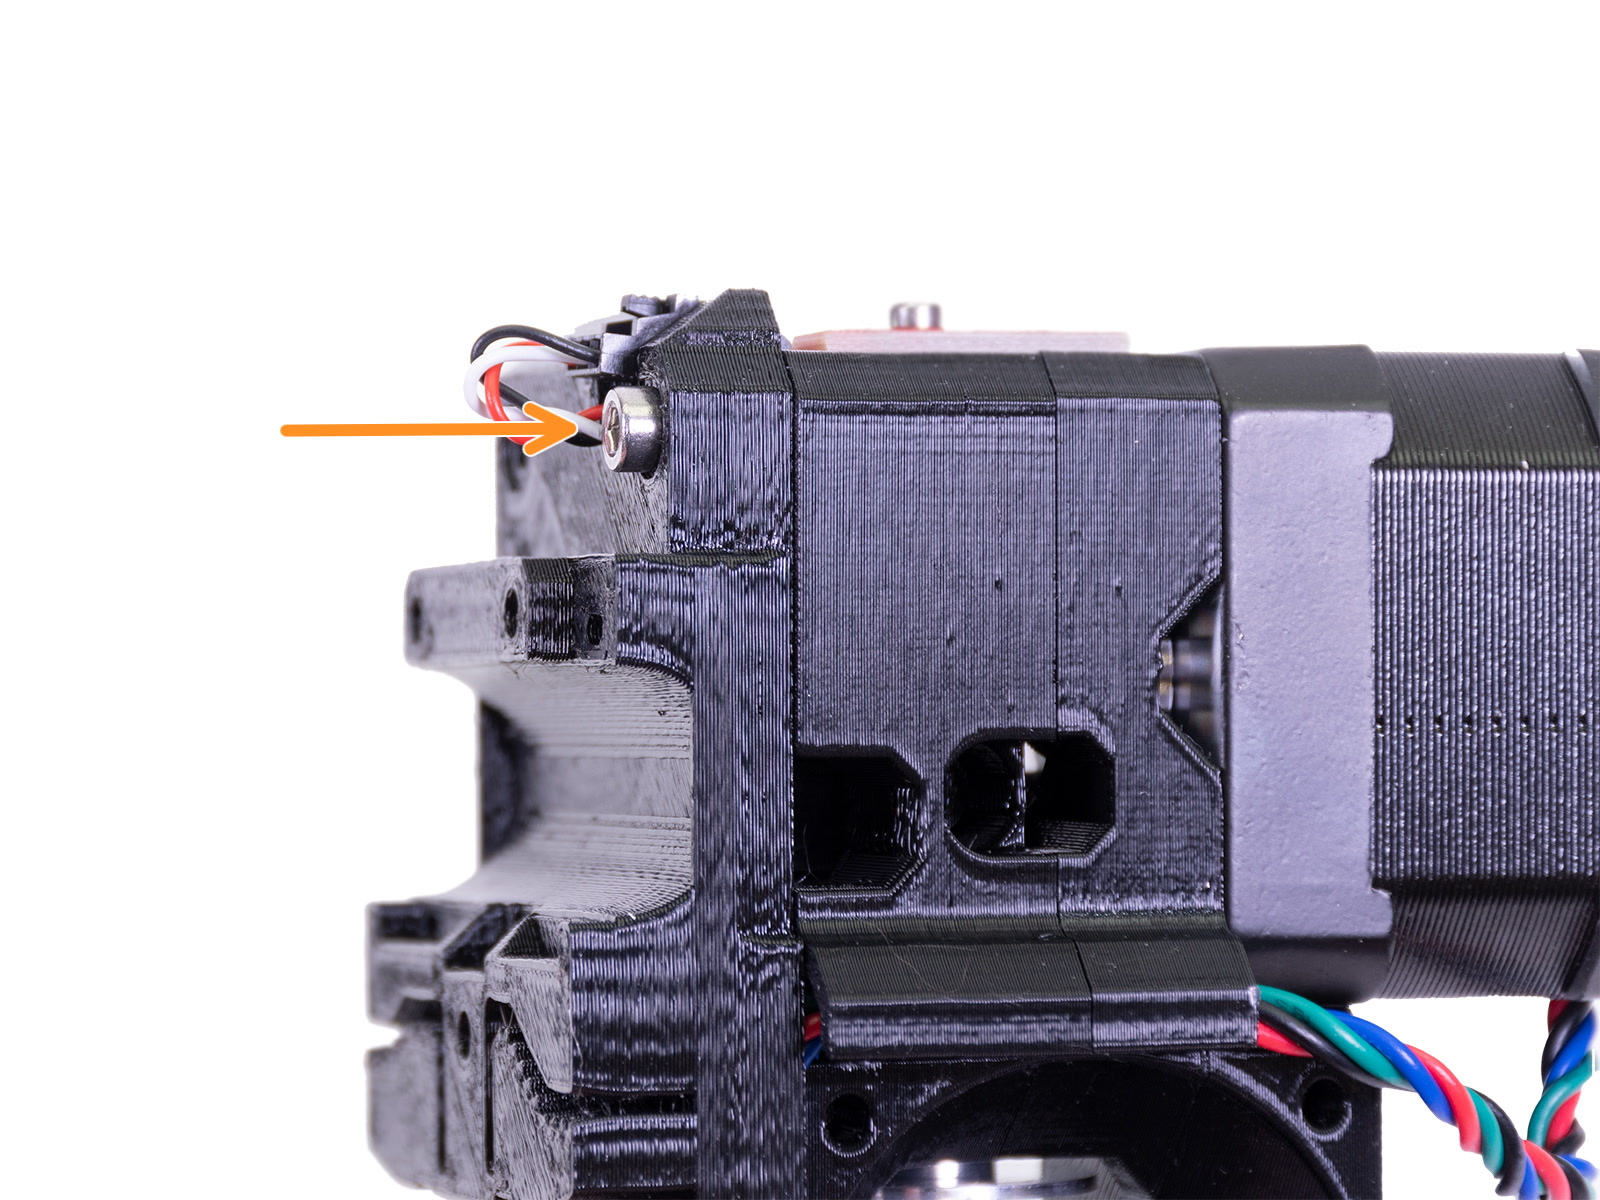
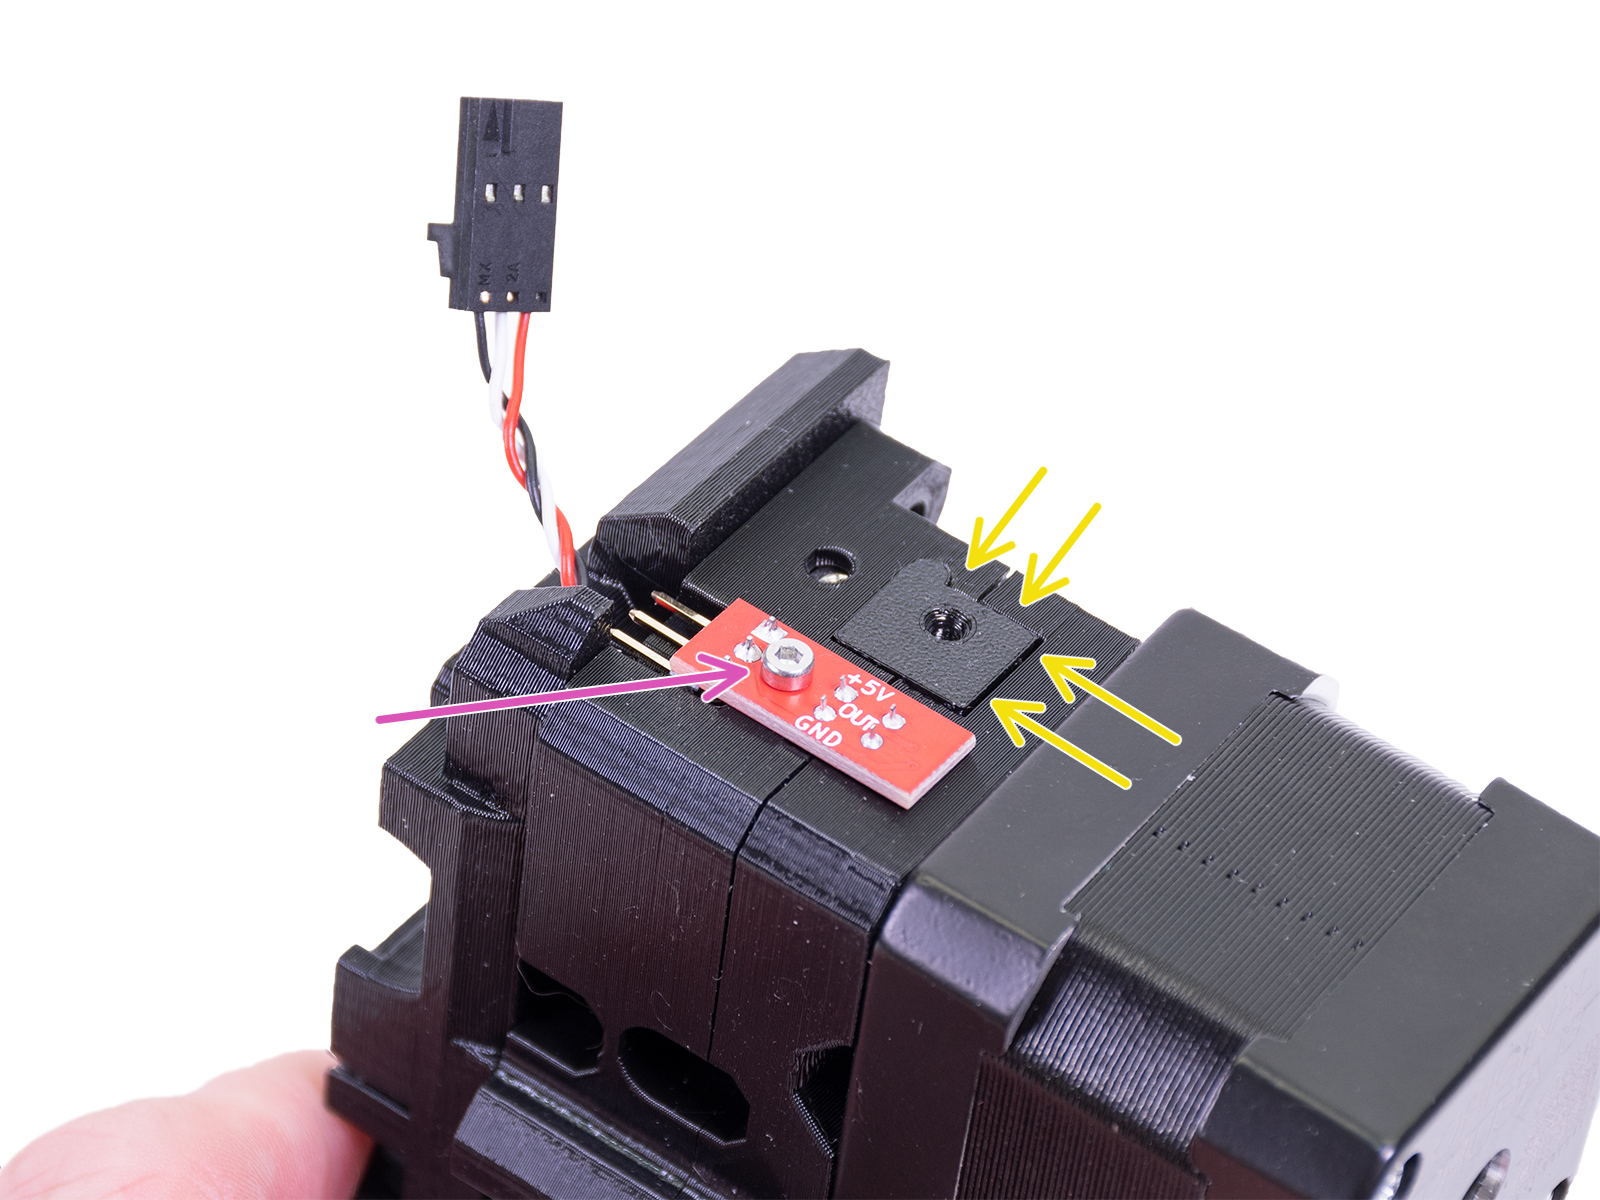
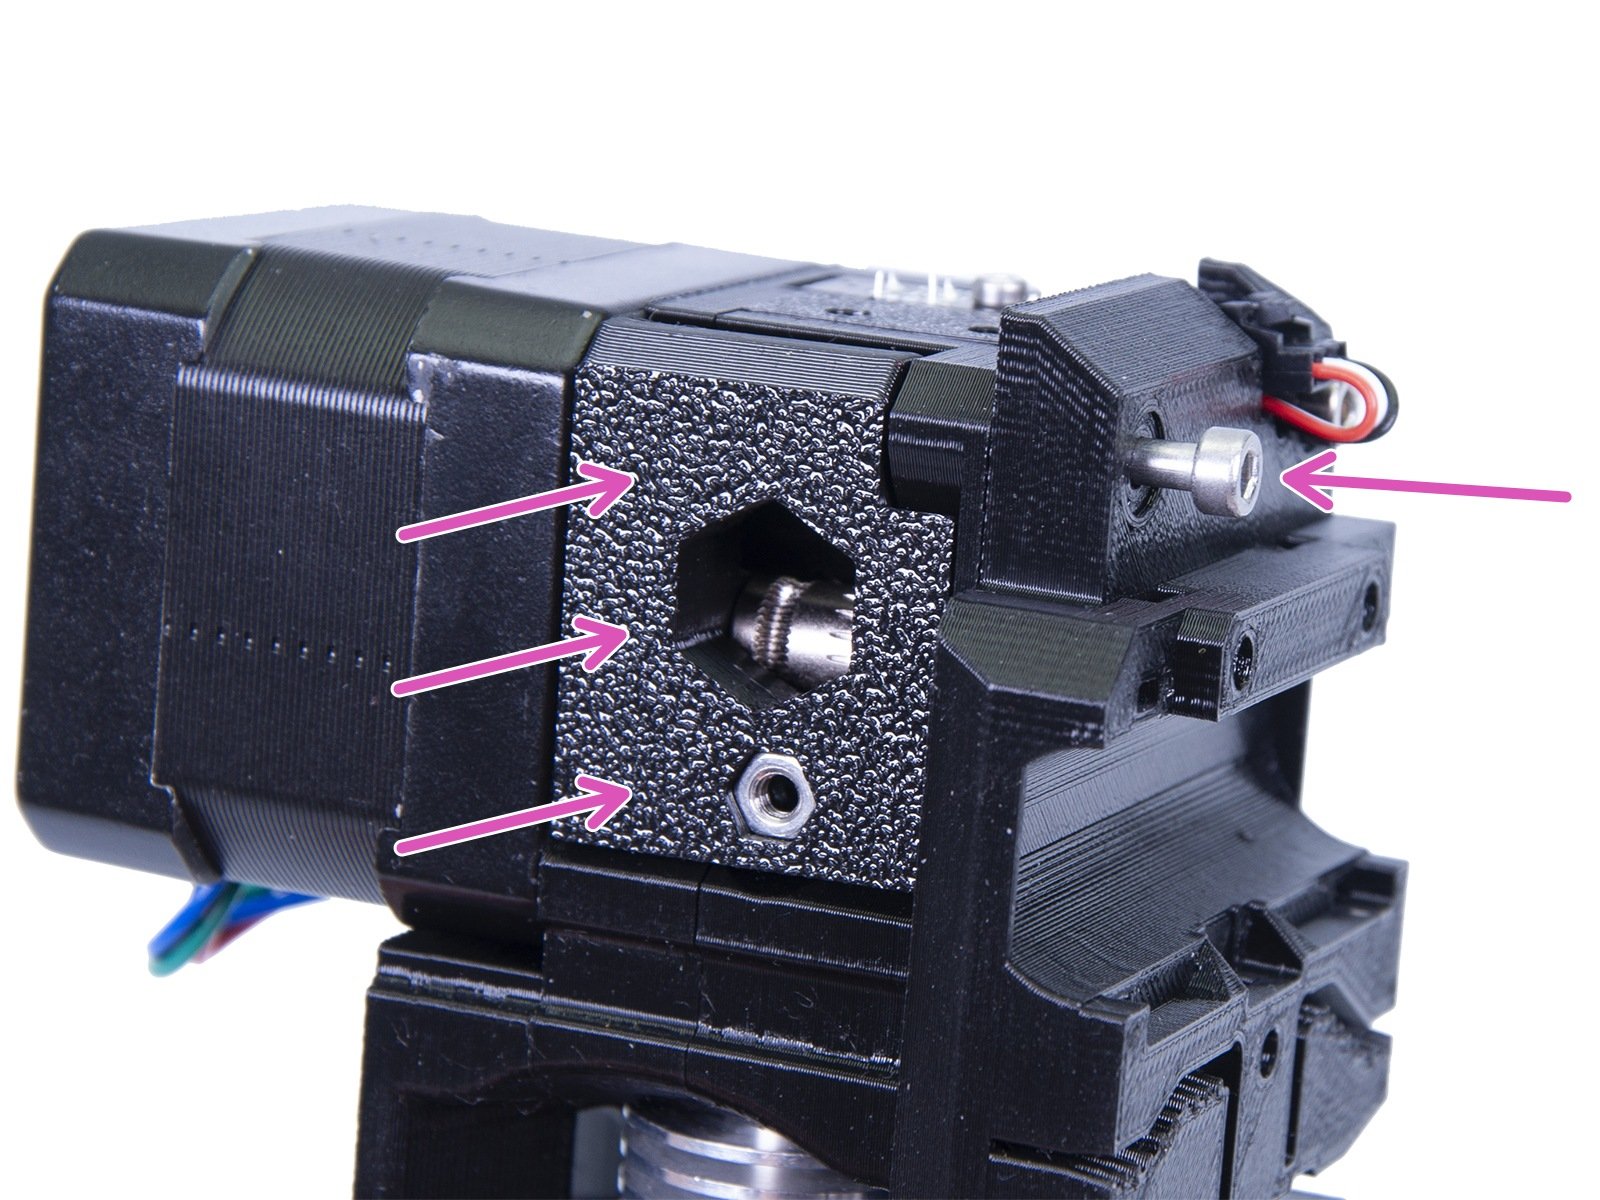
                  There have been some reported issues when overtightening the screws pictured below. Navigate to LCD Menu -> Support -> Sensor info and see if the 'Fil. Sensor' value (1 or 0) when adjusted.

                  • The M3x40 screw going from the back into the extruder motor (orange arrow left picture).
                  • The M2x8 screw securing the IR sensor itself (purple arrow right picture).
                  • The printed part 'adapter-printer' for the steel ball is protruding slightly above the surface of the surrounding extruder parts (yellow arrows right picture).
                  • The M3x10 screw securing the 'FS-cover' plate, which covers the filament sensor chip and 'adapter-printer' depicted to the right.

                  Access the filament sensor mechanism

                  The FS lever is the part that is moved by the filament to activate the sensor. It is important that this moves as expected.

                  How to access it:

                    1. The first step is to toggle the Filament autoload off. Do it in the LCD Menu -> Settings -> F. autoload. (but 'Fil. sensor' must be still ON!)
                    2. Now we need to get to the filament sensor mechanism. Before you start, make sure the printer is cold and that none of the fans are spinning.
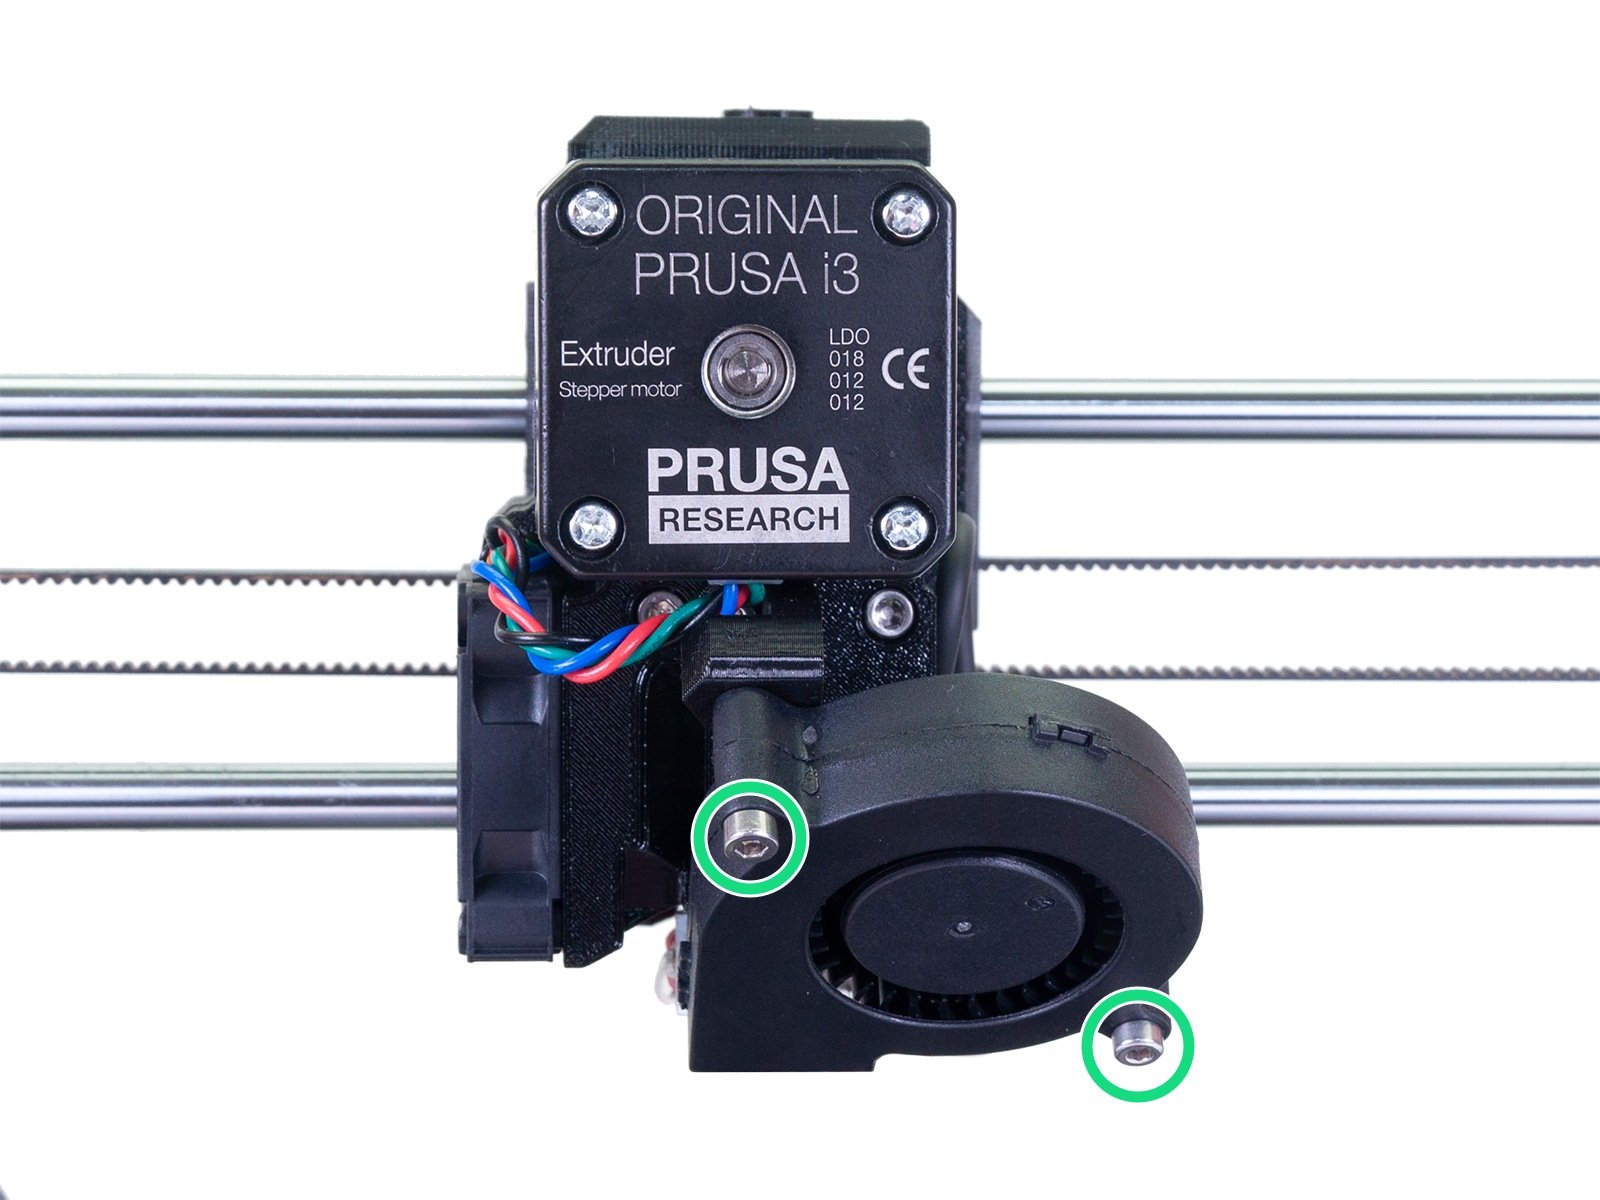
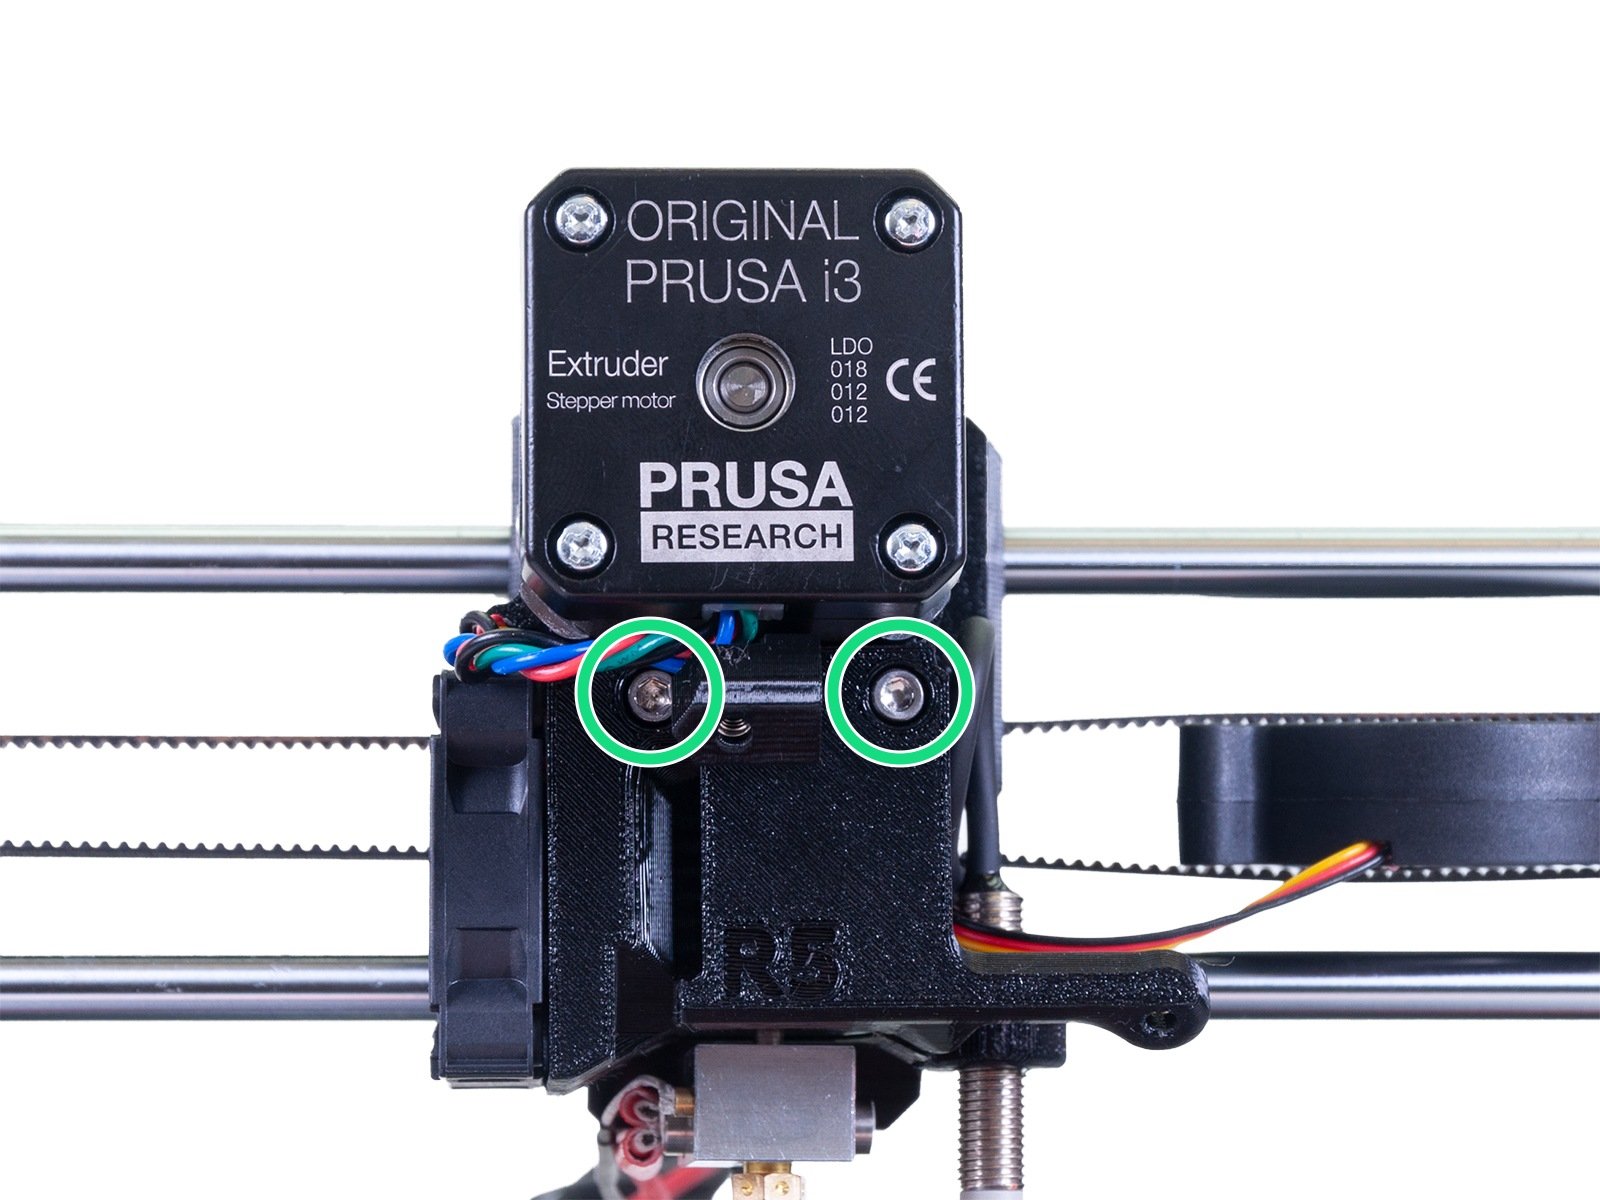
                      1. Take the Print fan off by unscrewing both M3x20 screws holding it on the Extruder. Do not lose the nuts for these screws. You can insert the fan in between the belts on the left side, it should fit there just fine.
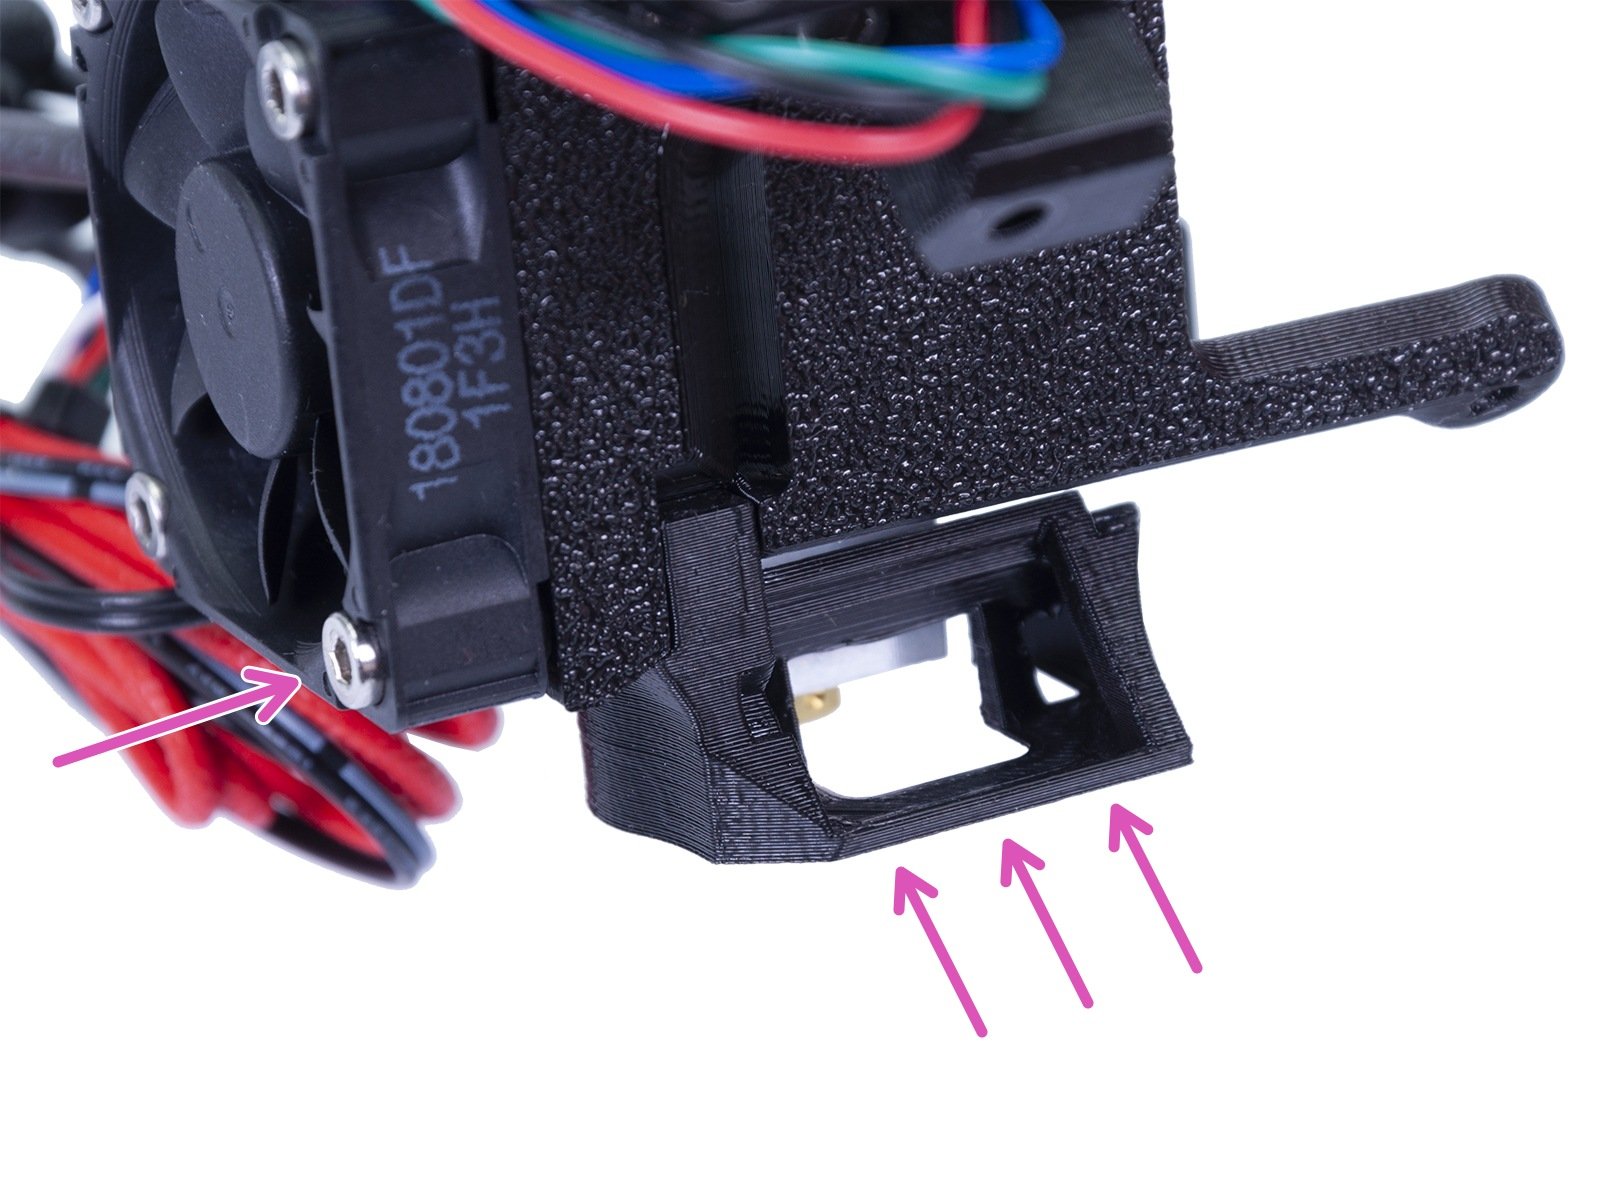
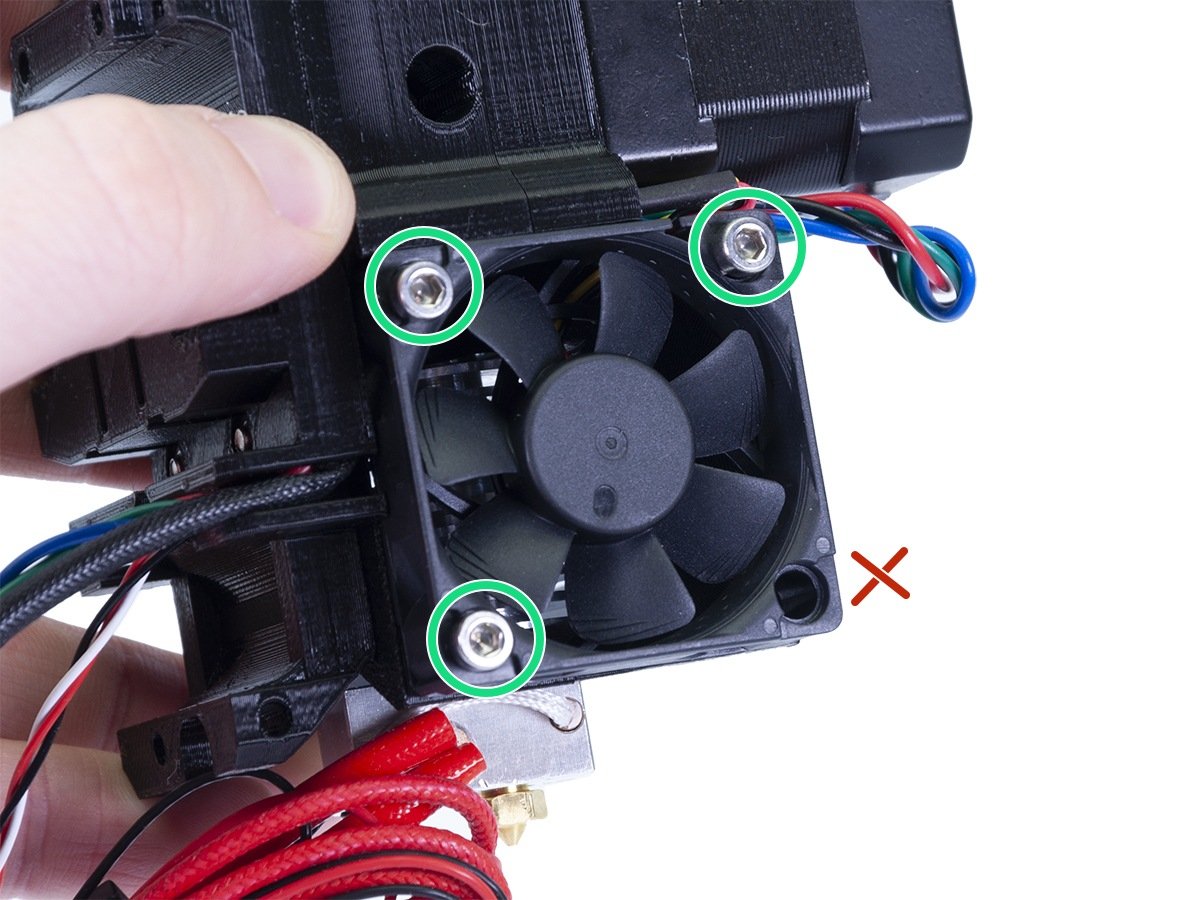
                      2. Unscrew 2 out of 4 screws of the Noctua Hotend fan that are the closest to the original position of the Print fan. One of them is M3x18 (or M3x20 if you decided to use it instead) and the other one is the top-right M3x14.
                      3. Unscrew both long M3x40 screws located below the Extruder motor and take the Extruder cover off.
                      4. Unscrew the M3x40 screw holding the Extruder idler door as well as the other M3x40 screw holding the upper part of the assembly together.
                      5. Take the Extruder motor off.
                      6. You now have full access to the hotend and to the filament sensor mechanism.

                  Now you need to go to the LCD Menu -> Support -> Sensor info

                    1. Here you can see the status of all sensors we are using on our printers: the 'PINDA', the 'FINDA' (if MMU2S is installed), and the 'IR sensor' (renamed to 'Fil. Sensor' in firmware 3.10.0). We will only need IR sensor/Fil. Sensor.
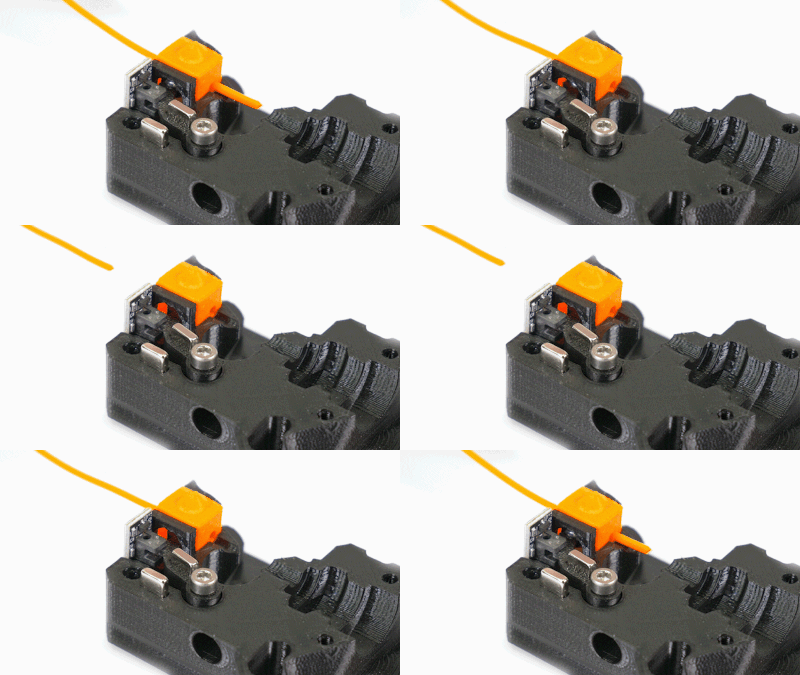
                    2. See how the IR sensor status changes from 0 to 1 as you are inserting a piece of filament inside the opened extruder. Also, observe how the filament sensor lever moves.
                    3. To be sure, blow some canned air (or just blow with your mouth) in the general direction of the sensor to get rid of any potential dust particles.

                  The IR sensor value should be a stable 0 when there is no filament and a stable 1 as long as the filament is present.

                  Summary

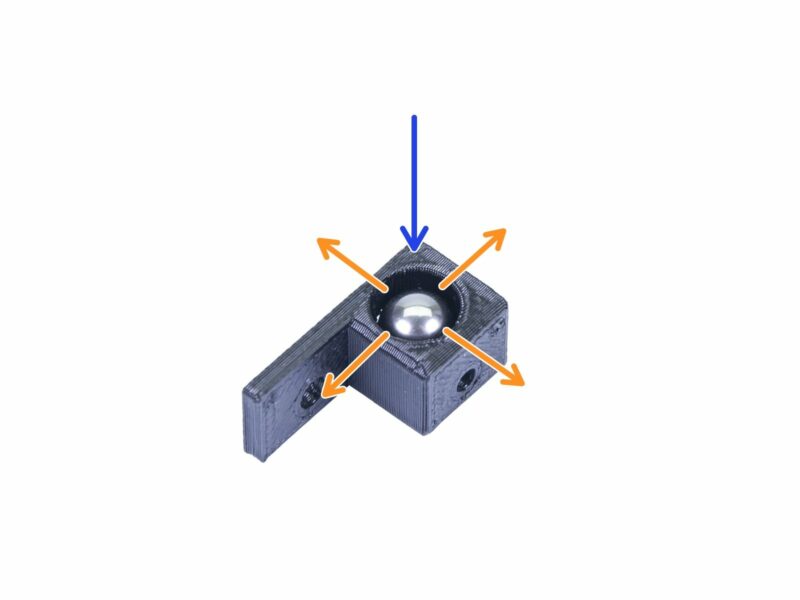
                  All in all, the lever has to move freely and get pushed by the steel ball in a regular manner.

                  • Make sure the steel ball is in its housing.
                  • Make sure that you did not forget to put in the M3x18 screw that serves as a shaft for the lever movement. This M3x18 screw also has to be tightened just right. Overtightening it makes the lever not move or move insufficiently. Having it too loose might make the lever move in other directions than intended.
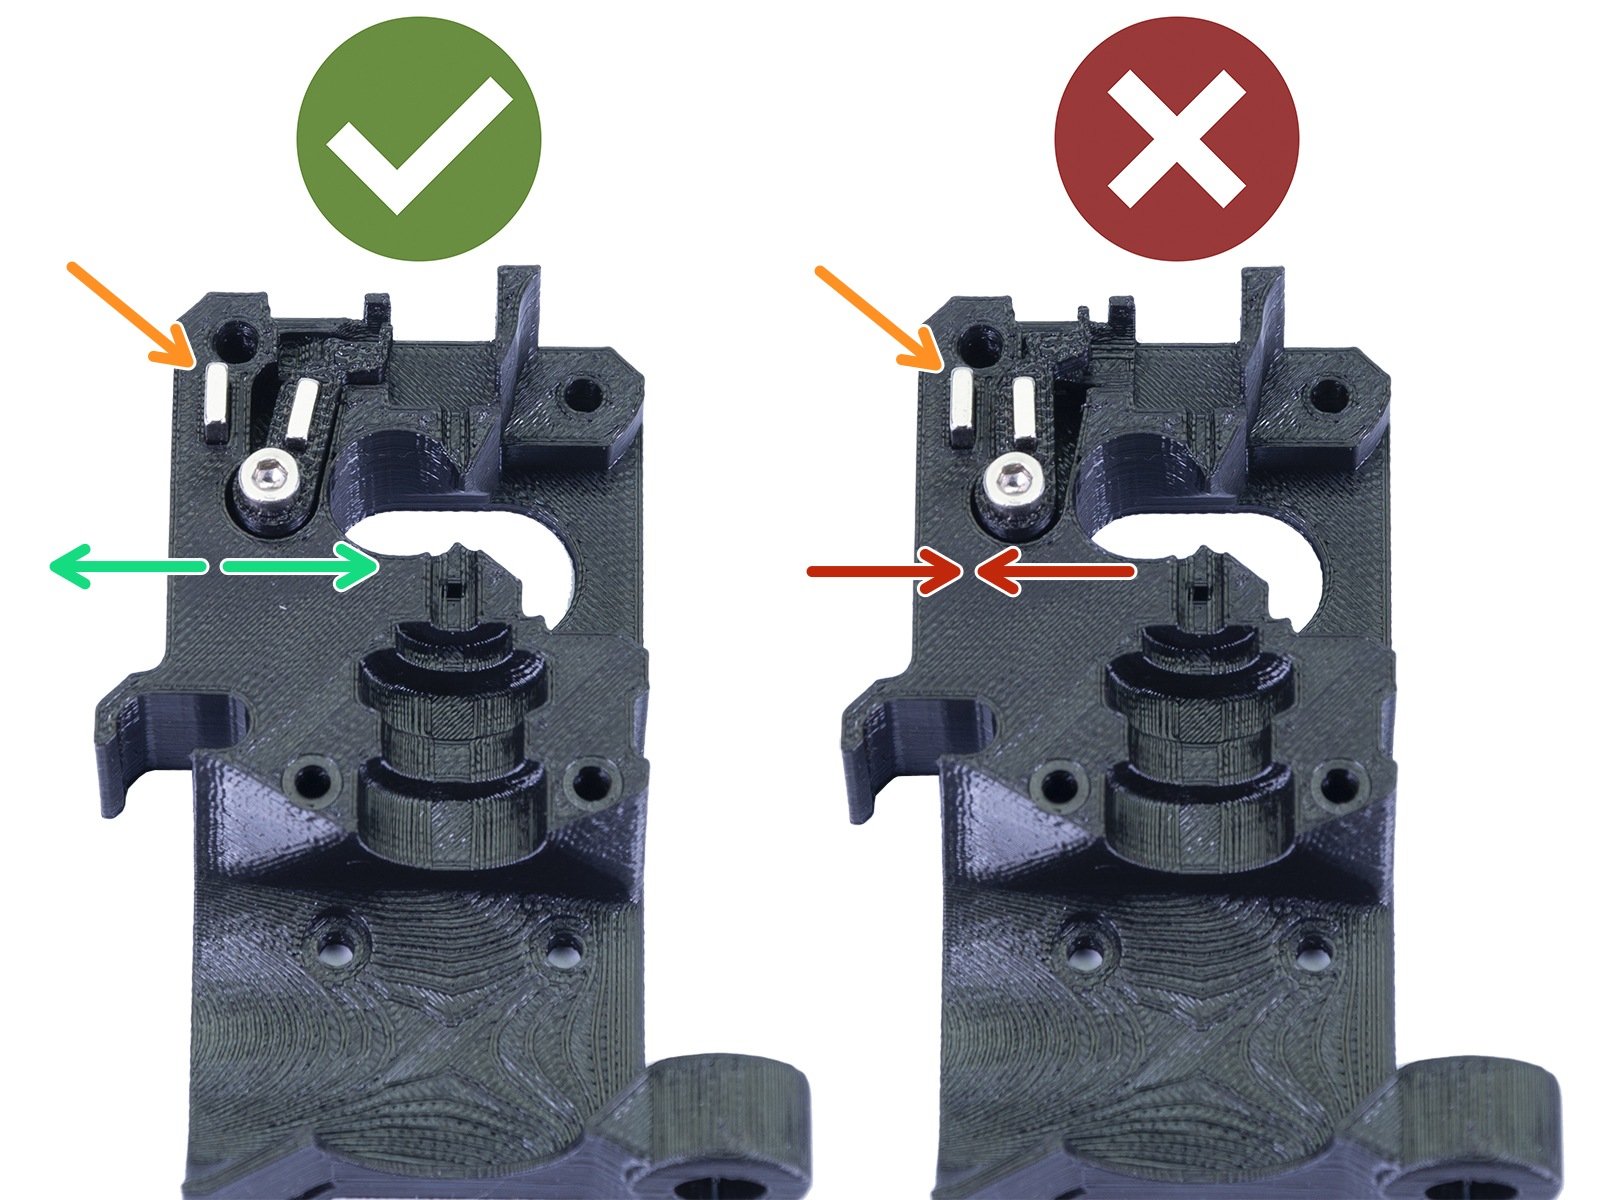
                  • Also, make sure the magnets have the correct orientation. They need to be repelling one another.
                  • The FS-lever has to be printed in black PETG. The color of the extruder plastic parts can be different, but the tiny FS-lever must be black.

                  After fixing this issue, assemble the extruder following 5. E-axis assembly you can also turn the Filament autoload back on. Re-do the Z calibration, it should not be necessary to re-do the entire XYZ Calibration, unless you have by mistake touched/moved with the P.I.N.D.A./SuperPINDA sensor.

                  Clean up of printed part

                  If all of the steps above do not solve your issue, and the IR sensor will continuously trigger, it may be necessary to do some clean-up of a printed part. The tolerances within the IR filament sensor mechanism are very tight. On some prints of revision R4/C4 of the extruder-motor-plate, it may be necessary to shave off a little bit of material to have the right clearance.

                  To easily access the area referenced, see Step 4 here.

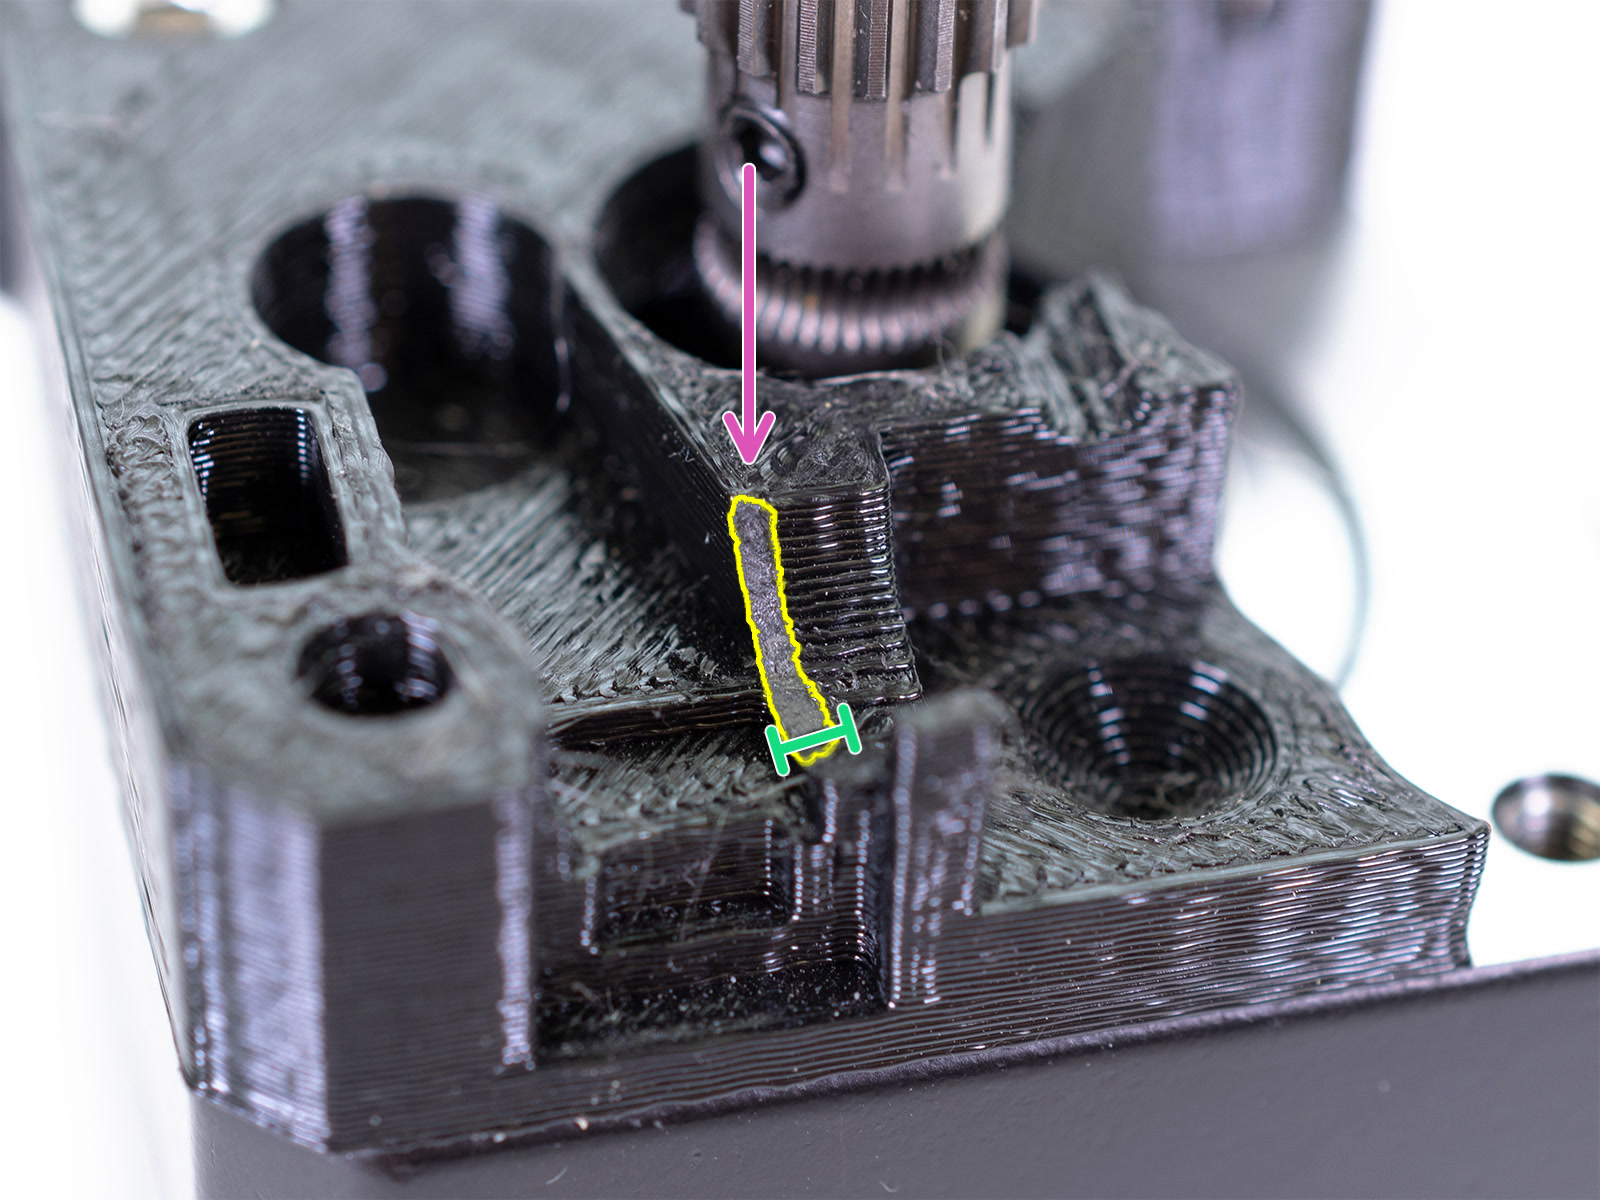
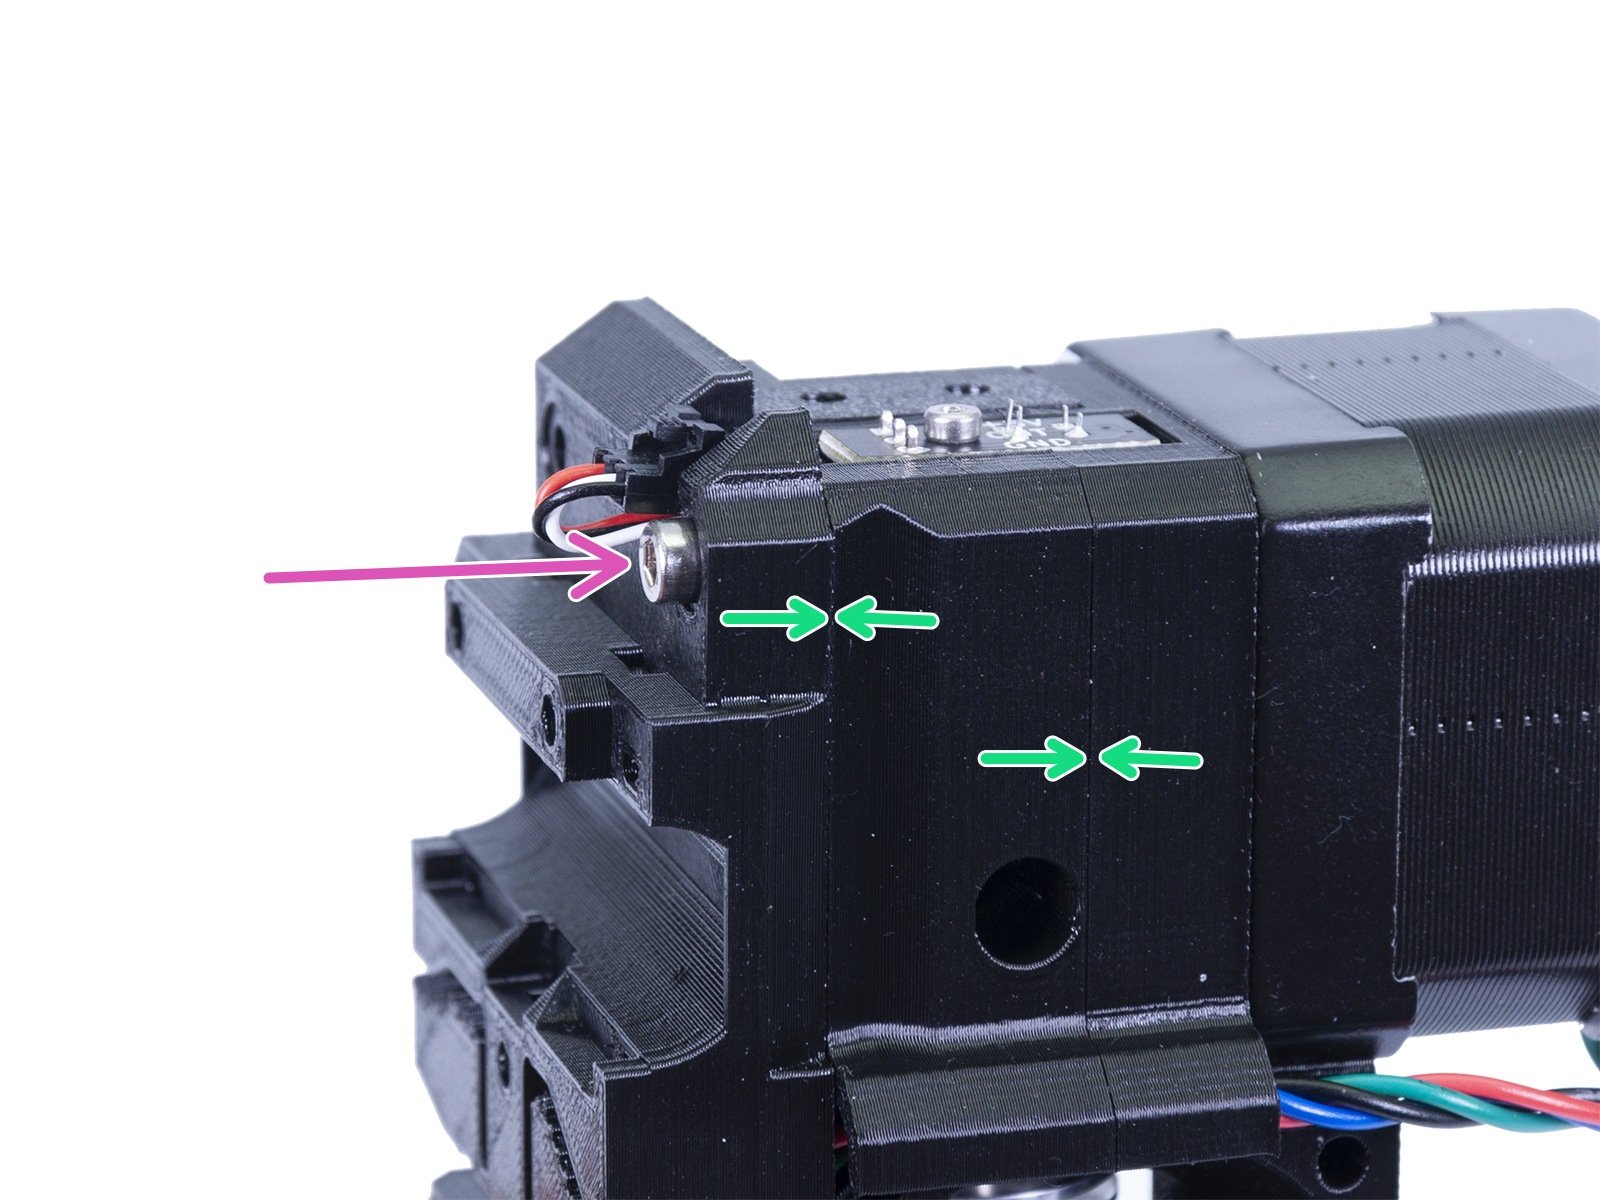
                  Using an Exacto knife, cut away the plastic ~0.5 mm deep around the edge, marked in the picture below (purple arrow and green measure). In essence, remove the steps from the layers in the round area where the Fs-lever triggers the sensor.

                  When the sensor is removed, you will see if the extruder-motor-plate is still interfering with the Fs-lever, moving it when placed back on.

                  An alternative is to remove a little bit of material on the FS-lever, but as it is already very small you can easily take off too much.
                  Was this article helpful?
                  This action is available only to registered users. Please log-in.

                  Topics

                  • Troubleshooting
                    • TMC driver overtemp
                    • File incomplete. Continue anyway?
                    • Thermal Runaway (i3 series)
                    • Blackout occurred. Recover print?
                    • Please open idler and remove filament manually
                    • Bed leveling failed
                    • Err: EXTR. FAN ERROR
                    • Err: PRINT FAN ERROR
                    • Preheat error (Heatbed)
                    • Preheat error
                    • MAXTEMP
                    • MINTEMP error and MINTEMP BED
                    • Preheat the nozzle!
                    • IR Filament Sensor Troubleshooting (MK2.5S, MK3S)
                    • Ghosting
                    • Poor bridging
                    • Bad looking surface above supports
                    • Stringing and oozing
                    • Layer separation and splitting FDM
                    • Failing supports
                    • Problems with infill
                    • Under-extrusion
                    • Warping
                    • Layer shifting
                    • Watertight prints
                    • The Benchy hull line
                    • Blown Fuse (MK3/MK3S/MK3S+)
                    • Extrusion stopped mid-print (Heat creep)
                    • Spaghetti monster
                    • Extruder blob
                    • Clogged nozzle/hotend (MK3.5/S, MK3S+, MK2.5S)
                    • Extruder noises
                    • Filament Not Loading
                    • Misaligned PINDA Sensor (MK2/S)
                    • Print fan is not spinning
                    • Hotend fan is not spinning
                    • Heatbed not heating up properly
                    • P.I.N.D.A./SuperPINDA Sensor testing
                    • SD card not working
                    • LCD screen not working
                    • Printer does not turn on or keeps turning off
                    • Blown Fuse (MK2S/MK2.5/MK2.5S)
                    • MK3S keeps prompting filament change
                    • Vibration when printing (MK3S+/MK2.5S)
                    • Factory reset (MK2S/MK2.5S/MK3S)
                    • Firmware updating issues (MK2.5S/MK3S+/MMU2S/MMU3)
                    • Nozzle crashed into the heatbed
                    • External SPI flash W25X20CL/xFLASH not responding - error
                    • Failing Z calibration (MK3S/MK2.5S)
                    • Ambient temperature check (MK3/MK3S)
                    • PrusaLink Troubleshooting
                    • Tangled filament
                    • SD cards and USB drives
                  • Assembly manuals
                  • About your printer
                  • Calibration
                  • Using the printer
                  • PrusaSlicer 2.9 (Legacy)
                  • Printables
                  • 3rd party accessories & Other projects
                  • PrusaSlicer 3.0 (Public Preview)

                  61 comments

                  Log in  to post a comment
                  Ed Friedman
                  •
                  Filament sensor trouble. When I turn it on, the printer interupts itself and repeatedly asks for removal of filament, installation of filament, then goes through calibration and starts the whole process over.
                  Reply
                  Paul M
                  •
                  I replaced the hot end and now the filament sensor reads 0, even when I block the slot on the sensor with a piece of filament. The ball and lever work fine. I also tried a new sensor (I had two) and got the same results. Sensor is stuck on 0.
                  Reply
                  diedhert
                  •
                  I have been struggling a long time with this problem.
                  Neither cleaning the sensor nor replacing the leveler did solve the problem.
                  I have been for hours with the chat to solve the problem - unfortunately with no luck.
                  Then I read somewhere here to replace the part holding the metal ball.
                  This resolved the problem. I suppose after some time, due to wear, the ball has too much space and can wiggle a little, triggering the sensor there is no filament inserted (or the filament ran out).

                  Regards
                  Reply
                  Marc Ashman
                  •
                  My sensor is just giving me a 0 on the sensor info page. I made sure the filament sensor level is moving freely. I have pulled the sensor out and tried to trigger it manually, no luck. Whenever the sensor is on, the printer never lets me go to the load filament screen. I can only unload, even if there is no filament loaded. If the sensor is supposed to output a 1 when the filament is loaded and a 0 when it is not, then why would a constant 0 show me a filament loaded condition?
                  Reply
                  Adam Tolson
                  •
                  I have the same problem. Did you find a solution?
                  Reply
                  Andrew
                  •
                  Loosening the FS lever bolt so the lever could move freely fixed it for me. Step 6 at 
                  https://help.prusa3d.com/guide/5-e-axis-assembly_28536#28872
                  Reply