As soon as the melted plastic leaves the nozzle, it's no longer under the precise control of the extrusion system. There are two problems to consider:
- Printing must always be done on an already solidified layer, otherwise, the previously extruded plastic will be moved around and distorted by the new layer
- When printing overhangs or bridges, it's important to freeze and solidify the plastic in place as soon as possible. Otherwise, the filament will sag down.
Most 3D printers come with a dedicated print fan. By blasting ambient air at the extruded filament, the cooling can be dramatically improved. However, with some materials, this could make things actually worse and cause warping or layer separation. PrusaSlicer lets you adjust the cooling settings for each filament.
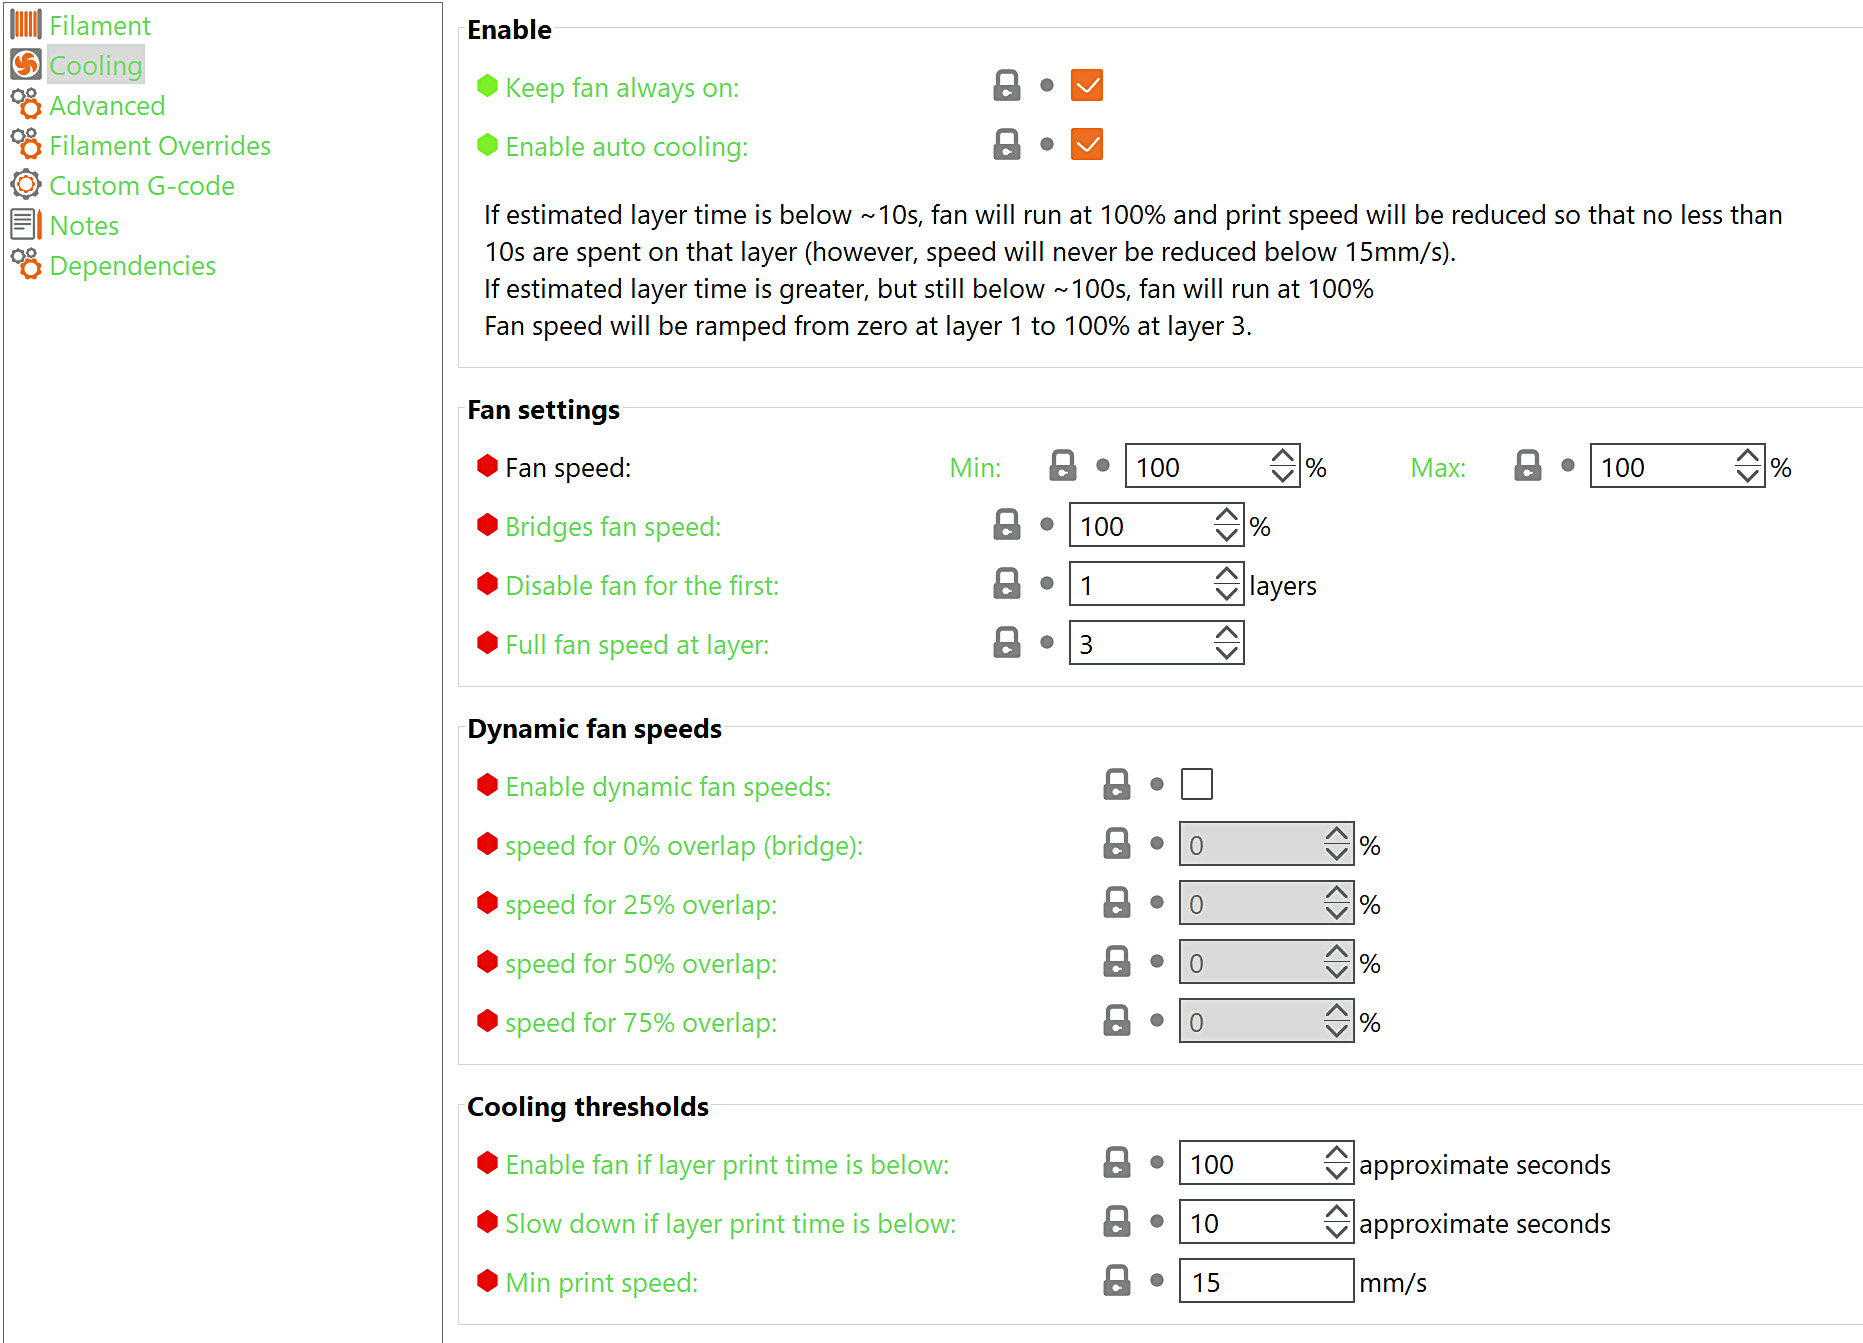
Keep fan always on
The print fan will always maintain at least a minimum speed. This setting is typically on for most materials with the exception of ABS, ASA, PC, and some flexibles.
Enable auto cooling
When enabled, the cooling fan and print speed will change during the print based on the settings below. A text description below will update with every change of any cooling setting and will explain in detail the resulting cooling behavior.
When disabled, the print fan will run at a fixed speed the whole time defined by Fan speed - Min with the exception of bridges, which can still be defined by Bridges fan speed.
Fan settings
Fan speed
You can set Min and Max fan speed as a percentage of the fan's max RPM.
The Max value will be used when the layer print time is below the Slow down if layer print time is below value.
The Min value will be used when the layer print time is longer than Enable fan if layer print time is below value.
If the layer print time is between these two values, the fan speed will run proportionally at a speed between the Min and Max value.
This may seem a bit confusing, but you can use the live-updating text description above Fan settings, which will hopefully make everything clear. Try changing the values and see how the description changes.
Bridges fan speed
Overrides the fan speed with set value when printing bridges and overhangs. Typically you'll set this to a higher value compared to normal printing.
Disable fan for the first X layers
Cooling the very first layer is usually not necessary, as it's being laid on a flat surface. With many filaments, you may even want to skip cooling for a few more first layers (typically between 1-5) to prevent warping and detaching the print from the print bed, which would inevitably lead to a ruined print.
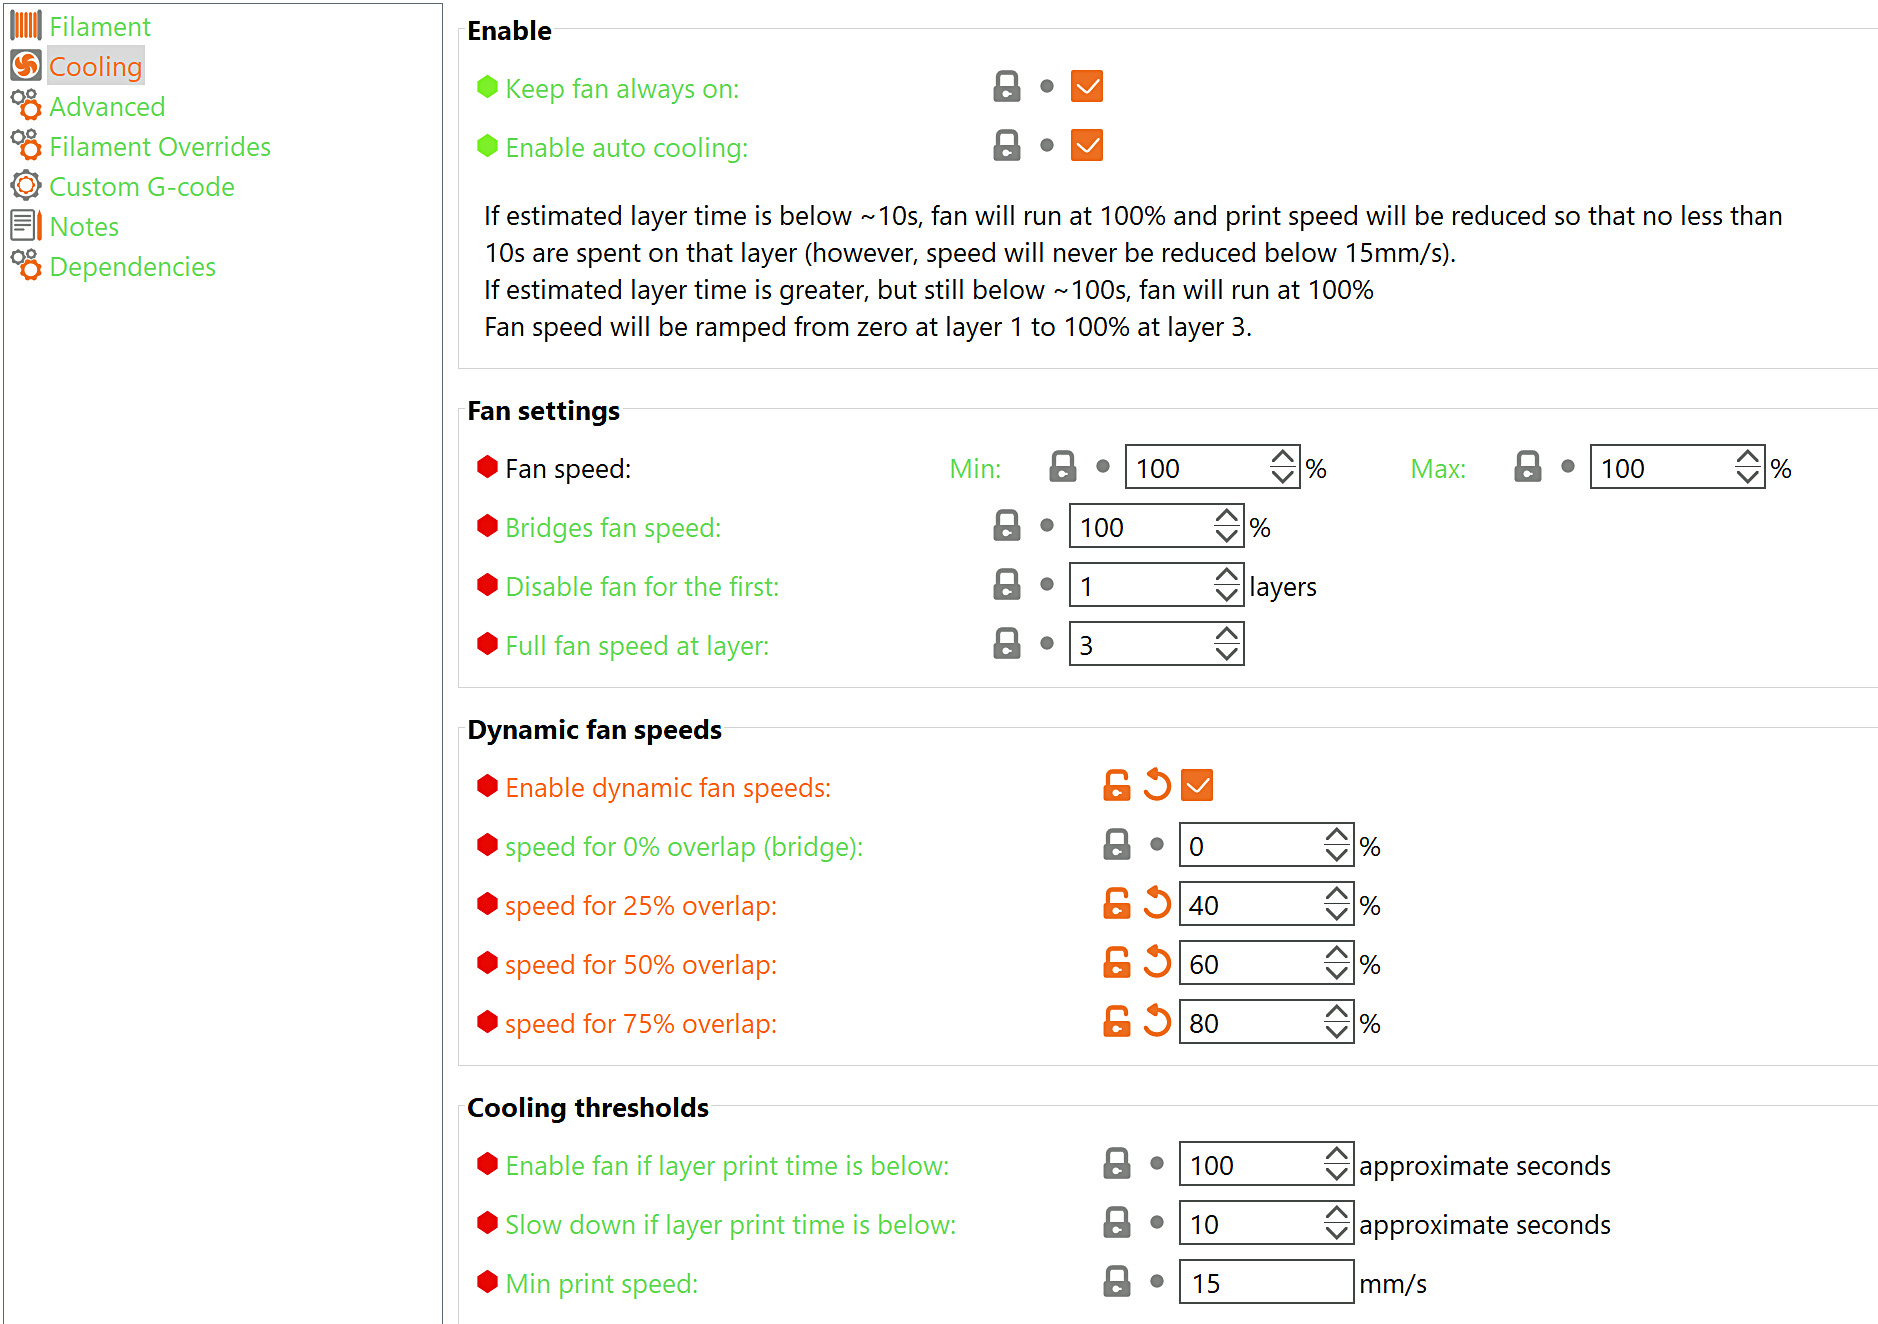
Dynamic fan speeds
The setting enables and controls dynamic, variable fan speed in function of the overlap percentage.
The overlap percentage represents the overlap of extrusion with the previous layer. A 100% overlap is a full overlap (no overhang), while a 0% overlap represents a full overhang (floating extrusion, bridge).
The input fan speed values represent the percentage of the fan's max RPM.
Fan speeds for overhang sizes in between are calculated via linear interpolation.
Cooling thresholds
Enable fan if layer print time is below
If the layer print time is estimated below this number of seconds, the print fan will be enabled and its speed will be calculated by interpolating between the Min and Max speed.
Slow down if layer print time is below
If the layer print time is estimated below this number of seconds, the print move speed will be slowed down to extend the duration to this value. The slowing is done by scaling the print speeds, so some moves will still be faster than others.
Min print speed
The minimum speed that PrusaSlicer will scale the speeds down to. Printing at extremely low speeds for extended periods of time could lead to problems such as heat creep.
Keep in mind that by raising this value too high, you may partially invalidate the minimum layer time set by Slow down if layer print time is below. Because even when printing at this minimum speed, the layer time might be shorter than the set value.
12 comments
The text is correct although certianly not clear. The example image is misleading. Lower overlap needs higher fan speed.
Let's look up the dictionary definition of “overlap” and “overhang” and then it will be clear that for 25% overlap should be 75% overhang. Since these concepts are related and opposite to each other. This is straightforward logic. There is either a mistake in the slicer's description of the settings, or the developer who described these commands was not guided by logic, but by his abstract ideas. I give 5+ for the human-understandable change in the description of these settings.
On my MK4, I use the macro
;BEFORE_LAYER_CHANGE
G92 E0.0
;[layer_z]
{if layer_z>0.35 && layer_z<4.0}
M106 S180
{else}
M106 S80
{endif}
Set the speeds and layers as you need them. This is much more effective, so even with one-sided cooling, the perimeters turn out well even on complex overhangs.
https://imgur.com/a/wKWOLM2
"The input fan speed values represent the percentage of the fan's max RPM"
Is the "max RPM" the maximim that the fan is capable of OR the 'Fan speed Max' set under Fan Settings?
It should be below the "Disable fan for the first" section?
NB: The Help-link in PrusaSlicer (v2.5.2) brought me to this page.
NB: this option does not seem to function as expected!?! The fan speed only ramps up to the "fan speed: Min:" setting (eg 35%), not 100%
I apologize but I do not fully understand your comment, if you need assistance you can reach out to tech support by pressing the lower right button to chat with them or send an email to [email protected]